You are using an out of date browser. It may not display this or other websites correctly.
You should upgrade or use an alternative browser.
You should upgrade or use an alternative browser.
What have you done to your car today?
- Thread starter Buckz
- Start date
- Featured
 Devon
Devon
Usel said:Interior looks great but you should order some paint for the arm rest from furniture clinic. Your interior looks like it is Kansas Coral Red?
Really easy job to repaint that arm rest.
Edit: I see your from Costa del sol but you should be able to find a similar product. No idea if furniture clinic ship internationally.
https://www.furnitureclinic.co.uk/colour-chart/bmw-colour-chart
I have previously painted it with paint / dye from Furniture Clinic but upon cleaning this time it all seems to have come off. I think this time I'll just get it done professionally.
ronk said:Think positive
That didn`t work

Front suspension inner bolts loose - which is really bizarre and ABS light not going out which I did notice on the way to MOT but decided to take it in anyway and I have now got the dreaded trifecta of lights
 Not my day
 1536Z4 said:ronk said:Think positive
That didn`t work
Front suspension inner bolts loose - which is really bizarre and ABS light not going out which I did notice on the way to MOT but decided to take it in anyway and I have now got the dreaded trifecta of lights
Bugger
Hope it's something straightforward...That's a nice easy fix theninkey$ said:Sorted an annoying rattle from in the cabin. Turned out to be the passenger seat on bumpy roads, so moved it right back and problem solved
All done and looks okay if a little high, will settle though. Very happy and car not as rattling any more, big relief .MikeyH said:Mine is in for its new rear springs tomorrow, MOT failure, fingers crossed that they are the correct height. I’ve taken photos with a ruler on the good side for proof if it’s wrong. Also washed and then waxed him, so he looks good, they might take more care then.
Good day today. Went out for 2 nice drives while the sun was out :Not driven him for 6 days, really strange but nice to get back in this little cramped cockpit and hear that amazing sound he makes. Really missed it TOMGREEN413 said:20230502_171656.jpg
I should have documented what I did but basically, removed, split fog lamps, cleaned and polished plastic lenses cover inside n out, wired brushed corrosion inside fog lamp, primed, painted with chrome paint, resealed the lens to the housing and refitted with new bulbs. They looked absolutely horrible before as all the chrome had come off and the plastic lenses were running with water and covered in the flanked off chrome. I'm hoping with the inspection cover well sealed and the lenses both water tight they should look good for some time, saved the best part of £180 which can go towards my brakes, bush and suspension upgrades.
Wow what a great improvement. Looks fantastic
Special Kay
Active member
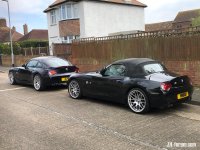
j3nks79 said:Washed it and had a visit from a friend with his Z4Mr
Great photo, both cars look stunning
Are those 18s or 19s? Originals or replicas? Attleborough, Norfolk
I did something similar a few weeks back having discovered just how easily they do come apart. However, I painted the insides black and fitted a pair of DRL units inside. Removed the fog bulbs, drilled a tiny hole through the holder to run the wires through, sealed that with clear gasket sealant then wired into the existing fog light loom. I do still have to switch on sidelights then front fogs, but I use them all the time as DRLs.j3nks79 said:TOMGREEN413 said:20230502_171656.jpg
I should have documented what I did but basically, removed, split fog lamps, cleaned and polished plastic lenses cover inside n out, wired brushed corrosion inside fog lamp, primed, painted with chrome paint, resealed the lens to the housing and refitted with new bulbs. They looked absolutely horrible before as all the chrome had come off and the plastic lenses were running with water and covered in the flanked off chrome. I'm hoping with the inspection cover well sealed and the lenses both water tight they should look good for some time, saved the best part of £180 which can go towards my brakes, bush and suspension upgrades.
Wow what a great improvement. Looks fantastic
A different solution to the same problem.
Nice. Are they easy to remove? I’ve not actually looked to see how they are mounted.enuff_zed said:I did something similar a few weeks back having discovered just how easily they do come apart. However, I painted the insides black and fitted a pair of DRL units inside. Removed the fog bulbs, drilled a tiny hole through the holder to run the wires through, sealed that with clear gasket sealant then wired into the existing fog light loom. I do still have to switch on sidelights then front fogs, but I use them all the time as DRLs.j3nks79 said:TOMGREEN413 said:20230502_171656.jpg
I should have documented what I did but basically, removed, split fog lamps, cleaned and polished plastic lenses cover inside n out, wired brushed corrosion inside fog lamp, primed, painted with chrome paint, resealed the lens to the housing and refitted with new bulbs. They looked absolutely horrible before as all the chrome had come off and the plastic lenses were running with water and covered in the flanked off chrome. I'm hoping with the inspection cover well sealed and the lenses both water tight they should look good for some time, saved the best part of £180 which can go towards my brakes, bush and suspension upgrades.
Wow what a great improvement. Looks fantastic
A different solution to the same problem.
Special Kay said:j3nks79 said:Washed it and had a visit from a friend with his Z4Mr
Great photo, both cars look stunning
19’s reps on both
I had the bumper off as I was changing a headlight at the same time, but I think they are accessible through the arch liner panels?j3nks79 said:Nice. Are they easy to remove? I’ve not actually looked to see how they are mounted.enuff_zed said:I did something similar a few weeks back having discovered just how easily they do come apart. However, I painted the insides black and fitted a pair of DRL units inside. Removed the fog bulbs, drilled a tiny hole through the holder to run the wires through, sealed that with clear gasket sealant then wired into the existing fog light loom. I do still have to switch on sidelights then front fogs, but I use them all the time as DRLs.j3nks79 said:Wow what a great improvement. Looks fantastic
A different solution to the same problem.
They look bonded, but if you dump them in a bucket of hot water for ten minutes it softens the seal and you can carefully prise them apart.
Not the best photo, but I mentioned them on page 801 of this thread.
ronk said:Hopefully it’s nothing too serious
Bugger
Hope it's something straightforward...Checkled the wheel speed sensors on ISTA whilst driving and they were fine driving and got the DSC 005DF0 and 005DF1 codes so will have to remove DSC/ABS unit and send it off to ECU testing
")
A busy/messy/leafy afternoon....
I did the what-a-great-way-to-find-old-leaves job, aka changing cabin filter (replaced with mann) and afterwards did the noise generator mod.
The filter I removed was stamped August 2013 so, combined with the amount of free leaves, pretty safe to assume it hasn't been changed in a while.
One thing I noticed was that I do not have the white electrical box that is on the back of the panel you unscrew in all of the how-to vids. Anyone know why that might be? Was it relocated on the facelift perhaps?

After removing the foam for the noise generator mod, since the bonnet was up I decided to take a look (again) at why my windscreen washers were only trickling out water. Pump makes all the right noises, but nowt happening on the windscreen.
Decoupled the pumps, removed the reservoir, and had a good look inside - it was like a science experiment. Something (I don't know what) caused a big fungus build up inside it, which had clogged the filter for the main pump, and was restricting flow. (Idle windscreen wash perhaps?)
This was the filter before

And after...

Some of the contents of the (now clean) reservoir.

And then to round everything off, I changed out my poorly looking exhaust tips for some smoked chrome items (thank you Amazon).

Will go for a spin after dinner and flaunt my functioning washers while judging if I am still young enough to live with the increased engine sound.
I did the what-a-great-way-to-find-old-leaves job, aka changing cabin filter (replaced with mann) and afterwards did the noise generator mod.
The filter I removed was stamped August 2013 so, combined with the amount of free leaves, pretty safe to assume it hasn't been changed in a while.
One thing I noticed was that I do not have the white electrical box that is on the back of the panel you unscrew in all of the how-to vids. Anyone know why that might be? Was it relocated on the facelift perhaps?
After removing the foam for the noise generator mod, since the bonnet was up I decided to take a look (again) at why my windscreen washers were only trickling out water. Pump makes all the right noises, but nowt happening on the windscreen.
Decoupled the pumps, removed the reservoir, and had a good look inside - it was like a science experiment. Something (I don't know what) caused a big fungus build up inside it, which had clogged the filter for the main pump, and was restricting flow. (Idle windscreen wash perhaps?)
This was the filter before
And after...
Some of the contents of the (now clean) reservoir.
And then to round everything off, I changed out my poorly looking exhaust tips for some smoked chrome items (thank you Amazon).
Will go for a spin after dinner and flaunt my functioning washers while judging if I am still young enough to live with the increased engine sound.
Washed it and drove it to the coast.
Sunshine in the English Riviera


Sunshine in the English Riviera
Having replaced the rocker cover gasket on my daughter's Mini last weekend I am currently halfway through doing the same job to my E86.
It's making me sweat a bit (nerves) but what I did find is that the Carolus Slim Sixty 3/8" socket set that I bought for cycles has sockets that fit both standard sockets and the Torx E sockets which was a bonus as I didn't have the size 8 required for the Valvetronic motor.
Typical of older cars you do one job and then immediately find another. Just as I started the rocker cover I noticed a pool of water on the garage floor which turns out to be from the drivers side headlamp washer. I've had a quick look and it appears to be covered in muck so hopefully a good clean will resolve it.