You are using an out of date browser. It may not display this or other websites correctly.
You should upgrade or use an alternative browser.
You should upgrade or use an alternative browser.
What have you done to your car today?
- Thread starter Buckz
- Start date
- Featured

BMW Z4 Oil Filter Housing & Cooler DIY (N52 specific)
I just changed out the oil filter housing gasket (OFHG) and oil cooler gasket (OCG) on my 2006 Z4 3.0Si with N52 engine. While there are some good videos and writeups on doing this job, I want to share several tips to make the job simpler.
The high-level outline:
1) Remove engine beauty cover
2) Remove air box (air filter)
3) Partly drain coolant (details below)
4) Remove oil filter and suck oil from oil filter housing (OFH)
5) Disconnect upper radiator hose at OFH
6) Remove coolant return hose from oil cooler (OC) – plug it or hold end high
7) Remove oil pressure sensor from OFH for access in next step
8 ) Unscrew three (3) E10 (E-Torx) bolts securing OFH to cylinder head
9) Remove OFH with OC, still connected, to bench to disassemble
10) Pop plastic cover off of the OC “button” or “ball” E-Torx bolts
11) Remove three (3) E12 “button” bolts and separate OC from the OFH
12) Clean OFH and OC, especially the channels that retain the two gaskets
13) Reassemble OFH to OC with new gasket (torque 22Nm, 16lbft from Bentley)
14) Replace plastic cover
15) Clean the cylinder head mating surface where the OFHG fits
16) Install OFHG and OFH / OC assembly with E10 bolts (22Nm, 16lbft from Bentley)
17) Complete reinstallation of hoses and other removed parts
18) If oil was not changed, top it up or change it
19) Top up with 50/50 BMW coolant and perform coolant bleed procedure
Note: I have seen others give different torque values for the E10 and E12 bolts – but though the heads are different, the shanks of both are M8. I used the Bentley values.
Suggestions from my experience:
Tip 1: Partly drain coolant using a small hand pump or baster. Suck it out of the expansion tank and/or the upper radiator hose bleeder screw opening. This avoids a total drain, and allows clean removal of the hose from the OC. I removed about 1.3 quarts/liters
Tip 2: Leave the OC plastic cover and OC attached to the OFH until you have removed the OFH from the cylinder head. E85 and E86 cars with N52 engine don’t have enough room to readily remove this cover without damaging it, and it can easily be removed on a workbench.
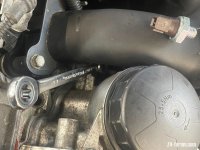
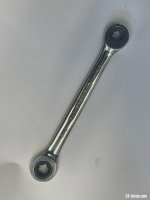
Tip 3: Get a combination E10 / E12 rachet wrench (spanner) – see the photo. I removed the under-intake E10 bolt (furthest to rear of the car) using this wrench in the space freed up by removing the oil pressure switch. Most OFHG videos show socket extensions and universal joints, but these can slip off the E10 under the manifold and round it off. I could swing my E10 ratchet 20-30 degrees (two ‘clicks’) in the space occupied by the oil pressure switch. I have linked a DIY suggesting use of a 12-pt 8mm box wrench, but I prefer a real E10 to protect the bolt heads.
Remove the under-intake bolt before loosening the other two bolts ! If this E10 ratchet or a similar 8mm ratchet wrench is used to remove the ‘back side’ E10 bolt (at the front of the cylinder head) it may back the bolt out against the cylinder head and be stuck until the other two bolts are loosened / removed.
A video DIY for N52 OFHG replacement: rp#cobssid=s&fpstate=ive&vld=cid:e71b8f99,vid:FFxi-VYEXFI,st:29
A text / photo DIY for N52 OFHG replacement: https://www.e90post.com/forums/showthread.php?t=476419
I just changed out the oil filter housing gasket (OFHG) and oil cooler gasket (OCG) on my 2006 Z4 3.0Si with N52 engine. While there are some good videos and writeups on doing this job, I want to share several tips to make the job simpler.
The high-level outline:
1) Remove engine beauty cover
2) Remove air box (air filter)
3) Partly drain coolant (details below)
4) Remove oil filter and suck oil from oil filter housing (OFH)
5) Disconnect upper radiator hose at OFH
6) Remove coolant return hose from oil cooler (OC) – plug it or hold end high
7) Remove oil pressure sensor from OFH for access in next step
8 ) Unscrew three (3) E10 (E-Torx) bolts securing OFH to cylinder head
9) Remove OFH with OC, still connected, to bench to disassemble
10) Pop plastic cover off of the OC “button” or “ball” E-Torx bolts
11) Remove three (3) E12 “button” bolts and separate OC from the OFH
12) Clean OFH and OC, especially the channels that retain the two gaskets
13) Reassemble OFH to OC with new gasket (torque 22Nm, 16lbft from Bentley)
14) Replace plastic cover
15) Clean the cylinder head mating surface where the OFHG fits
16) Install OFHG and OFH / OC assembly with E10 bolts (22Nm, 16lbft from Bentley)
17) Complete reinstallation of hoses and other removed parts
18) If oil was not changed, top it up or change it
19) Top up with 50/50 BMW coolant and perform coolant bleed procedure
Note: I have seen others give different torque values for the E10 and E12 bolts – but though the heads are different, the shanks of both are M8. I used the Bentley values.
Suggestions from my experience:
Tip 1: Partly drain coolant using a small hand pump or baster. Suck it out of the expansion tank and/or the upper radiator hose bleeder screw opening. This avoids a total drain, and allows clean removal of the hose from the OC. I removed about 1.3 quarts/liters
Tip 2: Leave the OC plastic cover and OC attached to the OFH until you have removed the OFH from the cylinder head. E85 and E86 cars with N52 engine don’t have enough room to readily remove this cover without damaging it, and it can easily be removed on a workbench.
Tip 3: Get a combination E10 / E12 rachet wrench (spanner) – see the photo. I removed the under-intake E10 bolt (furthest to rear of the car) using this wrench in the space freed up by removing the oil pressure switch. Most OFHG videos show socket extensions and universal joints, but these can slip off the E10 under the manifold and round it off. I could swing my E10 ratchet 20-30 degrees (two ‘clicks’) in the space occupied by the oil pressure switch. I have linked a DIY suggesting use of a 12-pt 8mm box wrench, but I prefer a real E10 to protect the bolt heads.
Remove the under-intake bolt before loosening the other two bolts ! If this E10 ratchet or a similar 8mm ratchet wrench is used to remove the ‘back side’ E10 bolt (at the front of the cylinder head) it may back the bolt out against the cylinder head and be stuck until the other two bolts are loosened / removed.
A video DIY for N52 OFHG replacement: rp#cobssid=s&fpstate=ive&vld=cid:e71b8f99,vid:FFxi-VYEXFI,st:29
A text / photo DIY for N52 OFHG replacement: https://www.e90post.com/forums/showthread.php?t=476419
Attachments
 Attleborough, Norfolk
Finally, after lots of faffing about with DME changes etc. (thank you bigwinn) I took Project Cheapskate for it's MOT.
To remind you all: 3.0i on 149k, driven back from Sussex to Norfolk with no power steering.
Fixed that, full service, interior spruced up, cleaned and coloured seats, shampooed carpets, repaired cup-holders, replaced some broken trim bits, new plugs and coils, all new suspension front and rear, brakes stripped, cleaned and painted, tatty 108s swapped for mostly better 108s, roof motor relocated, headlight lenses renovated. Plus loads of smaller titivations I can't remember.
Just had the news.....................
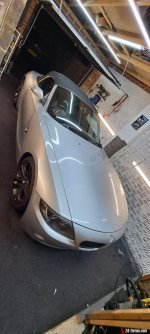
PASSED! One minor advisory for wear on the OSF tyre extreme outer edge.
So just the vanos to do and possibly find a new front bumper. Then on to a new home as another Norfolk Zed Rescue success story.

To remind you all: 3.0i on 149k, driven back from Sussex to Norfolk with no power steering.
Fixed that, full service, interior spruced up, cleaned and coloured seats, shampooed carpets, repaired cup-holders, replaced some broken trim bits, new plugs and coils, all new suspension front and rear, brakes stripped, cleaned and painted, tatty 108s swapped for mostly better 108s, roof motor relocated, headlight lenses renovated. Plus loads of smaller titivations I can't remember.
Just had the news.....................
PASSED! One minor advisory for wear on the OSF tyre extreme outer edge.
So just the vanos to do and possibly find a new front bumper. Then on to a new home as another Norfolk Zed Rescue success story.
Zedebee said:Yours won’t be the only Z4 in the car park, that’s for sure.SqerrNipz said:Gave the Z a thorough clean today, ready for a trip to RBM tomorrow. X8R VANOS and DISA kits to be fitted, plus some general maintenance.
Hate taking a dirty car to a garage, I feel like they’ll be judging me!
You were right, nice black 3.0si there! Despite the clean car, still felt a bit ‘second class’ compared to some of the beautiful M cars littering the car park! One day I’ll treat myself…
Yesterday I did the following:
(1) changed the gas struts on the hood
(2) refinished the Xenon headlights. Was oxidizing along the top.
(3) installed new BMW weather tech floor mats.
(4) fixed the convertible top ledge tray microswitch that I messed up when changing the rear shocks (metal arm fell off).
(1) changed the gas struts on the hood
(2) refinished the Xenon headlights. Was oxidizing along the top.
(3) installed new BMW weather tech floor mats.
(4) fixed the convertible top ledge tray microswitch that I messed up when changing the rear shocks (metal arm fell off).
enuff_zed said:Norfolk Zed Rescue
 With all the items addressed, maybe it's a 'resuscitation' ?
Z4Mariner said:BMW Z4 Oil Filter Housing & Cooler DIY (N52 specific)
I just changed out the oil filter housing gasket (OFHG) and oil cooler gasket (OCG) on my 2006 Z4 3.0Si with N52 engine. While there are some good videos and writeups on doing this job, I want to share several tips to make the job simpler.
The high-level outline:
1) Remove engine beauty cover
2) Remove air box (air filter)
3) Partly drain coolant (details below)
4) Remove oil filter and suck oil from oil filter housing (OFH)
5) Disconnect upper radiator hose at OFH
6) Remove coolant return hose from oil cooler (OC) – plug it or hold end high
7) Remove oil pressure sensor from OFH for access in next step
8 ) Unscrew three (3) E10 (E-Torx) bolts securing OFH to cylinder head
9) Remove OFH with OC, still connected, to bench to disassemble
10) Pop plastic cover off of the OC “button” or “ball” E-Torx bolts
11) Remove three (3) E12 “button” bolts and separate OC from the OFH
12) Clean OFH and OC, especially the channels that retain the two gaskets
13) Reassemble OFH to OC with new gasket (torque 22Nm, 16lbft from Bentley)
14) Replace plastic cover
15) Clean the cylinder head mating surface where the OFHG fits
16) Install OFHG and OFH / OC assembly with E10 bolts (22Nm, 16lbft from Bentley)
17) Complete reinstallation of hoses and other removed parts
18) If oil was not changed, top it up or change it
19) Top up with 50/50 BMW coolant and perform coolant bleed procedure
Note: I have seen others give different torque values for the E10 and E12 bolts – but though the heads are different, the shanks of both are M8. I used the Bentley values.
Suggestions from my experience:
Tip 1: Partly drain coolant using a small hand pump or baster. Suck it out of the expansion tank and/or the upper radiator hose bleeder screw opening. This avoids a total drain, and allows clean removal of the hose from the OC. I removed about 1.3 quarts/liters
Tip 2: Leave the OC plastic cover and OC attached to the OFH until you have removed the OFH from the cylinder head. E85 and E86 cars with N52 engine don’t have enough room to readily remove this cover without damaging it, and it can easily be removed on a workbench.
Tip 3: Get a combination E10 / E12 rachet wrench (spanner) – see the photo. I removed the under-intake E10 bolt (furthest to rear of the car) using this wrench in the space freed up by removing the oil pressure switch. Most OFHG videos show socket extensions and universal joints, but these can slip off the E10 under the manifold and round it off. I could swing my E10 ratchet 20-30 degrees (two ‘clicks’) in the space occupied by the oil pressure switch. I have linked a DIY suggesting use of a 12-pt 8mm box wrench, but I prefer a real E10 to protect the bolt heads.
Remove the under-intake bolt before loosening the other two bolts ! If this E10 ratchet or a similar 8mm ratchet wrench is used to remove the ‘back side’ E10 bolt (at the front of the cylinder head) it may back the bolt out against the cylinder head and be stuck until the other two bolts are loosened / removed.
A video DIY for N52 OFHG replacement: rp#cobssid=s&fpstate=ive&vld=cid:e71b8f99,vid:FFxi-VYEXFI,st:29
A text / photo DIY for N52 OFHG replacement: https://www.e90post.com/forums/showthread.php?t=476419
Awesome step by step! I’ll be changing my valve cover in the next few days, but also need to sort the oil filter/cooler gaskets too… if I feel brave enough to take it on myself I’ll refer back to your post!
enuff_zed said:PASSED! One minor advisory for wear on the OSF tyre extreme outer edge.
PHOTO-2023-02-20-15-37-16.jpg
Great news! Also quite liking the yellow calipers on black - works well imo
enuff_zed said:Finally, after lots of faffing about with DME changes etc. (thank you bigwinn) I took Project Cheapskate for it's MOT.
To remind you all: 3.0i on 149k, driven back from Sussex to Norfolk with no power steering.
Fixed that, full service, interior spruced up, cleaned and coloured seats, shampooed carpets, repaired cup-holders, replaced some broken trim bits, new plugs and coils, all new suspension front and rear, brakes stripped, cleaned and painted, tatty 108s swapped for mostly better 108s, roof motor relocated, headlight lenses renovated. Plus loads of smaller titivations I can't remember.
Just had the news.....................
PASSED! One minor advisory for wear on the OSF tyre extreme outer edge.
So just the vanos to do and possibly find a new front bumper. Then on to a new home as another Norfolk Zed Rescue success story.
PHOTO-2023-02-20-15-37-16.jpg
I really want to paint me callipers now!!
Removed the aero kit from my latest 2.5i.
That is now on its way to Holland to a great forum member & friends! Bigwinn the forum friendly courier kindly took those away and dropped off a standard bumper and some elipsoids for me to keep it road worthy
That is now on its way to Holland to a great forum member & friends! Bigwinn the forum friendly courier kindly took those away and dropped off a standard bumper and some elipsoids for me to keep it road worthy
Attachments
Fitted a yaw speed sensor and air bag module, many thanks to enuff_zed and bigwinn!!!!!!!
Did they fix it?Acestumacher said:Fitted a yaw speed sensor and air bag module, many thanks to enuff_zed and bigwinn!!!!!!!
Just the air bag module to recode, at this stage one light on is better than 5!!, also cured that noise when reconnecting the battery!enuff_zed said:Did they fix it?Acestumacher said:Fitted a yaw speed sensor and air bag module, many thanks to enuff_zed and bigwinn!!!!!!!
Glad the yaw sensor was a good call. Weird that it fixed the noise though?Acestumacher said:Just the air bag module to recode, at this stage one light on is better than 5!!, also cured that noise when reconnecting the battery!enuff_zed said:Did they fix it?Acestumacher said:Fitted a yaw speed sensor and air bag module, many thanks to enuff_zed and bigwinn!!!!!!!
Not me personally but met up with enuff_zed who kindly sorted my roof out for me and replaced the front bulbs. Motor was knackered, new one sorted it out. All ready for the summer sun. 
The ideal roof motor job. Get the young fit guy to do all the relocation stuff then step in like a consultant and bolt on a new motor 8)FunkyGBrown said:Not me personally but met up with enuff_zed who kindly sorted my roof out for me and replaced the front bulbs. Motor was knackered, new one sorted it out. All ready for the summer sun.
