What have you done to your car today?

Finally got around to removing the battery bay, which had an accident with 5 litres of emulsion, as detailed some months ago. :cry:

batterybay.jpg

Getting that off was the biggest PITA. Seized nuts, seemingly inaccessible bolts. Never again.

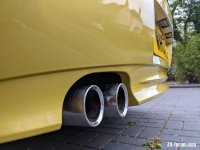
Also changed the rear shocks and springs for Eibachs/Bilstein. Shocks were completely shot. Check out this corrosion:
Rear-shocks.jpg

New top mounts etc. Drives great now, just need to get her running properly.
 
NiallR said:
Drove it out to photograph a client's car, came back the long way and took the chance to take some photos of my own car!
Only 150 miles into ownership and loving every second of getting used to it.

NRL06731-4.jpg
NRL06734-6.jpg

Fantastic photos and a good looking car. Great to see another Z4 with style 202 wheels. :thumbsup:
 
Waiting on my code reader to arrive so decided to clean the MAF.

Quick inspection of the AFE intake:
Air-Filter-Leaf.jpg
Leaves!

Couldn't get the MAF out so removed the whole intake shroud - lol at my extensions.
Air-Filter-Spanner.jpg
Filter, housing, nuts and MAF currently being cleaned.

Plastic mount rubbing on the hose - don't like that. It's made quite the indentation.
Air-Filter-clip-rub.jpg

Crack in the hose - this could be behind my woes....

Air-hose-split.jpg

Am I wrong in thinking there's an upgrade for the intake boot? I'm sure someone on here replaced a hose with something better.
 
firebobby said:
Finally fitted the new valve cover gasket and new plugs. No more burnt oil stink.

Spoke to soon, have had to take it off again and refitted. See what happens tomorrow :roll:
 
Ran into electrical lighting issues again so decided to swap out the LCM. Cured the problem but I've now got the tamper light to sort (again!) & for some reason the bulb failure light is on. Can't see anything obvious.
Stripped the old LCM & found this:
20210601_153128.jpg
20210601_153146.jpg
No wonder I'd got problems :x
 
steve_naive said:
https://i.postimg.cc/x8RbJTg5/Air-hose-split.jpg[/img]

Am I wrong in thinking there's an upgrade for the intake boot? I'm sure someone on here replaced a hose with something better.
I'd say that is definitely your problem right there.
Not sure if there's an upgrade though?
Is that the one with the sound generator fitted? Or the simpler version without all the extra pipes?
 
Spent the morning trying to remove one of those god awful screws that hold the front discs in place. Ended up having to drill the dam thing out. What APITA.
 
steve_naive said:
enuff_zed said:
steve_naive said:
https://i.postimg.cc/x8RbJTg5/Air-hose-split.jpg[/img]

Am I wrong in thinking there's an upgrade for the intake boot? I'm sure someone on here replaced a hose with something better.
I'd say that is definitely your problem right there.
Not sure if there's an upgrade though?
Is that the one with the sound generator fitted? Or the simpler version without all the extra pipes?

It's the one with three holes. At least I hope it is, because that's the one I ordered...
Part no. 13547514867

Also grabbed the aluminium DISA rebuild kit and will remove and clean out the idle control valve while I'm in there. Bit of preventative maintenance. :)
 
steve_naive said:
Also grabbed the aluminium DISA rebuild kit and will remove and clean out the throttle body while I'm in there. Bit of preventative maintenance. :)
Good idea.
Bit easier access to fit the new pipe with the DISA off too.
Be sure to get the hose on square to the housing. If not, the jubilee clip will pull it out of shape and create a slight gap when you tighten it up.
 
Benderloch said:
Spent the morning trying to remove one of those god awful screws that hold the front discs in place. Ended up having to drill the dam thing out. What APITA.

There is a special place in hell reserved for people who over tighten those bolts eh
 
Pulled mine out the garage on Monday, taxed and insured Tuesday and have been enjoying it! Although the passenger side wing mirror decided to fall of so replaced that today :lol:
 
Gave the exhaust tips a new lease of life. Sanded them down and polished out the years of buildup.

Also cleaned out the drain holes as a precautionary measure.

Nice and shinny again :D
 

Attachments

  • PXL_20210602_200042920.jpg
    PXL_20210602_200042920.jpg
    113.8 KB · Views: 1,938
enuff_zed said:
Good idea.
Bit easier access to fit the new pipe with the DISA off too.
Be sure to get the hose on square to the housing. If not, the jubilee clip will pull it out of shape and create a slight gap when you tighten it up.

Getting the hoses back on was an absolute PITA. :D

DISA absolutely destroyed.
Idle Control Valve completely gummed up and stuck
Boot split in two places
Dirty-Parts.jpg

New boot, Aluminium paddle DISA repair, Lovely click clacking ICV. 8)
Clean-parts.jpg

Dirty Filter
Dirty-Filter.jpg

Clean Filter and MAF
Clean-Air-Filter.jpg

Took her out for a blast for the 1st time in almost a year. Such a fun car.
New springs and shocks performing well. No fault codes - other than DTC sensors.

Even managed to knock the surface rust off the discs. :)

Service and MOT next. :o
 
Not just today but the last three days on installing aftermarket heated seat pads, £16 for one set on ebay, nice fibreglass pads and some solid wiring all prewired. Fitted the control switches in the gear stick surround and fed the power from the fuse box down the centre console and under the carpet where the stock wiring emerges under the seat. Upon stripping the covers off I found loads of old hog rings that had been left in there when the car was reupholstered sometime in its life. Heat pads trimmed where the lateral seams needed to be hog ringed back into the slots in the foam cushion and the seat cover refitted. Seat lifted back into the car, secured and all the connections made, battery reconnected and a quick test of the switches made. Seats bolted back down and tested the heat settings with the engine running, nice warm seat and back on both seats. Forgot to take pictures of the heated pads, the wired pad in the picture is the passenger seat occupancy pad, the heated pad was fitted on top and stuck down with iots adhesive strips at aech side. Will add a picture of the switches later.
 

Attachments

  • DSC_0007_4.JPG
    DSC_0007_4.JPG
    149.5 KB · Views: 1,824
  • DSC_0010_2.JPG
    DSC_0010_2.JPG
    131 KB · Views: 1,824
  • DSC_0011_2.JPG
    DSC_0011_2.JPG
    147.3 KB · Views: 1,824
  • DSC_0012_2.JPG
    DSC_0012_2.JPG
    100.2 KB · Views: 1,531
Back
Top Bottom