You are using an out of date browser. It may not display this or other websites correctly.
You should upgrade or use an alternative browser.
You should upgrade or use an alternative browser.
What have you done to your car today?
- Thread starter Buckz
- Start date
- Featured
Fitted some LeatherZ door armrests, still undecided on the centre armrest as it covers up my aftermarket handbrake gaiter :?
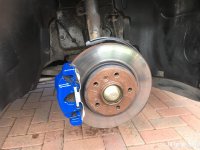
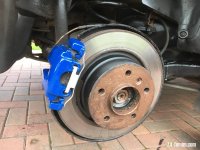
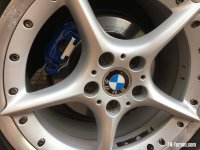
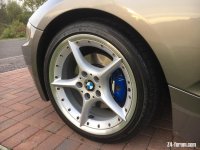
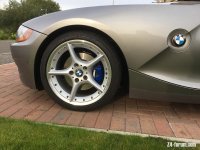
Painted callipers..,..
Attachments
-
 39581563-CD3B-407A-A090-CEFDD7F1D5D2.jpeg139.4 KB · Views: 655
 -
 E2B22A2E-44C5-47C8-A9A9-EA7E4444A3DC.jpeg154.9 KB · Views: 655
 -
 7851BA32-87BE-4F61-9D7C-4A0201A00815.jpeg105.8 KB · Views: 655
 -
 9B7B4AD1-473D-4225-984C-7FFE121317A2.jpeg143.2 KB · Views: 655
 -
 7B2B73E2-7192-44EE-9B05-0E5B43FE79F7.jpeg134.9 KB · Views: 655
 -
 E3B0F162-1BF7-41CE-A9B9-185D34FB5B5C.jpeg166.4 KB · Views: 655
Lovely. Been going to do this for a long old time.Mr_Ke1th said:Painted callipers..,..
Was interested to see in a video yesterday that if you replace the slide bushings with brass sleeves, then you don't need the outer (silver) clips anymore. My car's going to Ross next week for a brake fluid flush, so I might tackle this project after that.
D
Deleted member 32480
Guest
Mr_Ke1th said:Painted callipers..,..
Nice,
I painted my rear's red last weekend (replacing and painting front callipers, pads and discs this weekend).
I went for painting the clip red too.
Lovely. Been going to do this for a long old time.
Was interested to see in a video yesterday that if you replace the slide bushings with brass sleeves, then you don't need the outer (silver) clips anymore. My car's going to Ross next week for a brake fluid flush, so I might tackle this project after that.
[/quote]
Sounds interesting- could you show me a pic of the part- I think the breaks would look loads better without the clip.
mgrlane said:Sounds interesting- could you show me a pic of the part- I think the breaks would look loads better without the clip.
OK, on this page it included a how-to video that I watched and in the video he states you don't need the clips anymore.
https://www.bimmerworld.com/BimmerWorld-Solid-Brake-Guide-Kit-Most-ATE-Calipers.html
D
Deleted member 32480
Guest
OK, on this page it included a how-to video that I watched and in the video he states you don't need the clips anymore.
https://www.bimmerworld.com/BimmerWorld-Solid-Brake-Guide-Kit-Most-ATE-Calipers.html
[/quote]
I like them but I don't think they are for me. I would want the holes that the clips fit into filled in and painted off (if that makes sense).
Here is one of mine in rosso corsa- bit bright right now
 but I am sure it will calm down when it gets a coat of dust on it.
Attachments
![PXL_20200920_113508806[5800].jpg](/data/attachments/68/68960-30d43840b6d66ac6b189178c00221725.jpg?hash=Ria49lz5Md)
You could probably get rubber caps to block off the holes. I'll have a look.mgrlane said:I like them but I don't think they are for me. I would want the holes that the clips fit into filled in and painted off (if that makes sense).
Z4C_er said:Gave the poor girl a wash today. After being stuck in the garage for the last 6 months whilst I completed audio and wrapping projects she deserved a bit of love.
wash.jpg
Then I fitted some graphics to the sill, using wrap and knifeless tape. Thoughts?
sill 1.jpg
In our mind the length could be longer to the rear, as this area often suffers from stone peppering. Phoenix is a hard colour to photograph, seeing this colour in the flesh it is quite exciting 8)
Thanks for the feedback! Yes, I had already fitted protective film just behind the graphic, so there is only a small gap of exposed paint now.BTZ461 said:Z4C_er said:Gave the poor girl a wash today. After being stuck in the garage for the last 6 months whilst I completed audio and wrapping projects she deserved a bit of love.
wash.jpg
Then I fitted some graphics to the sill, using wrap and knifeless tape. Thoughts?
sill 1.jpg
In our mind the length could be longer to the rear, as this area often suffers from stone peppering. Phoenix is a hard colour to photograph, seeing this colour in the flesh it is quite exciting 8)

Went to get fuel, before we get on the ferry tomorrow (Early muster, for an 0800 sail..) and the Airbag light has come on!
I figure as I disconnected the door airbags (Probably didn't need to) it has thrown this light, Tried using the Torque Pro app, but it didnt even register it. Any ideas on how to clear it?
I figure as I disconnected the door airbags (Probably didn't need to) it has thrown this light, Tried using the Torque Pro app, but it didnt even register it. Any ideas on how to clear it?
Busy day today
New wishbones and lollipop bushes
Arb bushes
New discs and pads
Thanks to PDJ for being on call to tell me to hit it harder when a ball joint got stuck!
Only thing that failed was one of the disc retaining screws got stuck- back to that tomorrow to drill the b’stard out
Looking at the bushes that came off, especially the lollipops, they were a bit flaky- deffo expecting a change in handling
Wow ! A very busy day there Stuartbigwinn said:Busy day today
New wishbones and lollipop bushes
Arb bushes
New discs and pads
Thanks to PDJ for being on call to tell me to hit it harder when a ball joint got stuck!
Only thing that failed was one of the disc retaining screws got stuck- back to that tomorrow to drill the b’stard out
Looking at the bushes that came off, especially the lollipops, they were a bit flaky- deffo expecting a change in handling
Has the disc retaining screw rounded-out ? If it's still intact then the following couple of tools will usually do the trick


patriot66 said:Wow ! A very busy day there Stuartbigwinn said:Busy day today
New wishbones and lollipop bushes
Arb bushes
New discs and pads
Thanks to PDJ for being on call to tell me to hit it harder when a ball joint got stuck!
Only thing that failed was one of the disc retaining screws got stuck- back to that tomorrow to drill the b’stard out
Looking at the bushes that came off, especially the lollipops, they were a bit flaky- deffo expecting a change in handling
Has the disc retaining screw rounded-out ? If it's still intact then the following couple of tools will usually do the trick
Tried the impact driver- no dice
Think tomorrow I’m going to try to drill it out- then get some mole grips on the stem once off
Enjoyed it all- still going to sort the rear brake pipes and CDV delete
Surprised how easy these cars are to work on-
The trouble with the disc retaining screw is it protrudes through the back of the hub flange and corrodes from the back. A blow torch usually breaks the bond. Smother the new screw in Copperslipbigwinn said:patriot66 said:Wow ! A very busy day there Stuartbigwinn said:Busy day today
New wishbones and lollipop bushes
Arb bushes
New discs and pads
Thanks to PDJ for being on call to tell me to hit it harder when a ball joint got stuck!
Only thing that failed was one of the disc retaining screws got stuck- back to that tomorrow to drill the b’stard out
Looking at the bushes that came off, especially the lollipops, they were a bit flaky- deffo expecting a change in handling
Has the disc retaining screw rounded-out ? If it's still intact then the following couple of tools will usually do the trick
Tried the impact driver- no dice
Think tomorrow I’m going to try to drill it out- then get some mole grips on the stem once off
Enjoyed it all- still going to sort the rear brake pipes and CDV delete
Surprised how easy these cars are to work on-
I've ordered these:Z4C_er said:You could probably get rubber caps to block off the holes. I'll have a look.
https://ebay.us/7zPLEs
I'll let you know how they fit.

Finished off my install of carbon fibre trim 

Jamie-innes said:Finished off my install of carbon fibre trim
Looks very nice. 2 questions?
How do you get your plastic trim to look so good and do you have any issues with the vents heating the back of the screen?
Cheers