What have you done to your car today?

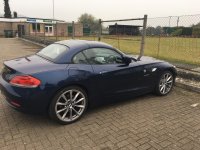
Woke him up out of his winter hibernation.
Started first button no hesitation (been on trickle charge all winter).
Just had to reset the clock, roof up and down 3 times all works perfectly.
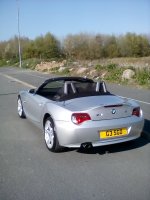
Did a Wynn's engine flush,oil and filter change. Dropped the tyre preasure back to normal.
Then a little run (roof down) to Baslow, 13 bends road, Hassop, Froggat edge and back home. Only 23 miles but great to get out again , no warning lights never missed a beat all set for spring / Summer now :D
 
[ref]Grumpyowl[/ref], what's your engine? I used to treat my old mx5 to an engine flush every couple of oil changes. The 1st time i ever did it I was SHOCKED at what came out. I did notice higher oil consumption in the mx5 after that, though.
Since then I've been unequivocally advised against doing the same treatment in my Z4M by my local indi. :o
 
Ruofdez said:
Replaced the DISA flap with the X8R one. The old one seemed to be moving ok though the pin at the top was loose and I was able to pull it straight out so I think it was a worthwhile upgrade. The OEM design clearly isn't the best.

IMG_4003.jpeg

Did also try and refurb the headlights with a 3M kit. Bit of a knack to it and fair to say I didn't have it initially so will need to go over them again. Bit annoying but live and learn. Hopefully the plastic covers are thick enough to take a little more sanding.

How long did you spend going through every stage? I spent a good 10 minutes on each different grade and as long as you dont go crazy hard on pressure, you should achieve a decent finish.
 
New RTABs and limiters today.

D2785CB8-BDAE-4014-B400-A9CC05B8999A.jpeg

Working on the trailing arm was a bit of a faff. Lots of bits to disassemble and then a bit of trial and error getting everything reinstalled and torqued up at the right angles.

Also reinstalled my rear struts with a 6mm spring seat shim. Should equate to about 10mm at the wheel.
 
ben g said:
Ruofdez said:
Replaced the DISA flap with the X8R one. The old one seemed to be moving ok though the pin at the top was loose and I was able to pull it straight out so I think it was a worthwhile upgrade. The OEM design clearly isn't the best.

IMG_4003.jpeg

Did also try and refurb the headlights with a 3M kit. Bit of a knack to it and fair to say I didn't have it initially so will need to go over them again. Bit annoying but live and learn. Hopefully the plastic covers are thick enough to take a little more sanding.

How long did you spend going through every stage? I spent a good 10 minutes on each different grade and as long as you dont go crazy hard on pressure, you should achieve a decent finish.
At one stage I pushed too hard, the sanding disc had run out and it flew off and it left a glue residue behind which became very difficult to remove. I did spend a good amount of time but there was one deep scratch I missed in stage 1 and instead of going back to the more abrasive disc, I pushed harder on the the 800 grade. Even after that I struggled to get the lights totally even. I think if I give it a go again it will go better as I now know what not to do!
 
Replaced the side LED Indicators (thanks Stuartt).
All straight forward but just a bit fiddly pushing the plastic tab in to release the original light with a long screwdriver .

I cleaned where the adhesive went and for some reason decided to clean the engine compartment !
Then thought the car needed a clean and before I knew it the polish was out (must be the effect this new car has in me as I never polish a car normally).
As I was washing it a white E89 drove past (P100 xxx) so gave them a wave)!
I forgot to take a final photo (duh) so have added one form the day before
 

Attachments

  • AA32D2C0-CD0D-4A71-8E80-F9BA218CC960.jpeg
    AA32D2C0-CD0D-4A71-8E80-F9BA218CC960.jpeg
    283.7 KB · Views: 754
  • 8BBDA9EB-0935-4D02-8510-F5BD802D9EB5.jpeg
    8BBDA9EB-0935-4D02-8510-F5BD802D9EB5.jpeg
    381.8 KB · Views: 754
  • 330FB380-4F31-43AB-8207-207B19C069BD.jpeg
    330FB380-4F31-43AB-8207-207B19C069BD.jpeg
    249.8 KB · Views: 754
  • EF5E2549-D79F-43C5-B94D-C73C4972ABE2.jpeg
    EF5E2549-D79F-43C5-B94D-C73C4972ABE2.jpeg
    346.5 KB · Views: 754
  • 5148CA94-4D54-48D7-BCB7-0FBED0C90EFF.jpeg
    5148CA94-4D54-48D7-BCB7-0FBED0C90EFF.jpeg
    462.9 KB · Views: 754
Cracking night so took it out a spin
 

Attachments

  • 20190409_204800.jpg
    20190409_204800.jpg
    234.8 KB · Views: 689
Cleaned a thousand flies of the noses of both cars ! :D
 

Attachments

  • IMG_4800.jpg
    IMG_4800.jpg
    445.6 KB · Views: 629
Gave the old girl a good seeing too :D
 

Attachments

  • IMG_20190410_161301.jpg
    IMG_20190410_161301.jpg
    235.7 KB · Views: 620
  • IMG_20190410_161208.jpg
    IMG_20190410_161208.jpg
    224.1 KB · Views: 620
  • IMG_20190410_161341.jpg
    IMG_20190410_161341.jpg
    212.3 KB · Views: 620
Got an estimate to have my bumpers resprayed. Now a necessity at the rear after I used the Zed to demolish a small part of my neighbours wall on Sunday. :cry: :oops:

Still need to get an estimate for the wall. :roll:
 
Sold it!!! 35i incoming, looking forward to a bit more punch, blue with white leather interior. Picking it up Saturday. Just 3 more sleeps, makes me feel like at kid at Xmas again
 
Frankie169 said:
Sold it!!! 35i incoming, looking forward to a bit more punch, blue with white leather interior. Picking it up Saturday. Just 3 more sleeps, makes me feel like at kid at Xmas again

Sounds like a great plan. :thumbsup:

Enjoy Saturday! :lol:
 
Frankie169 said:
Sold it!!! 35i incoming, looking forward to a bit more punch, blue with white leather interior. Picking it up Saturday. Just 3 more sleeps, makes me feel like at kid at Xmas again
Like your gonna sleep for the next three nights. :wink:
Have a good weekend. :driving: :thumbsup:
 
Back
Top Bottom