You are using an out of date browser. It may not display this or other websites correctly.
You should upgrade or use an alternative browser.
You should upgrade or use an alternative browser.
What have you done to your car today?
- Thread starter Buckz
- Start date
- Featured

 Devon
Devon
Changed my diff oil today. Used Redline 75w90 synthetic oil.
Started changing my rear shocks only to discover the cupped washer under the rear mounts were to rusty to use again so ordered a pair from eBay. A job for next weekend.
Started changing my rear shocks only to discover the cupped washer under the rear mounts were to rusty to use again so ordered a pair from eBay. A job for next weekend.
Attachments
Reamesy said:Well my exhaust tips were in poor order and at £55 each I thought I would polish them. However on inspection the corrosion had gone through to the copper layer as they were the Aluminium finish.
So scotch brite for a key then etch primmer. Then baked at 80 degrees for 30 minutes to cure.
Then satin black acrylic for the finish and baked again.
Results are just what I wanted to continue the look.
These look amazing. For someone who now is really considering this but has no idea, why do you bake each coat? Is it just to speed up the curing time?
 Attleborough, Norfolk
Young Ed is away on holiday this week, so I did a couple of jobs on his car that he couldn't really get too involved with anyway; pretty boring for the lad to stand and watch while I ferret around in the boot etc..
First I relocated the roof motor. It turned out to be bone dry and in excellent nick. While in there I discovered the insulation over the rear top mounts was still intact, so never had a shock absorber change. Really is incredible how well these OEM Sachs dampers last. :roll:
Second job I thought would be quick: turned into a nightmare!
Drivers door mirror not adjusting, but could hear the motor struggling. Thought I'd whip it out and clean it up. Ha! How wrong I was.
It seems that at some point the glass had been off and the owner didn't know how to refit it (deduced by the fact the locking ring was in the unlock position). So they'd fitted it back on with the world supply of silicon sealant! I guess before it set they were able to adjust the mirror to suit them?
The motor assembly was completely filled with white, rubbery gunk. The only way I could dismantle it at all was to sacrifice the glass and pick away at the sealant until I could prise the mounting ring off. Then dig down to find the mounting screws and remove the whole motor. Luckily i had spares and it's all up and running again.
Then, because wifey's away and I'm on a roll, I nipped across to Project Cheapskate and whipped out the EPS motor. So easy the second time around.
Now methinks I've earned a shower and a beer.
enuff_zed said:Really is incredible how well these OEM Sachs dampers last. :roll:
See what you done there


While it was still cool enough this morning decided to do the fabled wiper motor de-grease as my wipers have not been returning to home position 9/10 times. There was a lot of grease on the contacts and copper disc, but all in all a very easy job, only took 30-40 minutes.
I also put some of those wiper linkage clips on each ball joint of the wiper mechanism because recently a mate's snapped as he was going down the motorway and flung his wiper over his side mirror! Its probably a bit of over preventative maintenance, but for £6 and peace of mind I have no issues doing it")
I also put some of those wiper linkage clips on each ball joint of the wiper mechanism because recently a mate's snapped as he was going down the motorway and flung his wiper over his side mirror! Its probably a bit of over preventative maintenance, but for £6 and peace of mind I have no issues doing it


Replaced my original rear shocks with Bilstien B4’s. Then went for a test drive down the A272. A definite improvement in the ride quality as the originals were shot with virtually no damping. Must get onto the fronts soon.
Next on the list will be a transmission fluid change along with mechatronic sleeves and a water pump/ header tank/ thermostat change. Oh, forgot the brake fluid change as well!
Next on the list will be a transmission fluid change along with mechatronic sleeves and a water pump/ header tank/ thermostat change. Oh, forgot the brake fluid change as well!
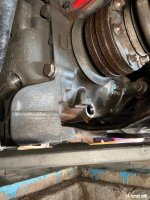
The fun of dragging trolley jacks out at 7.15 this morning and hopefully not waking the neighbours, so I could get the front in the air, remove the undertray and replace the auxillary belt on mine, before the sun crept up the drive to incinerate any flesh it could find, currently that is 8am. Getting off wasn't too difficult , but with putting the torx in the tensioner, it undid the tensioner pulley when refitting :roll: . So, I put on the belt other than the a/c compressor and a ratchet strap around the crank pulley, water pump and pulled the tensioner down to be able to slip it into place. As to why I changed it, there seemed to be a mist of something oily on the outer edges of the belt. Not sure if the previous owner had sprayed belt anti squeal on it , as couldn't find any leak from anything or could have been slight contamination from the rocker cover job a while back. The oil filter housing is all dry. I did clean all the pulleys with brake cleaner to make sure it was all clean and also washed out the undertray, which had no oil showing, so a bit of a mystery. Oh and luckily the old belt kept its shape on how the new belt should go on. I did contemplate a photo before removal, but thought, nah, it will be fine :roll:
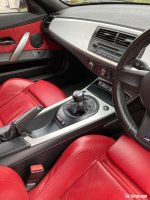
Hey All
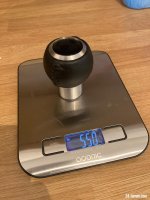
I swapped out my standard gear knob for a new CAtuned stainless/leather gear knob today. The difference is night and day, the standard one weighs 150g, where as the new one weighs 550g!
I think it looks pretty good too, nice compromise of stainless and leather!
The gear changes and feeling is incredibly different, much improved experience.
Attachments
Griffo46 said:where as the new one weighs 550g!
More weight = less performance and more fuel
But a lower Centre of Gravity, so what you lose on the straights you gain round the bends. :wink:1536Z4 said:Griffo46 said:where as the new one weighs 550g!
More weight = less performance and more fuel
enuff_zed said:But a lower Centre of Gravity, so what you lose on the straights you gain round the bends.
:bow:

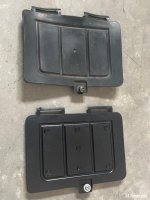
Posted on ZPOST too - I replaced the oil drain door / panel that clips into the underbody reinforcement plate. I hated looking at the underside of the car and seeing the edges drooping down from sloppy oil changes.
I installed a new plastic panel, but I added a thin sheet of aluminum to the top using "Low-Profile Binding Barrel and Screw" fasteners to attach it to the plastic panel. No one but myself and the wheel alignment techs will ever likely see it, but the car is new to me, and it felt shabby not to fix it. The metal should protect from oil drips and keep it flat - and as driver/owner/mechanic I will be pretty careful of spilled oil or leaks.

I installed a new plastic panel, but I added a thin sheet of aluminum to the top using "Low-Profile Binding Barrel and Screw" fasteners to attach it to the plastic panel. No one but myself and the wheel alignment techs will ever likely see it, but the car is new to me, and it felt shabby not to fix it. The metal should protect from oil drips and keep it flat - and as driver/owner/mechanic I will be pretty careful of spilled oil or leaks.