South Lanarkshire
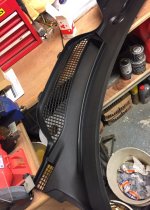
Removed the wiper arms and scuttle panel. Rubbed down and resprayed the wiper arms with a few coats of satin black (they look brand new again). Gave the scuttle panel a coat of Gtechniq to take away the faded grey look. It too looks brand new again.
You are using an out of date browser. It may not display this or other websites correctly.
You should upgrade or use an alternative browser.
You should upgrade or use an alternative browser.
What have you done to your car today?
- Thread starter Buckz
- Start date
- Featured
Nice, mine shows signs of deterioration as does the mirror trim. Is it a big job to remove?Big Andra said:Removed the wiper arms and scuttle panel. Rubbed down and resprayed the wiper arms with a few coats of satin black (they look brand new again). Gave the scuttle panel a coat of Gtechniq to take away the faded grey look. It too looks brand new again.
IAmOrion said:thanatu55 said:Yep... If you haven't done it... do it
I haven't! I need to read up on it (again) I did research it before but I've forgotten ha. Is it something I can do on my drive easy enough or do I need to get my garage owning friend to do it on on of his lifts?
Lifts will definitely make it easier. You could do it on the drive though, really quick job, we barely lost any fluid when mine was done. Worthwhile mod!!
z4too4 said:Nice, mine shows signs of deterioration as does the mirror trim. Is it a big job to remove?Big Andra said:Removed the wiper arms and scuttle panel. Rubbed down and resprayed the wiper arms with a few coats of satin black (they look brand new again). Gave the scuttle panel a coat of Gtechniq to take away the faded grey look. It too looks brand new again.
Simple. Wiper arms off and pop a couple of clips. It was very grey looking but I forgot to take a before pic.
Big Andra said:z4too4 said:Nice, mine shows signs of deterioration as does the mirror trim. Is it a big job to remove?Big Andra said:Removed the wiper arms and scuttle panel. Rubbed down and resprayed the wiper arms with a few coats of satin black (they look brand new again). Gave the scuttle panel a coat of Gtechniq to take away the faded grey look. It too looks brand new again.
Simple. Wiper arms off and pop a couple of clips. It was very grey looking but I forgot to take a before pic.
Cool. Thanks!


wyshyvanuk said:adam04, can you provide the brand of paint and color you used for your calipers? Excellent color match!! Thanks.
It was from euro car parts. Im away at the minute but will try and find a link and drop you a PM.
Thank you, sir!!
A few small dents on the Z need seeing to.
First off, one of the previous owners must have crammed the boot and having no liner protection, the skin took the brunt in a couple of places.


Progress...


Not perfect, but much, much better. Time to quit this one while I am ahead.


First off, one of the previous owners must have crammed the boot and having no liner protection, the skin took the brunt in a couple of places.
Progress...
Not perfect, but much, much better. Time to quit this one while I am ahead.


thanatu55 said:Carbon leather roll bar covers.... they're a b***h to do, a lot harder than they look !!
They're not perfect, but they'll do.
They look good to me! What glue did you opt for?
IAmOrion said:thanatu55 said:Carbon leather roll bar covers.... they're a b***h to do, a lot harder than they look !!
They're not perfect, but they'll do.
They look good to me! What glue did you opt for?
I used the Q-bond, nothing else seems to work with this material. That E6000 stuff was useless!
Getting everything to line up wasn't so easy so once you get it where you want it you need something thats going to cure quickly and hold tight. I think the carbon leather is thicker and allows you to rip off and re position without going too crusty.
look sweet! There's the grill question answered me thinks. Stick with the theme.thanatu55 said:IAmOrion said:thanatu55 said:Carbon leather roll bar covers.... they're a b***h to do, a lot harder than they look !!
They're not perfect, but they'll do.
They look good to me! What glue did you opt for?
I used the Q-bond, nothing else seems to work with this material. That E6000 stuff was useless!
Getting everything to line up wasn't so easy so once you get it where you want it you need something thats going to cure quickly and hold tight. I think the carbon leather is thicker and allows you to rip off and re position without going too crusty.
D
 Enquired about a remap for the coupe. I know a man that can. I'll keep you updated.
D
Z4 COUPSTER said:look sweet! There's the grill question answered me thinks. Stick with the theme.thanatu55 said:IAmOrion said:They look good to me! What glue did you opt for?
I used the Q-bond, nothing else seems to work with this material. That E6000 stuff was useless!
Getting everything to line up wasn't so easy so once you get it where you want it you need something thats going to cure quickly and hold tight. I think the carbon leather is thicker and allows you to rip off and re position without going too crusty.
D
Haha typical me working on the next job before finishing the last, the theme is good... it's worked for me so far anyway
thanatu55 said:I used the Q-bond, nothing else seems to work with this material. That E6000 stuff was useless!
Getting everything to line up wasn't so easy so once you get it where you want it you need something thats going to cure quickly and hold tight. I think the carbon leather is thicker and allows you to rip off and re position without going too crusty.
Interesting, the Q-Bond was useless for me on the handbrake leather, I had to use the E-6000... although I also needed to repair my MFSW trim, in which the E-6000 was completely useless, and the Q-Bond with powder was king lol
 North West Surrey
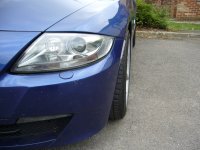
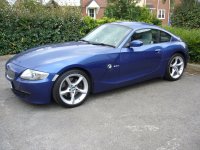
Fitted the 295 wheels I bought a couple of weeks ago from a true gent on the forum.
Thanks also to Chris999 who got the previous set and the input he got from mr wilks, which helped persuade me!
They've certainly improved the stance at the front! (Even if it was a 350 mile round-trip to pick them up).
Thanks also to Chris999 who got the previous set and the input he got from mr wilks, which helped persuade me!
They've certainly improved the stance at the front!
(Even if it was a 350 mile round-trip to pick them up).