Vanos Solenoids Observation

Brouse

Member
Another small rant in a series of "I've done a thing and I'm impressed with the result and must share my experience" apparently.

This time Vanos Soleniods on a 112k car, never had a perfect idle but would never describe it as rough. One thing it would do was hunt for 5 secs or so after a warm start - yet to find out if that is cured yet.

But yea wow, now it run very sweet bit more 'zingy' and a lovely balanced and even burble out the exhaust on idle, I couldn't believe the impact.

Will whip out the non-return valves/vanos filters (what have you) and give them a check and poss clean also.
 
Great news - did you clean or replace? Keep meaning to get round to mine as similar symptoms on start but not really a priority.
 
Replaced (sorry wasn't clear) with Vaico items from Autodoc. Surfed the app for the best discount for a few weeks and pounced, practically 2for1 in the end!

Also you get a 10p bonus in the app each day you "check in" so I'd amassed about a 5er by the time I purchased, all helps!

Easy job, prob 45 mins.
 
How hard a job is it to do, my cars 130k, wouldn't mind giving them a check / replacement to see if it ups my mpg a bit too.
 
No probs as I say pretty simple stuff. I'd say replace instead of cleaning, by all accounts cleaning is a temp fix. Don't have to go BMW, I read on a few places on the forum that Vaico are OEM or OEM quality, there's prob other brands - just don't get the £30 ebay ones.
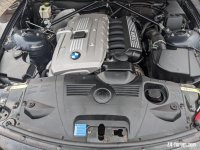
PXL_20211222_120741039.jpg Need to remove the radiator cover, 2 metal torx and 8 plastic screws/rivet fixings. Can remove the engine cover too, but mainly for light reasons rather than access.
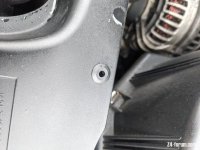
PXL_20211222_120845785.jpg Make sure you take out these little inserts too otherwise you'll lose them when removing the cover.

Fetch the fan out next
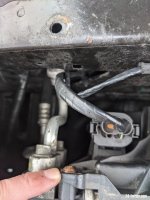
PXL_20211222_121130954.jpg Remove this torx screw

PXL_20211222_121144716.jpg Then use a flat head screwdriver to tease out the head of the rivet (middle bit)
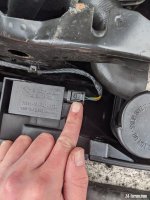
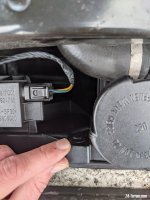
PXL_20211222_121149306.jpg Disconnect this plug, squeeze it at the cable end
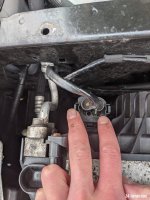
PXL_20211222_121159100.jpg ...and this one, squeeze both sides. Then you can just lift the fan assembly up vertically, it sits in a guide of sorts so will come up straight.
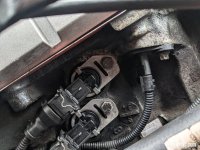
PXL_20211222_121526044.jpg Now you can get at the solenoids in terms or light and access for hands and tools, do one at a time to be safe.

Depress the metal clip and wiggle the connector off. Just the one bolt to undo (replace ideally, reusing is not world ending). Pop some rag underneath the solenoids and on the undertray in case of drips.

Use a gentle twisting and pulling combo to remove solenoid, you may need to retrieve the old o-ring from the block, clean the recess and surrounding area.

Refit is the reverse basically. I found locating the o-ring in the block first easier in terms of getting everything to fit properly. Grease the o-ring a little with some oil, prob not essential but something I've always done.

Once the o-ring is located in the block, insert the new solenoid with a gentle combo of twist and push. The little plate the bolt goes into should be flush with the block, this will ensure correct fitment of solenoid and that it is seated.

Then you can refit bolt, connect back up, and move on to the next one.

Once both are done, bung the fan back in and reconnect it and just start up briefly to check for initial leaks. Startup might be a bit rough initially once oil gets round the solenoids etc but will settle.

Refit everything else and go for a spin and check for leaks again.

Hope I've covered everything and that it is all clear!
 
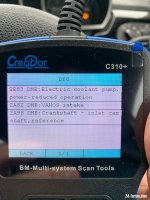
That’s great, might have to do it soon, just checked and had the following codes.

Going in soon to check a slight coolant leak.
 

Attachments

  • DCAE21AF-B676-469E-9C0F-5E765651A68F.jpeg
    DCAE21AF-B676-469E-9C0F-5E765651A68F.jpeg
    175.9 KB · Views: 658
I'm considering checking mine as I'm on 150k miles (M54b30).
I hit a bit of a plateau accelerating at around 4000rpm then get a continuation.
It's kind of like a 1 second hiccup mid-spurt the 'oh ok then, let's carry on til 6000+ rpm.

Does this sound like a solenoid issue?
tbh it's not a biggie as I drive like a nun these days anyway.
 
That how mine went, hard acceleration the. It felt like it dropped out of gear then picked back up. Driving it normally is fine though
Chris_D said:
I'm considering checking mine as I'm on 150k miles (M54b30).
I hit a bit of a plateau accelerating at around 4000rpm then get a continuation.
It's kind of like a 1 second hiccup mid-spurt the 'oh ok then, let's carry on til 6000+ rpm.

Does this sound like a solenoid issue?
tbh it's not a biggie as I drive like a nun these days anyway.
 
Where you based Brouse, would you fit some if in Birmingham? If so how much to fit :) I had a look today, anyone who can remove those without taking out the fan must bend like a cat and have baby hands
 
Brouse said:
No probs as I say pretty simple stuff. I'd say replace instead of cleaning, by all accounts cleaning is a temp fix. Don't have to go BMW, I read on a few places on the forum that Vaico are OEM or OEM quality, there's prob other brands - just don't get the £30 ebay ones.

PXL_20211222_120741039.jpg Need to remove the radiator cover, 2 metal torx and 8 plastic screws/rivet fixings. Can remove the engine cover too, but mainly for light reasons rather than access.

PXL_20211222_120845785.jpg Make sure you take out these little inserts too otherwise you'll lose them when removing the cover.

Fetch the fan out next
PXL_20211222_121130954.jpg Remove this torx screw

PXL_20211222_121144716.jpg Then use a flat head screwdriver to tease out the head of the rivet (middle bit)

PXL_20211222_121149306.jpg Disconnect this plug, squeeze it at the cable end

PXL_20211222_121159100.jpg ...and this one, squeeze both sides. Then you can just lift the fan assembly up vertically, it sits in a guide of sorts so will come up straight.

PXL_20211222_121526044.jpg Now you can get at the solenoids in terms or light and access for hands and tools, do one at a time to be safe.

Depress the metal clip and wiggle the connector off. Just the one bolt to undo (replace ideally, reusing is not world ending). Pop some rag underneath the solenoids and on the undertray in case of drips.

Use a gentle twisting and pulling combo to remove solenoid, you may need to retrieve the old o-ring from the block, clean the recess and surrounding area.

Refit is the reverse basically. I found locating the o-ring in the block first easier in terms of getting everything to fit properly. Grease the o-ring a little with some oil, prob not essential but something I've always done.

Once the o-ring is located in the block, insert the new solenoid with a gentle combo of twist and push. The little plate the bolt goes into should be flush with the block, this will ensure correct fitment of solenoid and that it is seated.

Then you can refit bolt, connect back up, and move on to the next one.

Once both are done, bung the fan back in and reconnect it and just start up briefly to check for initial leaks. Startup might be a bit rough initially once oil gets round the solenoids etc but will settle.

Refit everything else and go for a spin and check for leaks again.

Hope I've covered everything and that it is all clear!

Hi,

Just for reference Vaico are NOT OE or OEM on anything, many of their parts are of decent quality but they are a sourcing and boxing company selling various parts in the aftermarket.
 
Back
Top Bottom