VANOS refurb - how to loosen cross member

DMike

Veteran
 Finland
Site Supporter
Hi,

I’m preparing for the VANOS refurb on a 2005 3.0i M54. So far I’ve removed the radiator fan and I’ll continue with the valve cover etc. I will attempt to clear the studs by bending the cross member (aka radiator carrier). Anyone of you who have done this, which bolts did you loosen to allow the cross member to bend?
 
I loosened a bunch of stuff but in the end, I don't think any of it helped me get any particular flex.

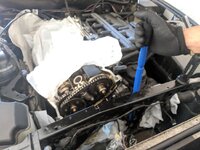
I put a bar on the end of the bolt for the water pump (put some thick/strong padding in between as to not damage it) and pulled backwards (away from the engine).

As you pull, try to move the vanos bit by bit and repeat until you can get it out - iirc you only need to get it off 1 particular bolt, after which you can rotate it around C/CW and slide off. Don't expect to move it much - we're really talking about 1-2 (if not less) millimetre here. If you need more clearance, you might be one of the unlucky ones and your stud is sticking out a bit more.

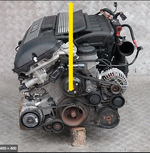
Yellowbar is how I positioned:
0UUky6d.png

Here's a pic from my job
mOQQw97.jpg

You're just flexing backward that piece the bar is on.
 
I don’t have to do any of this, I just had to remove one stud out of the head ant it came out easy.

As you look into the engine bay it was the top left stud of the Vanos. 2 x 10mm nuts onto the stud, tighten them then undo the rear but to pull the stud out.
 
I don’t have to do any of this, I just had to remove one stud out of the head and it came out easy.

As you look into the engine bay it was the top left stud of the Vanos. 2 x 10mm nuts onto the stud, tighten them then undo the rear but to pull the stud out.
 
Just answering my question about camshaft locking... Found a good thread about this on a E46 forum. General consensus was that there is no need to lock camshafts on M54. So I’ll take the plunge.
 
Good luck- I’m watching this thread with interest as I am planning the same soon!!!
 
No need to lock cams as you're not touching the timing chain :thumbsup:

Just be very conscious when undoing and refitting the little REVERSE threaded torx bolt. Take extra caution - U don't want to snap or cross thread it.

Only takes a low torque but you won't get a torque wrench in. Just get it hand tight.
 
Turned out that three of the studs were too long, prohibiting vanos removal. I managed, however, to bend the cross member as tomrdy described and removed the unit.

In the vanos unit the old seals were stone hard and pistons felt really loose. I installed also the rattle repair rings as the bearings clearly had some play.

Prior to reinstalling the vanos unit I made two of the studs slightly shorter - used two nuts to screw them a couple of millimetres further into the block. After that the vanos could be manouvered in place even without bending the cross member.

I”ll continue with the valve cover and other pieces to put back tomorrow...
 
DMike said:
Turned out that three of the studs were too long, prohibiting vanos removal. I managed, however, to bend the cross member as tomrdy described and removed the unit.

In the vanos unit the old seals were stone hard and pistons felt really loose. I installed also the rattle repair rings as the bearings clearly had some play.

Prior to reinstalling the vanos unit I made two of the studs slightly shorter - used two nuts to screw them a couple of millimetres further into the block. After that the vanos could be manouvered in place even without bending the cross member.

I”ll continue with the valve cover and other pieces to put back tomorrow...

How did it all go in the end- all sorted? Worth doing? How difficult?
 
Everything back in place again, really took my time to enjoy the process, ocd-clean the valve cover, all hoses etc. Now waiting for the RTV to cure and heading for a test drive tonight. I bought the car 15 years ago new and hope that the VANOS refurb would restore some of the whiplash-like throttle response and acceleration it once had.
 
Bit late to the party - Wheeler Dealers did the vanos on an E46 M3, which doesn’t show everything but certainly a fair bit to help
 
Some thoughts about tools and the process overall:

- I could not find a 8 mm Allen bit that would fit between the VANOS covers and the cross member - I used a conventional Allen key with an about 30 cm tube extension. The covers were crazy tight to open: When they finally cracked open I believed for a second that the Allen key had broken apart. For the same reason I couldn't tighten them properly with a torque wrench. Instead I used the Allen key with approximated torque ("crazy minus 30 percent").
- 90 deg angled needle nose pliers is a must to get the plugs out. Read a lot about this and had some 10 quid ones from Ebay. This part was easier than expected.
- The left handed VANOS torx screws have a really thin neck and thus can break easily. I had ordered new ones and tightened them to spec using a small torque wrench.
- As other have previously stated, the cross member makes access a bit tricky. A number of different socket extensions is handy.
- When finally clearing the studs by rotating the VANOS it will make a mess: This thing leaks oil from every angle and there's not else that can be done than trying to protect serpentine belts, alternator etc in advance. Altogether the patient lost some 200 ml of oil during the operation.
- The oil line banjo bolt cannot be accessed with a torque wrench. Again, torqued by feel and luck.

As tomrdy stated, opening the VANOS, cleaning the parts and changing the seals was the easiest part, well documented in the Beisan instructions. Again, took my time to clean everything, keeping things organised and enjoying the process.

I also installed the Beisan anti-rattle rings while being there. A cheap Ryobi battery-driven impact wrench opened the valve bearing covers with ease, with just one or two short bursts.

Altogether I'd say that the rebuild wasn't that difficult -- with proper tools, garage and plenty of time quite enjoyable. I spent a bit more than ten hours but used plenty of time cleaning parts, torquing to spec and. Now waiting for the test drive tonight, fingers crossed...
 
DMike said:
Some thoughts about tools and the process overall:

- I could not find a 8 mm Allen bit that would fit between the VANOS covers and the cross member - I used a conventional Allen key with an about 30 cm tube extension. The covers were crazy tight to open: When they finally cracked open I believed for a second that the Allen key had broken apart. For the same reason I couldn't tighten them properly with a torque wrench. Instead I used the Allen key with approximated torque ("crazy minus 30 percent").
- 90 deg angled needle nose pliers is a must to get the plugs out. Read a lot about this and had some 10 quid ones from Ebay. This part was easier than expected.
- The left handed VANOS torx screws have a really thin neck and thus can break easily. I had ordered new ones and tightened them to spec using a small torque wrench.
- As other have previously stated, the cross member makes access a bit tricky. A number of different socket extensions is handy.
- When finally clearing the studs by rotating the VANOS it will make a mess: This thing leaks oil from every angle and there's not else that can be done than trying to protect serpentine belts, alternator etc in advance. Altogether the patient lost some 200 ml of oil during the operation.
- The oil line banjo bolt cannot be accessed with a torque wrench. Again, torqued by feel and luck.

As tomrdy stated, opening the VANOS, cleaning the parts and changing the seals was the easiest part, well documented in the Beisan instructions. Again, took my time to clean everything, keeping things organised and enjoying the process.

I also installed the Beisan anti-rattle rings while being there. A cheap Ryobi battery-driven impact wrench opened the valve bearing covers with ease, with just one or two short bursts.

Altogether I'd say that the rebuild wasn't that difficult -- with proper tools, garage and plenty of time quite enjoyable. I spent a bit more than ten hours but used plenty of time cleaning parts, torquing to spec and. Now waiting for the test drive tonight, fingers crossed...

Amazing- great tips

Looking forward to hearing how the car drives....
 
First impression on a short test drive was that the powerband feels more linear, espesially when floring from 1k rpm on second or third gear. Low end torque didn’t feel massively different but I’ll report back in a few days. I have read mixed opinions about embedding the seals. No leaks from the valve cover gasket so far. :)

I had disconnected the battery during the rebuild and now experienced some electrical gremlins (roof motor didn’t want to work, dash cam swithing on and off repeatedly) so I may have a battery or alternator issue coming... Probably unrelated to the rebuild anyway.
 
It's a satisfying job to get out of the way!

I had the same issue with not being able to get an allen bit on the covers. "crazy minus 30 percent" sounds about right :rofl:
 
After one daily commute I have noticed the following differences. They’re all quite subtle and of course very subjective, but with a pinch of salt...
- Now a more linear power delivery. Before the refurb I had noticed an oomph at 4000 To 5000 rpm, probably due to missing torque below that.
- Low speed low rpm (1000 to 1500/min) cruising feels a bit more relaxed due to increased torque.
- High pitched, metallic noise (tambourine jingles) at 1500 rpm has disapeard, it didn’t come to my mind it was VANOS noise.

Too early to report any changes in gasoline consumption.
 
DMike said:
to 1500/min) cruising feels a bit more relaxed due to increased torque.
- High pitched, metallic noise

That jingle at 1500 is on my list too and I was thinking vanos

Did it only do it when hot?
 
Back
Top Bottom