Subframe refurb on my 06 Z4 M Roadster

Gazhyde

Member
 Newbury, Berks
Here's some pics to show the progress so far, a project between myself and Joycey (from here and other places :D ) and another mate called Trev :thumbsup:

2006 Z4 M roadie on 123k miles with seemingly original everything underneath (except for BC Racing coilovers)! Initially replacing the 17 subframe bushes and to deal with the leak on the input seal of the diff. Now we are underneath scope creep is setting in and may be dropping the gearbox as there may be a slight weep on the output seal (or it's coming from the engine, so probably gonna poke around that for a while).

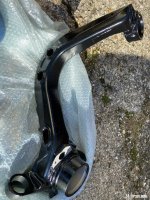
Everything coming off is being grit blasted and either powder coated or painted with black Hammerite. Got some exposed areas under the boot floor needing a good wire wheeling and rust proofing.

Just gonna throw some pics here, have a full write up elsewhere - not sure if I'm allowed to link :?

Into the garage she goes.
IMG_0647.JPEG

Up on the axle stands
IMG_0653.JPEG

Subframe down on the floor. Took about 3 hours to get to this stage removing the under braces, panels, exhaust, prop shaft and all the other things in the way!
IMG_0680.JPEG

IMG_0678.JPEG

Failed RTAB on both sides
IMG_0683.JPEG

New rear discs and pads on order
IMG_0672.JPEG

Diff going off for full rebuild including all bearings and seals and possibly clutch packs if needed.
IMG_0692.JPEG

General crustiness
IMG_0696.JPEG

Handbrake assembly and cables
IMG_0700.JPEG

Pulling bearings
IMG_0705.JPEG
 
New drop links...
IMG_0701.JPEG

Naked trailing arm
IMG_0708.JPEG

Bush removal with a bit of gentle heat, can't go mad as the wishbones are cast aluminium.
IMG_0709.JPEG

Subframe bushes get all the heat before being pushed out in a 10t standing press.
IMG_0718.JPEG

Front diff bush
IMG_0719.JPEG

Some bits back from powder coating :D

IMG_0731.JPEG
IMG_0743.JPEG
IMG_0748.JPEG
IMG_0746.JPEG
 

Attachments

  • IMG_0743.JPEG
    IMG_0743.JPEG
    303.1 KB · Views: 2,174
Some more random pics

Diff oil plastered over the petrol tank
IMG_2690.JPEG

Things to wire wheel and rust proof
IMG_2691.JPEG

Handbrake mechanism - shows why you need to remove the prop to get at it, 6 nuts and it comes out the bottom of the car. Also, don't forget to unclip the sensor cable like I did... :D
IMG_0667.JPEG

My shaft :lol:
IMG_0670.JPEG

Supersprint Racing with x-pipe
IMG_0655.JPEG
 
A bit about parts... It's an M, they are all expensive. Don't even think about asking for a running total :poke:

My parts spreadsheet has 25 lines, covering bushes, ball joints, wheel bearings, discs, pads, handbrake cables, diff & gearbox oil, friction modifier, braided brake lines, caliper seal rebuild kits and other sundries like nuts/bolts/clips.

Where I can I've aimed for best quality I can find, and at minimum OEM quality. Nothing unbranded or a brand I've not heard of. For example discs are BMW and the pads are EBC Yellowstuff. HEL for braided brake lines.

The 17 subframe bushes are either BMW OEM or Meyle HD (drop links are Lemforder which are OE equivalent). The diff is getting Powerflex Black, they should have been Purple but they sent the wrong ones in the right packaging. The reasoning being Powerflex on the diff is that you have seem to have to replace the rear diff cover to change the bushes, they aren't listed as separate parts. PowerFlex make replacement bushes for the back plate, so that was that.
 
Love it what a great bit of resto so far! Look forward to further updates! 8)
 
Great pics and resto matey

Fills me with dread as I know at some point I need to do a handbrake mech!
 
i have to say underneath has really weathered well..... the bits you took off needed some love but im really impressed with the underside condition.

Well done OP. excellent work.
 
Thanks all, we’ve done this on over 50 Z3 & Z3Ms now so a Z4 makes a nice change. Z3 subframes are very different, and a lot of them are starting to deteriorate badly.

43AA49D8-5D27-40C6-B00E-FA3FF5AE69D3.jpeg
 
Holy s**t!!! That z4 been parked under salt water?? Nice job on the refurb, but I've never seen it as bad as that.
 
Vanne said:
Holy s**t!!! That z4 been parked under salt water??
We like our roads well flavoured in the UK. Standard UK car, looks mint on the top but underneath...

Nothing more than surface rust, unlike the Z3's which are developing holes! :?
 
Great job!

Whilst you're there you should consider pulling the rear bumper and checking the rear bumper carrier as the rear bumper seems to trap alot of moisture.
 
Martyn said:
rear bumper seems to trap alot of moisture.
That makes sense as to why I struggled trying the new towing eye I bought, the internal thread on it was a mess with corrosion. Took me ages to clean up the thread so the eye would go in far enough. Just kept winding the eye in and out with a large bar and plenty of grease! Good tip, thanks!
 
Good work. Don't forget to clean off the diff oil from the tank. When I had my output shaft seals done, it wasn't cleaned off, and I am now wondering if the oil I have recently noticed is historic, or form a new leak!
 
Will you get the propshaft balanced before fitting?
This was an essential process during restoration of older cars that I've undertaken.
 
camtwister said:
Will you get the propshaft balanced before fitting?
This was an essential process during restoration of older cars that I've undertaken.

We don't need to as we've not actually touched it, only removed it and will be refitting.
 
Day three was a day of general fettling, more parts arrived and dumped in the boot. Hammerite and paintbrushes were the main order of the day, some things we planned to paint, others missed by the powder coaters after blasting.

Today was mainly about painting brackets, brakes and sundries with Hammerite and also looking in to an oil leak up front. @Rally was down as well who helped identify the likely cause of the oil leak (and also tell me part numbers).

Most of the parts, everything will be black except for the upper wishbones that get a coat of silver which is closest to their normal aluminium colour. Befores:
IMG_0758.JPEG
IMG_0759.JPEG
IMG_0760.JPEG
IMG_0761.JPEG
IMG_0762.JPEG

The drying rack, mid painting and afters...
IMG_0770.JPEG
IMG_0771.JPEG
IMG_0772.JPEG
IMG_0773.JPEG
IMG_0779.JPEG
 
Continued from above post...

IMG_0780.JPEG
IMG_0783.JPEG

Didn't get pics of the oil leak, but it appears to be the timing chain tensioner which is common on the S54 engine. Thanks again to Rally, my favourite Insta Influencer :wink:

Another part to add to the list, but this is a simple unscrew/screw back in again and it's not horrendous to access either. Part 5 on this diagram referred to as "chain tensioner" pn 11317838675
1635010529360.png

More parts delivered this week including an OEM set of rear discs, EBC Yellowstuff pads, HEL braided brake lines, Bigg Red caliper rebuild kits, Febi gearbox oil. More parts arriving this week, also forgot to order new bleed nipples for the calipers. The boots getting full!

IMG_0777.JPEG
 
Gazhyde said:
My parts spreadsheet has 25 lines,
Love the work you're doing! I'm right at the beginning of the same process, going to strip the car down to the shell and build it back up all new and fresh. Any chance that you could post your spreadsheet of bushings? That would be a big help to me and I'm sure many others.
I notice you are replacing some bushings with original rubber and others with poly, how did you come to that decision of which is which?
Thanks
 
Back
Top Bottom