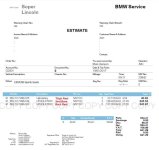
I acquired a pair of Sport seats in decent condition but with a badly crushed driver’s bolster and decided to buy a replacement seat back foam to refresh it with. The cost of this was £110 but I feel it was worth it, given the value of these seats on the second hand market at the moment.
This was the first part of a full refurbishment which also included reconditioning and tightening the leather (PawnSacrifice has written a great guide for this, here). The seats in question are heated, so removing and replacing the heating elements is part of this process. It took me about three hours at an easy pace.
You’ll need:
- Sport seat back foam (part number 52107896163)
- T20 torx screwdriver
- Pack of thin (3-4mm) tie-wraps
- Needle-nose pliers
- Interior trim tool
- Stanley knife
- Small scissors
- General purpose household glue
- Fingers of steel
- A cat (optional)
Pre-reqs:
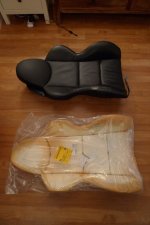
Take the driver’s seat out of the car and remove the seat back. These steps are covered in other guides. Here’s the seat back with the replacement foam beside it.
Steps:
Remove the belt guide using the torx driver.
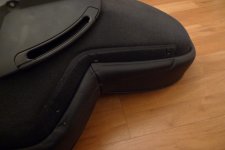
The leather is held in place with stiff plastic piping which slides into a slot that runs around the outside of the seat shell. Start freeing the leather using your hands and trim tool. It helps to compress the seat foam next to the edge you are removing while you lift out the plastic piping. I found it easiest to start in the middle, between the lower and upper bolsters.
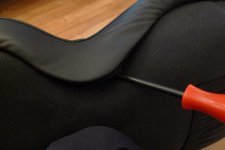
In the bottom corners of the seat, the leather is secured in place with metal rings that look a little like fish hooks. These can be prised apart using needle-nose pliers. You’d better get used to doing this, because there are few million more to do.
You’ll find the bottom of the seat pretty easy to remove and lift free of the seat shell.
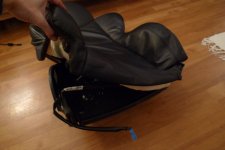
The headrest is the stiffest part due to the sharp curve at the top - leave it until last and you can flip the leather over to make it a little easier to remove.
Once the leather/foam and seat shell are separated, you may want to get a cat to check things over.
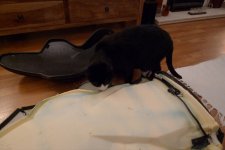
Here’s a pic just for info. The shell is actually two parts - a plastic outer with a polystyrene insert.
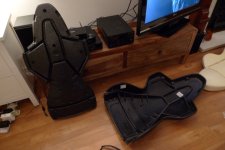
There are metal rails embedded into every seam of the seat foam along each seam. Small metal rings are used to secure the leather to the foam.
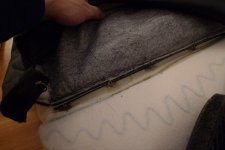
You’ll now need to remove all of these. Pretty straightforward but very tedious! Just be careful to not perforate the leather.
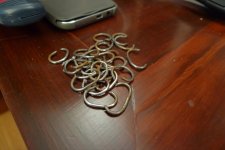
You’ll find that you can’t detach the leather completely without disconnecting the heater wiring at the base of the seat back.
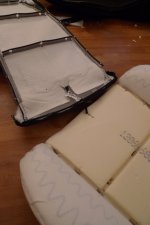
Next, peel off the heater elements. Try and keep it neat - any foam you rip off should be trimmed with a sharp knife, otherwise they’ll be lumpy when you reattach them to the new foam.
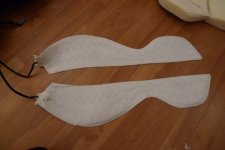
Here are the old and new seat foams side by side. You’ll notice a couple of things… how manky the new foam looks and just how bad the damage to the bolster is on the old foam!

I think the discolouration of the new seat is just due to it having been in long-term storage instead of immediately fitted to a new Z4. The structure of the foam is in fact perfect.
The damage to the old bolster is terminal, although looks particularly bad on this one because large chucks of foam fell out when the leather was removed. These bolsters are particularly susceptible to crushing because they have a channel running all round the backs which lines up with the hard plastic edge of the shell. You can see it in this photo of the foam backs.

After repeated encounters with people’s arses, the foam tears along the channel and then the edge of the of the shell starts to cut through it every time somebody gets in or out without using the "flying monkey" technique.
Next step is to glue the heater elements onto the replacement foam. Pretty easy - also smells great. :crazydude:

Most people would happily top themselves before reinstalling all of the tiny metal rings, so use tie-wraps instead [EDIT - the rings are called "hog rings" and you can reinstall them with a pair of hog ring pliers. Cheers to born for the tip]. Firstly, hook them under each exposed part of the metal rail in the foam.

Then loop them through the adjacent holes in the seat leather and pull them taught. Get this bit right and the seams will be nice and tight.

Trim the tie-wrap ends with scissors. Double check you have secured and tightened all of the seams. It will be really obvious if you haven't once you put the leather back on! This is also a good point at which to align and re-connect the heater cable at the base of the seat.

Once the leather is secured in place, you can start to reassemble the seat. I found it easiest to reverse the process of removing it - start at the top and work down. You need to ensure that the foam lines up with the rim of the seat shell without pinching or folding, and also that the plastic piping is fully inserted. If you don’t do this then the leather will not be pulled taught and you won’t be able to refit the belt guide.

It is very tough work on your hands and fingers, but gently squashing the seat foam helps. You can do this by putting a large, rounded object under the seat (e.g. a football or upturned bowl) and put some weight on it from above - but be careful with those shiny new bolsters! If you’re not sure how far you should be going, use your passenger seat as a reference point.
The final steps are to tidy up and secure the leather flaps in the lower corners - these ones will need metal rings (not tie-wraps!) - and reattach the belt guide.

Done!
This was the first part of a full refurbishment which also included reconditioning and tightening the leather (PawnSacrifice has written a great guide for this, here). The seats in question are heated, so removing and replacing the heating elements is part of this process. It took me about three hours at an easy pace.
You’ll need:
- Sport seat back foam (part number 52107896163)
- T20 torx screwdriver
- Pack of thin (3-4mm) tie-wraps
- Needle-nose pliers
- Interior trim tool
- Stanley knife
- Small scissors
- General purpose household glue
- Fingers of steel
- A cat (optional)
Pre-reqs:
Take the driver’s seat out of the car and remove the seat back. These steps are covered in other guides. Here’s the seat back with the replacement foam beside it.

Steps:
Remove the belt guide using the torx driver.

The leather is held in place with stiff plastic piping which slides into a slot that runs around the outside of the seat shell. Start freeing the leather using your hands and trim tool. It helps to compress the seat foam next to the edge you are removing while you lift out the plastic piping. I found it easiest to start in the middle, between the lower and upper bolsters.

In the bottom corners of the seat, the leather is secured in place with metal rings that look a little like fish hooks. These can be prised apart using needle-nose pliers. You’d better get used to doing this, because there are few million more to do.
You’ll find the bottom of the seat pretty easy to remove and lift free of the seat shell.

The headrest is the stiffest part due to the sharp curve at the top - leave it until last and you can flip the leather over to make it a little easier to remove.
Once the leather/foam and seat shell are separated, you may want to get a cat to check things over.

Here’s a pic just for info. The shell is actually two parts - a plastic outer with a polystyrene insert.

There are metal rails embedded into every seam of the seat foam along each seam. Small metal rings are used to secure the leather to the foam.

You’ll now need to remove all of these. Pretty straightforward but very tedious! Just be careful to not perforate the leather.

You’ll find that you can’t detach the leather completely without disconnecting the heater wiring at the base of the seat back.

Next, peel off the heater elements. Try and keep it neat - any foam you rip off should be trimmed with a sharp knife, otherwise they’ll be lumpy when you reattach them to the new foam.

Here are the old and new seat foams side by side. You’ll notice a couple of things… how manky the new foam looks and just how bad the damage to the bolster is on the old foam!

I think the discolouration of the new seat is just due to it having been in long-term storage instead of immediately fitted to a new Z4. The structure of the foam is in fact perfect.
The damage to the old bolster is terminal, although looks particularly bad on this one because large chucks of foam fell out when the leather was removed. These bolsters are particularly susceptible to crushing because they have a channel running all round the backs which lines up with the hard plastic edge of the shell. You can see it in this photo of the foam backs.

After repeated encounters with people’s arses, the foam tears along the channel and then the edge of the of the shell starts to cut through it every time somebody gets in or out without using the "flying monkey" technique.
Next step is to glue the heater elements onto the replacement foam. Pretty easy - also smells great. :crazydude:

Most people would happily top themselves before reinstalling all of the tiny metal rings, so use tie-wraps instead [EDIT - the rings are called "hog rings" and you can reinstall them with a pair of hog ring pliers. Cheers to born for the tip]. Firstly, hook them under each exposed part of the metal rail in the foam.

Then loop them through the adjacent holes in the seat leather and pull them taught. Get this bit right and the seams will be nice and tight.

Trim the tie-wrap ends with scissors. Double check you have secured and tightened all of the seams. It will be really obvious if you haven't once you put the leather back on! This is also a good point at which to align and re-connect the heater cable at the base of the seat.

Once the leather is secured in place, you can start to reassemble the seat. I found it easiest to reverse the process of removing it - start at the top and work down. You need to ensure that the foam lines up with the rim of the seat shell without pinching or folding, and also that the plastic piping is fully inserted. If you don’t do this then the leather will not be pulled taught and you won’t be able to refit the belt guide.

It is very tough work on your hands and fingers, but gently squashing the seat foam helps. You can do this by putting a large, rounded object under the seat (e.g. a football or upturned bowl) and put some weight on it from above - but be careful with those shiny new bolsters! If you’re not sure how far you should be going, use your passenger seat as a reference point.
The final steps are to tidy up and secure the leather flaps in the lower corners - these ones will need metal rings (not tie-wraps!) - and reattach the belt guide.

Done!

