Repairing fixing lugs on Chrome-line Steering Wheel Trim

Mojito

Member
I recently had my steering wheel re-trimmed by Royal – beautiful job and I’m well pleased. Like many others though, I had a problem with broken securing pins on the Chrome-line trim, in particular the two pins/lugs on the reverse of the slotted trim piece. This trim is secured by two self tappers screwed into the pins/lugs from the reverse side of wheel. I actually have two sets of trims, but sod’s law dictates that the perfect finish trim has both lugs broken off, whist the trim with a couple of scratches on it’s front surface has reasonable lugs :headbang: I could have sprayed the good set black, but like the Chrome-line.

I have read several threads where others with the same issue have simply glued their broken lugs back on with two part epoxy. Well I tried a couple of times, but despite good surface preparation and two different brands of epoxy, as soon as the screws were tightened the lugs broke away again. In my case the slightly thicker covering and ‘springiness’ of the new leather covering increased the pressure on these fixings, exasperating the problem. Also one of the side clips on the trim which might take some of the pressure was broken/missing. As many will know the contact area at the base of the pins is very small – mine were totally wrecked and the thin bit at the bottom had snapped right off. This plastic doesn’t glue that well either.

Faced with the cost of a new set of six trims at £212 :cry: , the cheapest I could find, I came up with the following solution....

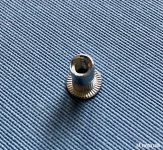
I have a Rivnut set in the garage, sure you are all familiar with them – blind fixings with a screw thread in them, which you set like a rivet. Think my set was £20 on Amazon a few years ago, complete with various aluminium rivnuts. A useful bit of kit.
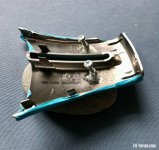
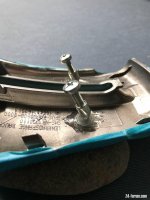
I used an M4, screwed a bolt in to protect the thread and then partly flattened the base of the rivnut on opposite sides with a hammer and flat blade screwdriver. This enabled me to bend the rivnut to the same angle as the plastic lug moulding. I then lightly epoxied the base of the rivnut to the trim and just as it was setting, loosely fitted both back and front trims on the wheel to check alignment – you can adjust it with a bolt through the back trim. When it was set I applied a little more epoxy …. just to make sure. Cut a couple of bolts to length and its job done :) Photos show better than I can describe.

Result – a secure fixing, which I could tighten up properly :thumbsup: Hope this helps someone.
 

Attachments

  • IMG_3945.jpeg
    IMG_3945.jpeg
    176.6 KB · Views: 577
  • IMG_3953.jpeg
    IMG_3953.jpeg
    358.4 KB · Views: 577
  • IMG_3988.jpeg
    IMG_3988.jpeg
    253.1 KB · Views: 577
  • IMG_3989.jpeg
    IMG_3989.jpeg
    125.9 KB · Views: 577
A very useful post. I am just considering having my wheel recovered at Royals and I know this is a common problem with the trims. :thumbsup:
 
IRD said:
A very useful post. I am just considering having my wheel recovered at Royals and I know this is a common problem with the trims. :thumbsup:
Thanks. This is the second wheel I've had retrimmed by Royal and their work is first class. Worth talking to Jack there about rim thickness. I didn't want their standard double thickness, but opted for "padded originally/1mm" as some others have done on the forum. Well pleased with the result. :thumbsup:
 
Mojito said:
IRD said:
A very useful post. I am just considering having my wheel recovered at Royals and I know this is a common problem with the trims. :thumbsup:
Thanks. This is the second wheel I've had retrimmed by Royal and their work is first class. Worth talking to Jack there about rim thickness. I didn't want their standard double thickness, but opted for "padded originally/1mm" as some others have done on the forum. Well pleased with the result. :thumbsup:
I agree with you. This will be my second wheel from Royals. I was advised by another member to go for 3/4 the thickness of an MSport wheel and that worked just fine. We have an MSport wheel on our 330e Touring and I find it a bit thick. Mind you I have fairly short fingers.
Cheers
Ian
 
Good idea. Think I'll be using this too.

Out of interest, the rivets seem to hold with the epoxy? While the plastic didn't?
 
kis said:
Good idea. Think I'll be using this too.

Out of interest, the rivets seem to hold with the epoxy? While the plastic didn't?
A very good question :)

Probably several reasons, or a combination of them - but I'm guessing.

The epoxy, I settled on Gorilla as the best of the two I tried, adheres really well to the aluminium rivets - and that leaves only one plastic surface in the equation that can 'pull away'. Also with the pins totally broken off, I could really scrape the fixing area to provide a good key - you can't really do that if you are trying to glue the pin back to the tiny stub where it broke off. The rivets also give a larger surface area to adhere onto the plastic. In the original moulding, the two 'pins' are just two thin side sections at the point they join the main trim piece - this is where mine broke off - leaving a tiny stub with very lttle surface area at the base to glue.

Others seem to have managed it, but it just wouldn't work for me.....
 
Mojito said:
kis said:
Good idea. Think I'll be using this too.

Out of interest, the rivets seem to hold with the epoxy? While the plastic didn't?
A very good question :)

Probably several reasons, or a combination of them - but I'm guessing.

The epoxy, I settled on Gorilla as the best of the two I tried, adheres really well to the aluminium rivets - and that leaves only one plastic surface in the equation that can 'pull away'. Also with the pins totally broken off, I could really scrape the fixing area to provide a good key - you can't really do that if you are trying to glue the pin back to the tiny stub where it broke off. The rivets also give a larger surface area to adhere onto the plastic. In the original moulding, the two 'pins' are just two thin side sections at the point they join the main trim piece - this is where mine broke off - leaving a tiny stub with very lttle surface area at the base to glue.

Others seem to have managed it, but it just wouldn't work for me.....
I wrote earlier that I had had one wheel done by Royals. This was a naked wheel I bought from another Forum member who lived near to Royals and kindly delivered it in person for the recovering. I was hoping my current wheel could be recovered without removing the trim.
But I am guessing that isn’t possible and that the trim will have to be removed?
 
IRD said:
Mojito said:
kis said:
Good idea. Think I'll be using this too.


I wrote earlier that I had had one wheel done by Royals. This was a naked wheel I bought from another Forum member who lived near to Royals and kindly delivered it in person for the recovering. I was hoping my current wheel could be recovered without removing the trim.
But I am guessing that isn’t possible and that the trim will have to be removed?
Hi Ian,
I'm pretty sure you will have to remove the trim as I recall an email from Royal saying that all trim should be removed before sending the wheel.
Worth asking though, they are a helpful bunch.
Cheers,
Kevin
 
T
Mojito said:
IRD said:
Mojito said:
Hi Ian,
I'm pretty sure you will have to remove the trim as I recall an email from Royal saying that all trim should be removed before sending the wheel.
Worth asking though, they are a helpful bunch.
Cheers,
Kevin
Thanks Kevin. I pretty well thought that would be the case. Knowing me I will end up having the same problem as you did.
 
Mojito said:
kis said:
Good idea. Think I'll be using this too.

Out of interest, the rivets seem to hold with the epoxy? While the plastic didn't?
A very good question :)

Probably several reasons, or a combination of them - but I'm guessing.

The epoxy, I settled on Gorilla as the best of the two I tried, adheres really well to the aluminium rivets - and that leaves only one plastic surface in the equation that can 'pull away'. Also with the pins totally broken off, I could really scrape the fixing area to provide a good key - you can't really do that if you are trying to glue the pin back to the tiny stub where it broke off. The rivets also give a larger surface area to adhere onto the plastic. In the original moulding, the two 'pins' are just two thin side sections at the point they join the main trim piece - this is where mine broke off - leaving a tiny stub with very lttle surface area at the base to glue.

Others seem to have managed it, but it just wouldn't work for me.....

Yes same with me. Ended up popping on one without the screw. Think I’ll give this a go! Thanks for sharing!
 
Zedebee said:
Ingenious fix, thanks for sharing.

Nash3vans said:
Great work. To reuse rather than replace is :thumbsup:

Thanks Zedebee and Nash3vans. I've picked up so much help and advice over the last couple of years from the forum, it's nice to be able to pass something back, even if it's only a little thing like this :)
 
After doing your normal glueing process, to add some extra strength use hot glue.

Really go to town and add as much as you can without compromising the assembly.

Love hot glue when you can't see it.
 
Usel said:
After doing your normal glueing process, to add some extra strength use hot glue.

Really go to town and add as much as you can without compromising the assembly.

Love hot glue when you can't see it.

Thanks Usel - that's a really good idea :thumbsup: Never cossed my mind ..... and I've got a hot glue gun :)
 
Very clever, I have the same problem to solve so I'll give your method a try. I think I might try some 3M 2 part panel bond epoxy, the strongest epoxy I have ever used and happen to have half a tube left from some previous body work.
Thanks
 
grannyknot said:
Very clever, I have the same problem to solve so I'll give your method a try. I think I might try some 3M 2 part panel bond epoxy, the strongest epoxy I have ever used and happen to have half a tube left from some previous body work.
Thanks
I hadn't realised that this problem was quite so common - just thought it was my bad luck :o 
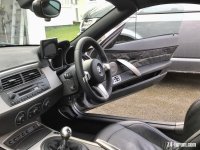
Hope it works well for you :thumbsup:
 
Back
Top Bottom