Removing exhaust tips on E86 3.0Si

ME10LOR

Member
 Manchester
Hi everyone,

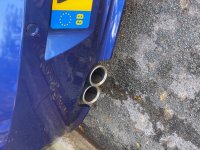
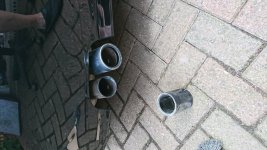
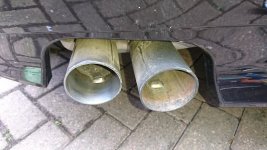
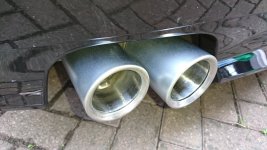
I'm looking for advice on whether it's possible to remove the exhaust tips on my E86 3.0Si as they're in need of a good clean. Any hints or help as to whether these come off would be appreciated. From a quick look there's no screw or similar holding them on. Other than taking a hammer to them and trying to pry them off softly I wondered whether anyone had done this before?
 
I'm sure I've read that they pull off. Obviously, if yours are like mine, then they won't be coming off without a fight :lol:

Will be interested to see if others confirm, as I'm keen to do mine as well.
 
Twist and pull.

If you want to replace them or get another set check on the eBay and the Amazon as I managed to get some cheap ones to put on while I clean the Machine Monkey tips I have.

Also check on the for sale section as someone might be selling exhaust tips.
 
They will eventually come off. I used a small piece of wood against the edge and tapped with a mallet; sprayed it with WD40 when it got sticky, after a minute or two it then came off...
 
Thanks everyone. I've just gone out and pulled and twisted both tips and there's very slight movement in both but think they'll need a bit of extra help from a mallet or similar to get the fully off.

Worried about pulling the entire backbox off with them! Going to give them a good clean when they do come off, but if they don't come up great I'll look at replacements. Any suggestions welcome!

These got a good write up from a few forum members.

https://www.amazon.co.uk/Top-Longer-Stainless-Steel-Exhaust-Polished/dp/B017XLG2H8/ref=sr_1_1?ie=UTF8&qid=1527840385&sr=8-1&keywords=top+longer+exhaust+tips&tag=z4fo-21
 
There's tabs inside them that hold them in place. Including one that is locking in a groove. Twist and pull should do the work.
Here's some pictures on how they look on the inside.
IMG_0351.jpg
IMG_0353.jpg
 
fredej said:
There's tabs inside them that hold them in place. Including one that is locking in a groove. Twist and pull should do the work.
Here's some pictures on how they look on the inside.
IMG_0351.jpg
IMG_0353.jpg

Great, thanks for posting the pictures, really helpful! I'll wait for the wire wool and autosol to arrive before pulling them off and giving them a good clean. Will post some pictures of the before and after too!
 
Ok so twisting and pulling got me nowhere! Looking like I’m going to need to take a hammer to it tomorrow which could be interesting!
 
So I ended up taking some WD40 and a claw hammer to the tips, but wrapped them in a towel before I started tapping them off. They came away pretty easily.

I used wire wool and Autosol on them and they came up pretty nicely considering it looked like they've not been cleaned since the car left the showroom.

I forgot to take before shots but here's a few of them back on the car post wash and polish.

Thanks for everyone's help in the thread.
 

Attachments

  • UNADJUSTEDNONRAW_thumb_7c25.jpg
    UNADJUSTEDNONRAW_thumb_7c25.jpg
    250.1 KB · Views: 1,158
  • IMG_0126.JPG
    IMG_0126.JPG
    375.8 KB · Views: 1,158
  • UNADJUSTEDNONRAW_thumb_7c24.jpg
    UNADJUSTEDNONRAW_thumb_7c24.jpg
    296.1 KB · Views: 1,158
I used a small flap wheel sander on a drill to do the insides.
 

Attachments

  • DSC_0118.JPG
    DSC_0118.JPG
    236 KB · Views: 1,080
  • DSC_0119.JPG
    DSC_0119.JPG
    233.8 KB · Views: 1,080
  • DSC_0120.JPG
    DSC_0120.JPG
    171.7 KB · Views: 1,080
  • DSC_0121.JPG
    DSC_0121.JPG
    169.9 KB · Views: 1,080
  • DSC_0124.JPG
    DSC_0124.JPG
    163.1 KB · Views: 1,080
Back
Top Bottom