
 Raleigh NC
Several years ago the rear window on my top delaminated from the frame. As this was my fun car it was not driven every day and by the time I noticed it, rain had filled the battery compartment and all of the fuses and boxes there were just junk. To say this was a disappointing is an understatement. At the time I was working far to many hour to sort it out so I put a cover on it and put it up on stands. One year turned to 4 before I retired and had time to look at fixing it.
The parts for the battery compartment were the easy part. All still available and once fitted everything electrical started to work again. The top was a no go though. It would unlatch but it would not move. Go figure, the pump location was flooded and the electric motor was a solid rusted brick. A new motor was installed and the assembly relocated to the trunk and the top would go up and down as it should.
Now it was a real decision point. A new top is north of $1,500 just for the kit and no headliner. A local upholstery shop quoted me just over $4,500 to replace it all, including the headliner. That's just not a good investment given the cars age and value. So off to Youtube-University I went to see what my options are. The upholstery shop stated the window could not be re-attached and they would not attempt it. However, several people, some in the upholstery business show several methods for actually accomplishing this task. For me, the intent was to get it back in and at least buy myself some time to drive and enjoy the car while I consider the replacement of the top on my own. I am no slouch at working on cars and have the space and tools to do the job. The real issue is the brittle nature of the plastic parts in these cars and what happens if I break something that is no longer available.
Anyways, I set about fixing the rear window. On my top there was a metal frame that was folded into the fabric so that was helpful to add some rigidity to the structure before gluing the window back in place. The first step was getting this frame fitted back in place and sealed up nice and tight so the window had a solid foundation to be seated against. I used 3M Auto Glass Urethane Windshield Adhesive, 08693 and every clamp I would find at my local harbor freight. The space at the top was the area where the frame was still attached to the top. This was allowed 24 hours to cure and fortunately the frame was solidly set in place. Now, truth be told, it was not a perfect fit, the corners were a problem spot and there were a few high spots that needed to be addressed and that took another day. Its a real truth that that adhesive gets everywhere by pure magic. I went through many, many, many sets of rubber gloves to contain it.
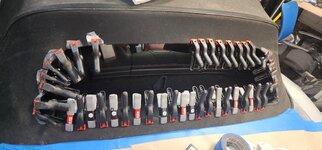
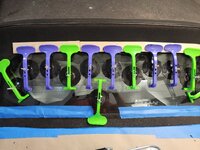
Next came the glass. Setting this in place is a team effort and I enlisted the help of my wife to be inside and hold the window in place while I set the clamps in place. The real challenge here was that the window is so small I couldn't do it all at one time. I had do it in phases that would allow me to get good purchase on the window. This added days to the effort but it is what it is at this point in time. I was very liberal with the adhesive at this time, preferring to have a solid seal over worrying about some oozing on the inside surface. I started by getting the top of the glass set in place and added as many clamps as I could. These are easily sourced on Amazon and contrary to the reviews, they hold it very tight. The secret is a solution of a few drops of dish soap in water in a spray bottle. Wet the surface and they grip very well. This was allowed to cure for 24 hours before working the corners and the bottom. After two more days it was all sealed up. I gave it another day and a half to cure while I worked on other items that needed attention.
Once it was cured I pulled it outside and ran water on it for an extended time. I also placed paper towels on the parcel shelf and in the trunk. After a sever hosing with a high pressure sprayer the towels were bone dry. I didn't care much for the final look without any trim rubber. Off to Amazon I went and found some window trim that I thought would work. It took some modification of the profile but, in the end it served its purpose. While not perfectly straight, moved a bit under the clamp pressure. It does look better with it than without it. I hope to have the top down more than up and well, if someone doesn't like the way it looks then its more of a "them problem", lol.
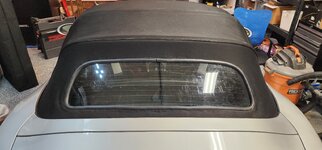
We had several recent days of all day rain so I put the car outside and let it get good and wet. It spent two days in the rain and again, bone dry inside the trunk and on the parcel shelf. This was after running the top up and down over a dozen times to make sure the folding and unfolding didn't introduce a leak.
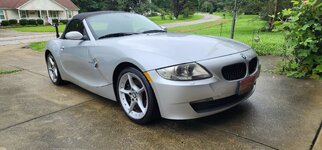
This has held so far but I will be keeping a close eye on it as this is now going to be my daily driver once again. I also used the time it was in the garage to do the following:
New shocks and struts.
New Zenon bulbs and ballasts.
New windshield rubber trim.
Used the cerakoat headlight refurbish kit to remove the yellowing they had.
All new fluids.
New kidney grills as the old ones had some damage.
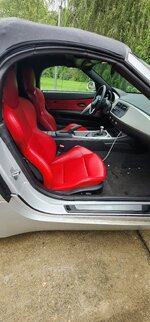
A good cleaning of the interior to get the dust out.
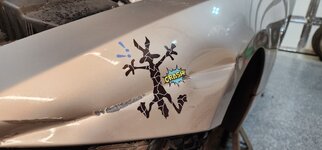
I am still waiting on new floor mats and a new left front fender, (The road runner led Wile-coyote into it at some time while it was parked).
The parts for the battery compartment were the easy part. All still available and once fitted everything electrical started to work again. The top was a no go though. It would unlatch but it would not move. Go figure, the pump location was flooded and the electric motor was a solid rusted brick. A new motor was installed and the assembly relocated to the trunk and the top would go up and down as it should.
Now it was a real decision point. A new top is north of $1,500 just for the kit and no headliner. A local upholstery shop quoted me just over $4,500 to replace it all, including the headliner. That's just not a good investment given the cars age and value. So off to Youtube-University I went to see what my options are. The upholstery shop stated the window could not be re-attached and they would not attempt it. However, several people, some in the upholstery business show several methods for actually accomplishing this task. For me, the intent was to get it back in and at least buy myself some time to drive and enjoy the car while I consider the replacement of the top on my own. I am no slouch at working on cars and have the space and tools to do the job. The real issue is the brittle nature of the plastic parts in these cars and what happens if I break something that is no longer available.
Anyways, I set about fixing the rear window. On my top there was a metal frame that was folded into the fabric so that was helpful to add some rigidity to the structure before gluing the window back in place. The first step was getting this frame fitted back in place and sealed up nice and tight so the window had a solid foundation to be seated against. I used 3M Auto Glass Urethane Windshield Adhesive, 08693 and every clamp I would find at my local harbor freight.
The space at the top was the area where the frame was still attached to the top. This was allowed 24 hours to cure and fortunately the frame was solidly set in place. Now, truth be told, it was not a perfect fit, the corners were a problem spot and there were a few high spots that needed to be addressed and that took another day. Its a real truth that that adhesive gets everywhere by pure magic. I went through many, many, many sets of rubber gloves to contain it.Next came the glass. Setting this in place is a team effort and I enlisted the help of my wife to be inside and hold the window in place while I set the clamps in place. The real challenge here was that the window is so small I couldn't do it all at one time. I had do it in phases that would allow me to get good purchase on the window. This added days to the effort but it is what it is at this point in time. I was very liberal with the adhesive at this time, preferring to have a solid seal over worrying about some oozing on the inside surface. I started by getting the top of the glass set in place and added as many clamps as I could. These are easily sourced on Amazon and contrary to the reviews, they hold it very tight. The secret is a solution of a few drops of dish soap in water in a spray bottle. Wet the surface and they grip very well. This was allowed to cure for 24 hours before working the corners and the bottom. After two more days it was all sealed up. I gave it another day and a half to cure while I worked on other items that needed attention.
Once it was cured I pulled it outside and ran water on it for an extended time. I also placed paper towels on the parcel shelf and in the trunk. After a sever hosing with a high pressure sprayer the towels were bone dry. I didn't care much for the final look without any trim rubber. Off to Amazon I went and found some window trim that I thought would work. It took some modification of the profile but, in the end it served its purpose. While not perfectly straight, moved a bit under the clamp pressure. It does look better with it than without it. I hope to have the top down more than up and well, if someone doesn't like the way it looks then its more of a "them problem", lol.
We had several recent days of all day rain so I put the car outside and let it get good and wet. It spent two days in the rain and again, bone dry inside the trunk and on the parcel shelf. This was after running the top up and down over a dozen times to make sure the folding and unfolding didn't introduce a leak.
This has held so far but I will be keeping a close eye on it as this is now going to be my daily driver once again. I also used the time it was in the garage to do the following:
New shocks and struts.
New Zenon bulbs and ballasts.
New windshield rubber trim.
Used the cerakoat headlight refurbish kit to remove the yellowing they had.
All new fluids.
New kidney grills as the old ones had some damage.
A good cleaning of the interior to get the dust out.
I am still waiting on new floor mats and a new left front fender, (The road runner led Wile-coyote into it at some time while it was parked).

 south yorkshire