Project Cheapskate has left the building

Well it's been a while, but I am making a little progress. Done a few little clean up bits, but wasn't worth getting too involved all the time the EPS issue was hanging over me. so last Sunday I whipped out both seats and the steering wheel. Then I phoned the surgery to book a tetanus jab!!!
On the plus side, in amongst the 20 years of debris I recovered 87p and an as new pair of genuine Rayban Wayfarers. 8)

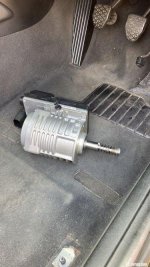
An hour later the EPS motor was in a box and I'd booked ECU Testing through Ebay.
True to form they phoned me at 8am Monday, emailed me a postage label and DHL collected that afternoon. Tuesday lunchtime they called to confirm they'd found a fault, rectified it and were posting it back. It got here 11am this morning!
So today I am taking advantage of the sunny weather to clean, recolour and seal the seats. Then it'll be a deep clean of the carpets and put everything back together.

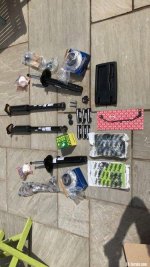
In the meantime I've gathered together a complete set of front and rear shocks, top mounts etc, new plugs, known good coils from Stuart, a new centre storage door from Barry, a vanos repair kit from X8R, various trim clips, LED bulbs etc.

Plan is to get it steering properly then use it for a month until the MOT runs out, to hopefully shake out any other issues it's hiding.
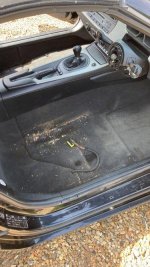
Health hazard.JPG
EPS out.JPG
Goodies.JPG
 
Zedebee said:
That pile of goodies doesn’t look particularly cheapskate.
Well by keeping an eye on Autodoc discounts and finding some basically fitted but never used rear shocks, added to the generosity of a couple of forum members, that little lot has come to a little under £375. :thumbsup:
 
Just a heads up mate,if you doing rattle rings on vanos supplied by x8r,they told me they may have produced a bad batch of undersized 7.3 mm instead of 7.5mm width which causes the needle bearings to be squeezed a bit to much so they don’t spin inside pistons.
 
Robster68 said:
Just a heads up mate,if you doing rattle rings on vanos supplied by x8r,they told me they may have produced a bad batch of undersized 7.3 mm instead of 7.5mm width which causes the needle bearings to be squeezed a bit to much so they don’t spin inside pistons.

What?!?

That’s pretty significant?
 
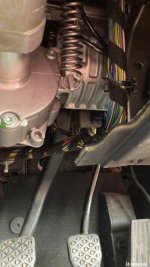
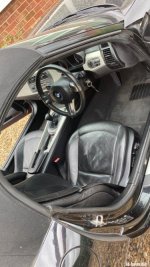
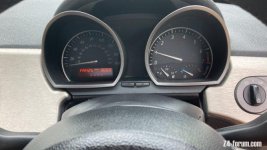
Bit more progress last night and this morning. Took a while, dodging the showers, but now have the EPS motor back in, cockpit rebuilt, battery reconnected, started up and no little yellow steering wheel.

The eagle-eyed may spot that the sacrificial section has been removed from under the column. This is BMWs way of getting the column out. The chap I bought it off took it to a 'specialist' who lowered the column, including butchering the panel, then decided it was too difficult and put it back together.
I'm not condoning cutting that section out, but it did make it a bit easier to get at the mounting bolts for the motor.

Next stop, sort out the misfire from cold.
EPS in.JPG
Rebuilt.JPG
Lights check.JPG
 
Well work was slack so I decided to look for this misfire.
Already had a new set of plugs and a known good set of coils from Stuart, so decided to dive in and change one thing at a time until I cured it.
Well that plan soon changed!
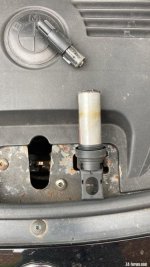
Now I'm not usually one to jump to conclusions but I have a sneaking suspicion No1 coil may have been the culprit. I'm basing this on the fact that the top half of it lifted away as I tried to unplug the electrical connector. Must have just been resting on the bottom half!
I had to resort to hammering a socket onto the stump to get the remains out.
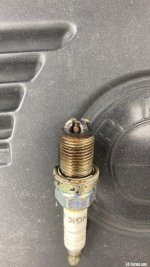
Add to the mix an unmatched set of spark plugs that look like they were new when Pontius was still an air cadet.

Needless to say it seems to be running a little better now!
No1 Coil.JPG
Old plug.JPG
 
Got a bit of momentum going at last so decided today to tackle the rear shocks and various bits and bobs in that general area.
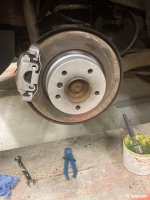
So the callipers got a lick of paint, as did the disc hubs. Found the drain bungs already removed so someone in the past has cared a little bit at least.
However, I may have discovered a new record! At 149425 recorded miles the rear top mount interior insulation was unmolested and sure enough the shocks that came off are dated 2003. Apart from filling the gap I doubt they were achieving anything.
Downside of course being that if the front is the same then removing the knuckle bolts is not going to be the easiest of tasks!

Another layer of smoothrite on the callipers tomorrow then the wheels can go back on.
While the boot is apart I may as well move the roof motor as well.

Coming along nicely and on a fairly low budget.
 
enuff_zed said:
Got a bit of momentum going at last so decided today to tackle the rear shocks and various bits and bobs in that general area.
So the callipers got a lick of paint, as did the disc hubs. Found the drain bungs already removed so someone in the past has cared a little bit at least.
However, I may have discovered a new record! At 149425 recorded miles the rear top mount interior insulation was unmolested and sure enough the shocks that came off are dated 2003. Apart from filling the gap I doubt they were achieving anything.
Downside of course being that if the front is the same then removing the knuckle bolts is not going to be the easiest of tasks!

Another layer of smoothrite on the callipers tomorrow then the wheels can go back on.
While the boot is apart I may as well move the roof motor as well.

Coming along nicely and on a fairly low budget.
If you don't mind me asking what colour smoothrite did you use?
 
MikeyH said:
enuff_zed said:
Got a bit of momentum going at last so decided today to tackle the rear shocks and various bits and bobs in that general area.
So the callipers got a lick of paint, as did the disc hubs. Found the drain bungs already removed so someone in the past has cared a little bit at least.
However, I may have discovered a new record! At 149425 recorded miles the rear top mount interior insulation was unmolested and sure enough the shocks that came off are dated 2003. Apart from filling the gap I doubt they were achieving anything.
Downside of course being that if the front is the same then removing the knuckle bolts is not going to be the easiest of tasks!

Another layer of smoothrite on the callipers tomorrow then the wheels can go back on.
While the boot is apart I may as well move the roof motor as well.

Coming along nicely and on a fairly low budget.
If you don't mind me asking what colour smoothrite did you use?
I have a selection and use them as the fancy takes me, as long as it suits the car.
The disc hubs were easy, silver. Always remember to overlap the front face a few mm or you're bound to see a thin rusty line when the wheel is on.
For the callipers on this one I've used bright yellow.
I'll get a photo when it's completed..................... if I remember.

The last one 'Project Freeleeta' was also black but had a red interior so I did the callipers red to match.

Trick is a lot of wire brushing first, a small brush, thin coats and patience. Plus a rag with a bit of white spirit to remove any slips onto the disc or pads.
Usually I combine it with a full brake refresh so do the painting off the car, but in this case the brakes look pretty good and the budget doesn't, so they are being done still bolted on.
 
I just did mine because I replaced rear handbrake shoes,pistons out,I sprayed silver heatproof paint this time after messing around with those brake painting kits you brush on one side let dry then do the other.
 

Attachments

  • 683BF8BA-7DAE-4281-B4BF-27088F8F2849.jpeg
    683BF8BA-7DAE-4281-B4BF-27088F8F2849.jpeg
    148.3 KB · Views: 499
Back
Top Bottom