Chezsherman told me he had checked his roof drains and I was keen to see how he'd done this.
Cherrym said we could meet at his garage and check all three Zeds - great idea!
I took a few photos and it was a fairly straightforward task so I thought I'd post them up to encourage others to have a go.
Considering the cost of a roof motor replacement it would be a useful check. It's certainly good to know all of our Zeds are fine!
There are drains on both sides of the Zed and you will need to remove the rear wheel first so that you can remove this panel
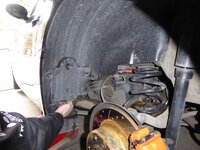
It's held on with a 10mm bolt top centre and two star drive bolts either side
TAKE NOTE - there is another 8mm bolt beneath the sill that needs removing before the panel can come away. If you look under the sill you will see a plastic retaining section (see next photo - poor image) IT IS THE 8mm BOLT IN THE TOP RIGHT CORNER OF THE PHOTO BELOW THAT NEEDS REMOVING. It's a bit awkward but very short and doesn't take many turns to remove.
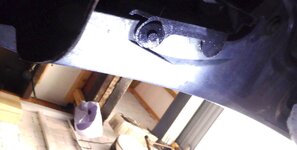
When you have removed the three fasteners at the top and the one small bolt underneath you will be able to remove the panel.
The panel has been removed in this next photo and where the torch is shining is where you will find the small bolt. I found I had to get my head right underneath the sill to see it clearly (SO MAKE CERTAIN THE ZED IS SECURE)
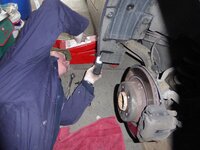
It's just up and slightly forward from this point that you'll find this cap (see next photo) fitted to the end of the drain channel
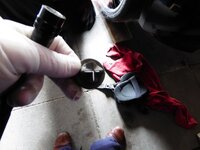
It fits into a groove all the way around the end of the drain channel and I found it a bit awkward to remove as it was tight but it does come off.
On Craig's Zed this part (see next photo) also came away from the end of the drain channel
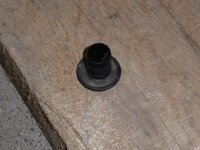
This just pushes up into the end of the channel and it makes fitting the caps easier as they can be fitted first onto this and then this pushed securely into the end of the drain channel.
Mike had a length of wire with a brush on each end which we used to push up the drain channels and check they were clear (a useful piece of kit - it's a flexible 'snake' cleaning brush for a trumpet or cornet - see on ebay - that he'd previously bought for use on an MX5). Craig had used a piece of coat hanger wire previously. The drivers side should push up through the top of the channel into the roof storage area. The passenger side drain channel wont push all the way through as the roof motor is in the way - (go steady you don't want to damage the motor or the watertight seal on facelift motors).
Once you've checked that the channels are clear (I've heard some owners then pour water in at the top to check this - we didn't bother) you can replace the panel - fit it at the bottom first - the small bolt can be a bit awkward but not that difficult) then the three fasteners at the top. Check all is secure and then replace the wheel - job done.
We all left the drain covers off - they are quite difficult to refit but the main reason was that we felt they would just retain any obstructions and cause water not to flow freely (despite the thin open slits)
Not a very technical 'How to' but I hope it encourages some to have a go - use in conjunction with other guides if necessary.
It's good to know that all three Zeds are ok and we'll probably have another checking session some time in the future.
Thanks Craig and thanks Mike
:driving:
Cherrym said we could meet at his garage and check all three Zeds - great idea!
I took a few photos and it was a fairly straightforward task so I thought I'd post them up to encourage others to have a go.
Considering the cost of a roof motor replacement it would be a useful check. It's certainly good to know all of our Zeds are fine!
There are drains on both sides of the Zed and you will need to remove the rear wheel first so that you can remove this panel

It's held on with a 10mm bolt top centre and two star drive bolts either side
TAKE NOTE - there is another 8mm bolt beneath the sill that needs removing before the panel can come away. If you look under the sill you will see a plastic retaining section (see next photo - poor image) IT IS THE 8mm BOLT IN THE TOP RIGHT CORNER OF THE PHOTO BELOW THAT NEEDS REMOVING. It's a bit awkward but very short and doesn't take many turns to remove.

When you have removed the three fasteners at the top and the one small bolt underneath you will be able to remove the panel.
The panel has been removed in this next photo and where the torch is shining is where you will find the small bolt. I found I had to get my head right underneath the sill to see it clearly (SO MAKE CERTAIN THE ZED IS SECURE)

It's just up and slightly forward from this point that you'll find this cap (see next photo) fitted to the end of the drain channel

It fits into a groove all the way around the end of the drain channel and I found it a bit awkward to remove as it was tight but it does come off.
On Craig's Zed this part (see next photo) also came away from the end of the drain channel

This just pushes up into the end of the channel and it makes fitting the caps easier as they can be fitted first onto this and then this pushed securely into the end of the drain channel.
Mike had a length of wire with a brush on each end which we used to push up the drain channels and check they were clear (a useful piece of kit - it's a flexible 'snake' cleaning brush for a trumpet or cornet - see on ebay - that he'd previously bought for use on an MX5). Craig had used a piece of coat hanger wire previously. The drivers side should push up through the top of the channel into the roof storage area. The passenger side drain channel wont push all the way through as the roof motor is in the way - (go steady you don't want to damage the motor or the watertight seal on facelift motors).
Once you've checked that the channels are clear (I've heard some owners then pour water in at the top to check this - we didn't bother) you can replace the panel - fit it at the bottom first - the small bolt can be a bit awkward but not that difficult) then the three fasteners at the top. Check all is secure and then replace the wheel - job done.
We all left the drain covers off - they are quite difficult to refit but the main reason was that we felt they would just retain any obstructions and cause water not to flow freely (despite the thin open slits)
Not a very technical 'How to' but I hope it encourages some to have a go - use in conjunction with other guides if necessary.
It's good to know that all three Zeds are ok and we'll probably have another checking session some time in the future.
Thanks Craig and thanks Mike
:driving: