Yeh that's how I went about it, insert was 0.001" oversize and needed to be pressed into tube. What's needed after that is tack weld and put it between centres and check the run out on it and adjust, then it can be welded. I was very surprised at how far the prop ran out!GuidoK said:So how do you extend (or shorten) a propshaft?
You cut it and use an inner sleeve, or is this outer measurement turned on a lathe and an outer sleeve fitted?
I'd say use an inner sleeve in slight oversize, heat the propshaft and cool the innersleeve, and crimp fit it in place. After that weld the edges.
You are using an out of date browser. It may not display this or other websites correctly.
You should upgrade or use an alternative browser.
You should upgrade or use an alternative browser.
Newbie with a serious tuning disorder.
- Thread starter Stevie.w
- Start date

A few other pics.


I'm trying to put aside as much time for myself to crack on with the Z4, but way to much customers work to be done. Been in touch with Royal steering wheels and placed an exchange order for re trimmed wheel. I've went for black alcantara with extra padding and tri colour stitching. The gators are being done as well, should freshen up the interior. Oh and will match new gear knob already bought.
I'm trying to put aside as much time for myself to crack on with the Z4, but way to much customers work to be done. Been in touch with Royal steering wheels and placed an exchange order for re trimmed wheel. I've went for black alcantara with extra padding and tri colour stitching. The gators are being done as well, should freshen up the interior. Oh and will match new gear knob already bought.
Attachments
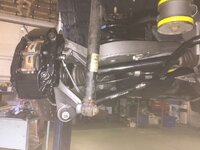
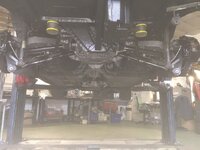
Another couple of late nights on motor and now started to cover front braking system. The only poly bush required on the front is for the wishbone so that's been fitted.
The front hubs have been modified so they accept a spacer/bush instead of a tapered track rod end. This has been done because the quick rack I used now sits lower than standard.

Then came the bit I've been waiting for, fitting the discs and calipers.

Very happy with the way everything bolted up, I'll need to check and see if there needs to be steering stops as there seems to be a lot of steering lock.
The front hubs have been modified so they accept a spacer/bush instead of a tapered track rod end. This has been done because the quick rack I used now sits lower than standard.
Then came the bit I've been waiting for, fitting the discs and calipers.
Very happy with the way everything bolted up, I'll need to check and see if there needs to be steering stops as there seems to be a lot of steering lock.
Attachments
 By the seaside...
They are looking their age, I'll pop on to do list. Oh and shopping list, which is turning out to be a rather thick folder with fairly serious receipts tucked in it.PerryGunn said:All those lovely new & custom made bits and you're using rusty wheel bolts
:wink:


Stevie.w said:

That's a very tight fit for the exhaust. Are you able to still fit a heat shield between the exhaust and the chassis?
Stevie.w said:A few other pics.
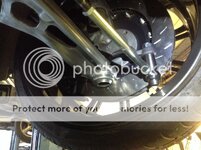
You made that rear brake hose yourself?
I still need to make somthing with a banjo bolt myself too.
You don't get any leaks with the bolt (and washer) directly to the caliper housing? they mostly have a tapered inside insert that is the seal surface.
It looks a lot closer in pic but yeh there's heat wrap for exhaust and I'll be making heat shields with heat tape applied to them.GuidoK said:Stevie.w said:
That's a very tight fit for the exhaust. Are you able to still fit a heat shield between the exhaust and the chassis?
Stevie.w said:A few other pics.
You made that rear brake hose yourself?
I still need to make somthing with a banjo bolt myself too.
You don't get any leaks with the bolt (and washer) directly to the caliper housing? they mostly have a tapered inside insert that is the seal surface.

All Brembo calipers as far as I've seen use banjo bolt with copper washers and both my sets are the same. I made up the rear brake lines with Goodrige fittings and hose, their one piece lines fitted with p clips. I deleted the ridged part of the original line to simplify.
I've put it of for long enough, but it's time to start rebuilding the body work. So here's a couple of pics.

These were last night, today I spent more time on the rear panels and got the boot lid on. I probably spent longer adjusting the panel gaps than it took to fit them all. The paint finish is excellent and looking forward to seeing it fully assembled and ready for its final polish and sealant.

These were last night, today I spent more time on the rear panels and got the boot lid on. I probably spent longer adjusting the panel gaps than it took to fit them all. The paint finish is excellent and looking forward to seeing it fully assembled and ready for its final polish and sealant.


Ah the tunnel it just seems to be never ending, there's always more issues to deal with. Couple of deliveries before the weekend and another major hurdle could be achieved. A drive around the block would be a good end to the weekGrumpyowl said:Looking good stevie w 8)
You can see light at the end of the tunnel now.

Stevie.w said:Ah the tunnel it just seems to be never ending, there's always more issues to deal with. Couple of deliveries before the weekend and another major hurdle could be achieved. A drive around the block would be a good end to the weekGrumpyowl said:Looking good stevie w 8)
You can see light at the end of the tunnel now.
Good luck and Fingers x for the weekend then
If it happens pictures or a vid would be good.
Stevie.w said:Will do
The only bad choice on the whole build getting such a good paint job Stevie, you won't want to take it anywhere now..
The only way round it is to do like when you get a new pair of boots, shrug the shoulders, drag the toes along the workshop floor to scuff them and you're away.
Take it straight to Morrisons, park across 2 spaces at the far end of the car park, go and have a brew and hey presto, you're in ding city and away you go.
Fab build btw.
john-e89 said:Stevie.w said:Will do
The only bad choice on the whole build getting such a good paint job Stevie, you won't want to take it anywhere now..
The only way round it is to do like when you get a new pair of boots, shrug the shoulders, drag the toes along the workshop floor to scuff them and you're away.
Take it straight to Morrisons, park across 2 spaces at the far end of the car park, go and have a brew and hey presto, you're in ding city and away you go.
Fab build btw.
Your dead right John, not looking forward to seeing it all peppered with chips and dings. Thing is I've never built show queens, I need to get out there and have some fun & scare myself, but it'll probably be on weekends/ shows and planned road trips. The first hopefully will be the Silverstone Classic. The second will be a trip to KW's head quarters in Germany where I've been invited to have a bespoke set of Clubsport's manufactured. Really looking forward to seeing their facility and seeing the car on their chassis dyno. They say it'll be a couple of days spent fine tuning their kit, but will be a great experience. Oh by the way seems they have access to a track, purely for testing their suspension.
")

You got me thinking ///MmmJasey said:You gonna put a ///M badge on the back - even the snobbiest of snobs wouldn't begrudge you that
Infact maybe a ///M+ :evil: