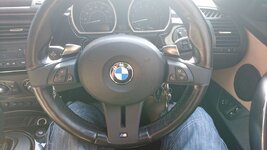
Appreciate the comments guys! Really happy with the outcome its such an improvement over what I had...
So on to the notes about the process and what I'd change if I was to do it again....
I'll start with the paint, this is what I used http://www.ebay.co.uk/itm/262623852897?_trksid=p2057872.m2749.l2649&var=561520531274&ssPageName=STRK%3AMEBIDX%3AIT To say it was difficult is an understatement! The finish was decent but actually using the rattle can was a massive PITA!! Normally with a spray can you just use your index finger on the nozzle but my can was so stiff I had to use 2 hands and was pressing with my thumbs to be able to put enough constant pressure down on the nozzle to get the paint to come out smooth.
I did just re read the advert and saw that they state in the listing "To achieve an even better finish and eject more paint from the can, consider a spray gun trigger (Available in our eBay store)" and to be honest I didn't take any notice of that when ordering but now it makes sense, although probably should have read "this stuff is a bloody nightmare to use unless you buy a spray gun trigger" So thinking about it I would probably uxe this paint again, but absolutely no chance Id even try without one of these
http://www.ebay.co.uk/itm/Spray-Paint-Aerosol-Applicator-Trigger-Gun-Black-Professional-Rapide-Machine-/162434867933?hash=item25d1df62dd:g:gnkAAOSwax5Yy9m2
Also trying to get it all done in a day is probably not the best idea, there are a couple of minor imperfections one from dust lading on the paint before it was touch dry and another from a little bit of splatter before I realised I needed top hold the can with 2 hands and use both thumbs. I would really have liked to be able to very lightly sand again on those areas before the next coat but I was going out at 6pm and needed the car the following morning so just didn't have time.
Also on spraying, I definitely made it more difficult for myself around the edges by having the pieces flat on the surface, I could have made some little stands with cardboard and stuck the parts to them with blutac to raise them up to make the edges much easier to coat smoothly.
Also I wasn't careful enough removing the masking tape, I lifted a tiny bit of the finish around the //M badge I touched it in by spraying some paint directly into the lid of the can and using a very fine paint brush but could have been better if I'd just been more careful...
All in all though really happy with the result for a total of £4.49 spent using a few other bits I already had in I have made a massive improvement to my cars interior, just wish I'd known to spend the extra £2.70 on the gun attachment