Luke and his Z - Getting there!

Oh Luke....what have you started....I'll be following this with envy now. Saw Ranski's quad conversion on Sunday and it is awesome. Count me in if you do any bulk buying of the components! :thumbsup:
Merry Christmas BTW
 
The tips look good - but the important work is the muffler/silencer as you will need to understand how the inside of the OEM muffler is laid out if you plan to do a cross pipe off it, otherwise you won't get an even flow - even worse drone!

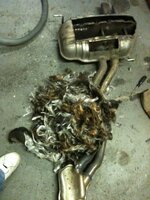
The below picture shows the standard OEM muffler including all the baffling that was inside it - you would need to understand any internal chambers when connecting the cross pipe

upu3uty4.jpg

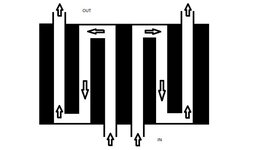
I and several others used a specialist to manufacture a new muffler, it's still an 'unrestricted' muffler, more so as it doesn't contain any baffling. This is the layout with gives zero drone

qa5udage.jpg
 
Leesfarm07 said:
Oh Luke....what have you started....I'll be following this with envy now. Saw Ranski's quad conversion on Sunday and it is awesome. Count me in if you do any bulk buying of the components! :thumbsup:
Merry Christmas BTW

:rofl: that's what the forum is all about! Glad to be of service!! :D

TBH it was looking at the thread by ranski that got me thinking about it in the first place and looked like a relatively simple mod.

Richard, I saw the muffler that was created , and don't understand how that is not as loud if not louder than the first one with 2 rear silencers?! If this is basically a straight through system with 2 bends in each section then enclosed to hide the bends... Did you have a sound clip on the thread? Thats Great if it achieves that, as it looks like a simple muffler to make and i will probably make that instead of changing the OEM one if the drone is not there. I'm sure the box wouldn't cost much to make either. May be on to a winner! :thumbsup:
I remember when I first saw your picture of the inside of the muffler and thought that was a huge amount in there!
 
Hi Luke, I thought the same when I visited the exhaust specialist but I tool a punt and there is no drone - it doesn't even have any baffling inside so it's even more free flowing than the OEM muffler - not sure of this has given any marginal increase in performance?

Mac and richardG (maybe one more?) have had the same muffler fitted, what is interesting is that mine has a deeper note than Mac's which we think is down to the fact that my tips have a wider diameter (worth mentioning incase your after a noisy system there isn't any popping or rasping due to the layout of the muffler)

But yes, if you can build the muffler yourself then I would go for that option, otherwise it's a £650 - £700 to use the same firm as we did

PS don't forget to insulate / wrap the crossover pipe!
 
Forgot to add - The first quad conversion I had used two mufflers - but these were small and straight through in design, with that made them very loud with an awful drone
 
So...
Update on bits installed yesterday!...

Step one... I Pulled of gear knob (sat in drivers seat and with two hands just pulled as hard as poss!) then pulled up gaiter ring.
Gear knob and gaiter...
00EE228A-86C9-4180-8F4B-BAD0B0DB1C0A-4550-00000455960111CF.jpg


Old and new gaiters
04203E8D-9F99-4EA0-88D2-AC88412AC099-4550-000004559BB01408.jpg


There are 4 clips on the bottom of the Gaiter Ring. The old one was glued on and goes through the clips too. This new one was elastic and folded up et the bottom of the ring so it wasn't going anywhere once in position. Simply popped clips through the slits in the gaiter and job done! Little tricky lining them up initially because its so tight so had to be patient!
970E6DCB-6DA5-47AF-A51B-23ADF6795457-4550-00000455805FEAEB.jpg


Gaiter all ready to go back on the car
D702F492-5D5D-4A02-8476-894EDF77C28A-4550-000004557B518B0B.jpg


Finished! :D
7BA19559-4BB9-42A9-AA30-7332102FB5DD-4550-00000455761D238F.jpg


Quick and easy mod that makes a HUGE difference!
I really like the ZHP knob but am glad I now got the Performance Knob. If feels so much better!!
 
Handbrake...

First I took up the back end of the handbrake
515BD46F-3D59-412F-8ADA-1F8AF8D63CCF-4550-000004556A9B09A0.jpg


Then pulled the gaiter forward over the OEM lever to expose cable tie holding it in position
5833DF57-36A0-4334-A1C8-22816B379461-4550-0000045564D0F9B1.jpg


I then cut off cable tie and pulled off the gaiter
85472FBD-6F8D-4348-9DAE-458BDA26D1DA-4550-00000455705A8F4F.jpg


The old lever then easily pulls off the end
A4E38F8D-FC81-4284-B5B6-5104AAE5123E-4550-000004555999509B.jpg


I then place on the new one and lined up grub screws to each side (left and right) to hold it in position
260C0292-8EB9-4021-81BE-8FD267EFEB0F-4550-00000455535DE6AB.jpg


Grub screws now done up
14590BC6-10DE-4539-BE00-FF61E1E715F6-4550-00000455491393CE.jpg


Placed rings over lever to hide slot for the grub screws.
7FB7D1FB-DBAA-44C6-8F72-55F20D3CC1DC-4550-00000455379403D9.jpg


Re cable tied the gaiter to the base of the new handbrake lever, pulled gaiter through and pushed base back into position! Done!
D11A58A6-6EBB-462E-B6C3-70E22EF41702-4550-000004553CA6EC13.jpg


MachineMonkey sent me a how to for the handbrake removal etc.
Was spot on! Nice easy install and again makes a huge difference!
I have to say the MachineMonkey did a FANTASTIC job of making this and is GREAT quality! Very, very impressed!
 
Radio knobs (again from MachineMonkey)...

Sat nav hole is a little bigger than the volume control
482B960D-86A6-4B53-AA03-5767D89B80A6-4550-000004552C817AB0.jpg


Pull of old one, put on new one, do up small grub screw
DF13797E-805C-4C54-9B3D-C66426CD42F0-4550-00000455250556FF.jpg


Put on black rings (same as handbrake lever)
CC02EC97-9542-4041-9795-33E9AEDC8457-4550-000004551B9B41DB.jpg


All done!
704BB1A4-A932-4C6E-9F23-075A0B6802E0-4550-0000045514B87175.jpg


Again, MachineMonkey did a great job on these too
Finished look inside looks great! I I do say so myself!! :rofl:
 
Carol M said:
Luke, they look really good.
The radio knobs looks really neat. Great job. :thumbsup:

Thank you! The radio knobs were the fiddlyest of all jobs done yesterday but very worth it!

Last but not least was the iPod integration unit (Connects 2)
Basically take out wires from CD changer and pop in! Couldn't be more easy!!

DE02D9B2-5016-49B7-B711-01A82D8BE678-4550-00000521805949EC.jpg

Still a little tidying to do!

Very Happy Z on Christmas!!
 
Looking good Luke.

Just one question, how easy was it to attach the new gaitor to the plastic mount ring? Did you need to glue the new gaitor on? After seeing Swiftly thread http://www.z4-forum.com/forum/viewtopic.php?f=2&t=45557 the other day, another member had said it needed to be glued onto the ring.
 
BrianD said:
Looking good Luke.

Just one question, how easy was it to attach the new gaitor to the plastic mount ring? Did you need to glue the new gaitor on? After seeing Swiftly thread http://www.z4-forum.com/forum/viewtopic.php?f=2&t=45557 the other day, another member had said it needed to be glued onto the ring.

Thanks!

Nope, I will write an explanation with the pictures in a sec but there are 4 hooks that hold the gaiter in place.
The original is glued in to place but I saw no need with this new one because it tucked under the bottom edge of the ring so it would only pull into its self (making it tighter) whilst putting the ring back on the car, and not come out. If that makes sence!?
 
Hi Luke. Merry Christmas. Where abouts did you buy the gaitor from that's a lovely bit of kit (sorry if I've missed it elsewhere in the thread)
 
Leesfarm07 said:
Hi Luke. Merry Christmas. Where abouts did you buy the gaitor from that's a lovely bit of kit (sorry if I've missed it elsewhere in the thread)
The gaiter was from eBay... I will find the link for you
Here it is...
http://www.ebay.co.uk/itm/BMW-E46-E36-Z3-Z4-BLACK-SUEDE-GEAR-BOOT-SILVER-ST-/280486009166?pt=UK_CarsParts_Vehicles_CarParts_SM&hash=item414e44d94e
 
LukeMace said:
Leesfarm07 said:
Hi Luke. Merry Christmas. Where abouts did you buy the gaitor from that's a lovely bit of kit (sorry if I've missed it elsewhere in the thread)
The gaiter was from eBay... I will find the link for you
Here it is...
http://www.ebay.co.uk/itm/BMW-E46-E36-Z3-Z4-BLACK-SUEDE-GEAR-BOOT-SILVER-ST-/280486009166?pt=UK_CarsParts_Vehicles_CarParts_SM&hash=item414e44d94e
Cheers :thumbsup: I do like that with the silver stitching. Ordered :D
 
Luke, great write up :thumbsup:

If/when I get round to changing my gaiters this will be one of the threads I use - thanks mate :D
 
Back
Top Bottom