Hydraulic steering conversion - N52-engined Z4 models

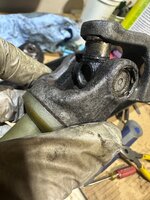
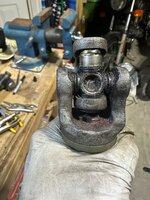
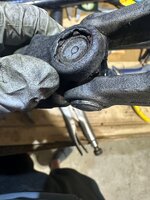
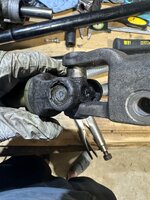
The spline joint should go far enough down so that the bolts can pass through to secure it in place, it's difficult to place any real force on the shaft. Check splines for damage and grease well. I grabbed the middle of the shaft and pushed hard back and forth until it seated. You can try, as a last resort, to open the joint up very slightly. Some pictures would help
 
The splines are in good shape and I can fully seat each end, but when I do, it pulls the other side out just too far to where the pinch bolt will hit the splines instead of that little groove. I did read about modifying the telescoping portion of the intermediate shaft. Apparently if you disassemble the shaft and remove a pin or stop dimple, it will allow extra extension. I’ll just need to make sure there’s enough overlap for it to be strong. I probably need a half inch at most.
 
AlexG1080 said:
The splines are in good shape and I can fully seat each end, but when I do, it pulls the other side out just too far to where the pinch bolt will hit the splines instead of that little groove. I did read about modifying the telescoping portion of the intermediate shaft. Apparently if you disassemble the shaft and remove a pin or stop dimple, it will allow extra extension. I’ll just need to make sure there’s enough overlap for it to be strong. I probably need a half inch at most.

Not going to advise it but can explain how to do it.

First have you got large plastic caps or rubber caps each end of the shaft? If plastic you'll probably destroy it trying to get it out. If rubber then it's a fiddle but you can force it past the UJ.

Firstly remove the plastic over the slider. Be careful as its easy to snap the clips.

With all the plastic covers off, with no force on sliding open but force on close, open and close the slider a few times. The rubber/plastic cap will start to come out. Now lever it out.

With the cap out close the slider once again and the end you removed the cap will have the slider come out and you'll see the pin to remove. Pulls out easy with round nose pliers.

Assemble it all but be very careful as the slider now will pull all the way out and you be holding two halves. Probably best to tape the two halves together whilst trying to install.
 
Thank you for instructions! It all worked as you said. Interestingly, I did nothing but disassemble it, and reassemble and now it has an extra 10mm of extension. I wonder if there was corrosion or debris preventing that extra extension. I reinserted the ball bearing sleeve and the c clip as well and I got the extra extension I needed. It even stops when trying to fully extend so it feels safe. Not sure exactly what happened but hey it works now. Thanks!
 
The sliders need servicing imo, so disassembly, a bit of grease and reassembly is good for it. The ball bearings in the plastic casing can get rusted up.

Once installed I'd advise putting a heavy amount of grease on the outside of the lower UJ as it gets all the damp with road grime on it down there.
 
Ya the ball bearings were a little rusted, I suspect that was the issue. I cleaned and greased it all and it’s installed with each end fully seated.
 
AlexG1080 said:
Ya the ball bearings were a little rusted, I suspect that was the issue. I cleaned and greased it all and it’s installed with each end fully seated.

Great :thumbsup:
 
For those who went through with this, did you install the supplemental "cooling loop" for the PS fluid? I'm trying to figure out how important that is.
 
I am planning on installing the loop. For all the work I’ve done, it’s a small amount of extra work. That being said it seems like it’s more important if you’re going to be doing track days with a lot of intense steering.
 
Alex,

Can you take pictures when you install the loop? I'm wondering how easy / hard it will be given the mount for the loop isn't in the right spot on the Z4.

I don't know if it will be as effective, but I'm considering this finned ("remote") resevoir with filter:

https://www.kartek.com/parts/kartek-offroad-billet-aluminum-finned-power-steering-reservoir-with-filter-and-pressure-relief-valve.html

I've looked into more "serious" PS coolers that could be mounted near the radiator but it looks like it would need some kind of mounting bracket to keep it in place.
 
Will do, I missed the idler pulley in the parts list and my steering rack didn’t come with any of the bolts used in the banjo fittings so have to order a few things and I’ll hopefully have it all sorted out next week.
 
Found this in a Reddit posting on N52 cam bearing ledge wear (please ignore the "THIS"), but think the picture is pretty helpful for anyone considering how to route the belt, position of the PS pump, etc:

N52_serpentine_b3hdo3kqlmgc1.jpg
 
Hello,

I made my account just to share my experience related to the conversion of electrical to hydraulic steering. With no using new shaft from Z4M.

1/ The conversation was done on M46 engine, on the car which I converted from right-hand drive to left. Only a hydraulic pump is needed, not any additional pulley, belts, etc. The hydraulic pump is behind water on the same shaft.

2/ I did not buy a middle shaft from Z4 M, just exchanged the top part E46 to Z4 one in my leaving room. It is not hard, I used dremmel tool to "unlock" small bearings and pull them out.

3/ To turn off the steering dash light I used Scanner 1.4. Very easy just put out the tick for the steering light from the dash menu. Also the same tool to adjust the steering sensor.
What did you use the dremel for? I’m trying to get my old U joint out without destroying it (I have a replacement coming, but it’s in China and I’m impatient). I ground the stakes out with a dremel and a carbide bit.

See the pics below for where I’m stuck. Pushing the joint through until it bottoms out in the middle of the yoke doesn’t enough protrusion to grab onto the cap and pull it out. Also, the cap that I can grab onto inside the yoke wont pop up off the u joint shaft. Wondering if it’s not meant to come off. Appreciate any tips!
 

Attachments

  • IMG_2443.jpeg
    IMG_2443.jpeg
    1.2 MB · Views: 10
  • IMG_2444.jpeg
    IMG_2444.jpeg
    1.2 MB · Views: 10
  • IMG_2442.jpeg
    IMG_2442.jpeg
    1.2 MB · Views: 10
  • IMG_2440.jpeg
    IMG_2440.jpeg
    1.1 MB · Views: 10
Back
Top Bottom