Fyi, I followed the recommendations here and it did not correct the problem, replacing the relay fixed it. I have a 2003 Z4 and the original relay was blue and the replacement is black, also another word of caution working at the back of the fuse panel there are two locations for a relay, the one for the wiper is the upper one, the lower one on my car is for a headlight washer and was empty on my car. I installed the relay in the wrong slot and the wipers ceased to work, be sure to install the relay in the upper location.
You are using an out of date browser. It may not display this or other websites correctly.
You should upgrade or use an alternative browser.
You should upgrade or use an alternative browser.
HOWTO: Fix wiper resting point issues
- Thread starter sk93
- Start date
inject said:Fyi, I followed the recommendations here and it did not correct the problem, replacing the relay fixed it. I have a 2003 Z4 and the original relay was blue and the replacement is black, also another word of caution working at the back of the fuse panel there are two locations for a relay, the one for the wiper is the upper one, the lower one on my car is for a headlight washer and was empty on my car. I installed the relay in the wrong slot and the wipers ceased to work, be sure to install the relay in the upper location.
What's the part number for a 2003 E85 wiper relay
Just to keep it alive. Just did the repair and it fixed my issue perfectly. I did snap one or two of the plastic hooks on the windscreen pan. I think using some tool and sliding it down the window to get a good vertical force straight upp might avoid it. Though about lubricating the plastic prongs so they come out easier if I need to do it again at some point.
robinsevers10
Member
Bought a 2004 E85 2.5i on Wednesday. My wife immediately noticed the wipers were going down and then bouncing back up to about two inches from the bottom of the screen and resting there, so I tried to fix it...
A few problems I encountered:
1) Wiper arms would not come off. I don’t consider myself a weak man but they just would not budge. I ended up buying a wiper arm/ battery terminal puller from amazon for £9. This did the trick.
2) The plastic screws are trash and having to remove and replace the scuttle 3 times didn’t do them any good (This is because I’m an idiot and a perfectionist, read on...). Still managed to get them all back in though.
3) EVERY. SINGLE. CLIP. SNAPPED. I was so cautious because I’d already done quite a lot of reading on this and didn’t want to mess up my new car, so I slid my hand under one end a gradually pulled it up but it didn’t work at all. By the looks of it the clips on my one had been permanently attached. I’m not sure if anyone else has found this, but they looked like the tabs that connect the scuttle to the clips had been melted into the clips from the other side (see photos). I ended up managing to get one clip to slot back together but removed all the others because they were causing the wiper pan to sit higher with a concerning gap between it and the glass. Not sure how BMW service centres would do this without providing an entirely new part because the damage isn’t just to the clips but to the wiper tray itself.


4) I forgot to plug it back in . Seriously please don’t forget this step when reassembling. I had attached everything back together, got in the car to test it and... nothing. This meant having to take it all apart and reassemble it again.
5) I was concerned about the seal of the wiper pan against the window because of the lack of clips. I didn’t want there to be a big gap, although presumably water can drain from beneath anyway as there are gaps at either side. I gently bent the tray a few times just to make sure it sat right when I placed it back down.
It worked though! Wipers now sit in the right place, wife is happy, and I’m only slightly p***ed off.
A few problems I encountered:
1) Wiper arms would not come off. I don’t consider myself a weak man but they just would not budge. I ended up buying a wiper arm/ battery terminal puller from amazon for £9. This did the trick.
2) The plastic screws are trash and having to remove and replace the scuttle 3 times didn’t do them any good (This is because I’m an idiot and a perfectionist, read on...). Still managed to get them all back in though.
3) EVERY. SINGLE. CLIP. SNAPPED. I was so cautious because I’d already done quite a lot of reading on this and didn’t want to mess up my new car, so I slid my hand under one end a gradually pulled it up but it didn’t work at all. By the looks of it the clips on my one had been permanently attached. I’m not sure if anyone else has found this, but they looked like the tabs that connect the scuttle to the clips had been melted into the clips from the other side (see photos). I ended up managing to get one clip to slot back together but removed all the others because they were causing the wiper pan to sit higher with a concerning gap between it and the glass. Not sure how BMW service centres would do this without providing an entirely new part because the damage isn’t just to the clips but to the wiper tray itself.
4) I forgot to plug it back in
. Seriously please don’t forget this step when reassembling. I had attached everything back together, got in the car to test it and... nothing. This meant having to take it all apart and reassemble it again.5) I was concerned about the seal of the wiper pan against the window because of the lack of clips. I didn’t want there to be a big gap, although presumably water can drain from beneath anyway as there are gaps at either side. I gently bent the tray a few times just to make sure it sat right when I placed it back down.
It worked though! Wipers now sit in the right place, wife is happy, and I’m only slightly p***ed off.
sk93 said:The plastic rivets that hold the wiper pan in place (with the soft plastic heads) are still available from BMW for about 50p each. Their BMW part number is 51717001494
Just to let everyone know: this seems to be the incorrect part number. The rivets look the same but are much bigger (too big to fit). The part you want is 51481915964.
[ref]sk93[/ref] - would you be able to edit that in your original post? Might help people to avoid ordering the incorrect part
")
Z4Couple4me
Member
Came across this video, interesting technique to get the blades off with the wooden wedge.
Haven't tried it but might be worth trying if you're struggling.
https://www.youtube.com/watch?v=hZMna_thucU&list=TLPQMDMwNjIwMjFpXVoMuHr1ag&index=2
Haven't tried it but might be worth trying if you're struggling.
https://www.youtube.com/watch?v=hZMna_thucU&list=TLPQMDMwNjIwMjFpXVoMuHr1ag&index=2
 Shropshire, UK
Had a slightly different issue with mine, whilst the blades were sat high on the windscreen at rest they didn't return down when the engine was turned off, they just stayed about 10% up the screen the whole time. They also swept down to where I'd expect them to stop, before coming up the 10% during the normal stroke. It was as if the rest point was just offset by 10% into the stroke for some reason.
Followed the above to pull them apart, many thanks to everyone that's contributed to this and the prior thread(s) over the years, it was super clear and easy to follow. Wasn't going particularly quickly and had it all apart, cleaned and back together in about 45 minutes. Couldn't see anything mechanically wrong/adjustable, and the contact disc inside the mechanism didn't _appear_ to be greasy, but I cleaned it well with meths anyway.
Put it all back together, tested it without the arms attached and it appeared to rest at the bottom of the sweep now as you'd expect normally. Put everything back together, angling the wipers at rest just below the black edge of the screen border. Both of them sweep the screen perfectly now. Well, aside from what used to be the tax disc area, but that's what I get for buying cheap blades from Wilko - they don't bend much.
I did this resently as the wipers were doing the same thing of not resting in the correct position. However after I had completed this Ive found that the intermittent function has stopped working, the two speeds are working fine however. Has anyone else had a similar issue? The rain sensor on the window appears to be ok so I cant see it being the problem.

For years my wipers would sometimes raise an inch or 2 when they stopped. It wasn't annoying enough to even look into.
But thw other day i was using the Z (as the daily was broke) and the wipers stopped entirely! In the dark and rain. Engine off and on again fixed it for a few wipes.
So, followed this guide and they seem to work really well now, dont even jump back up.
I had 16mm wiper arm nuts and torx bits on a 56 plate. Also gave it all a good clean, so many leaves under the skuttle.
Thanks OP!
Just finished doing this on mine today but have a couple of pointers to add. Sorry if some have been mentioned previously.
Getting the wiper arms off.
I had huge difficulty with this and it’s a topic in its own right. Many days of soaking with various penetrating fluids didn’t do enough to make it a hand only operation so I bought a small puller (the small V-shaped ones available everywhere). This was still not enough so had to use mole grips to get extra leverage. Eventually the wipers freed off but it was touch and go as to whether the tool would break first.
I would recommend one that has the possibility of putting a socket on the top of the puller or be prepared to get nasty with the puller.
Removing the annoying plastic screws.
Dreadful things that are badly placed and round if you look at them.
Jamming a flat head in works but I found it was easier to lever a stubborn one out with a trim tool. Horrid things and probably worth replacing with new.
The clips by the windscreen.
I found starting at each end and working towards the center of the car allowed me to then slide my finger between the screen and the rain tray and pop out each clip in succession. If you’re doing this in the winter/cold or your tray is heavily sun damaged, I’d recommend gently warming the plastic so it’s a little less brittle. Not too much though as you don’t want it to distort when you apply pressure.
These pull up almost vertically but may break off as illustrated above. If this happens, put the clip back in place and use a soldering iron to melt that part of the clip back on to the main part of the tray/scuttle trim. Don’t make too good-a-job of it as if you want to remove it in the future it’s best that these remain the sacrificial part.
Remove the plastic side drains.
The small open ended collectors that clip in to each side of the body and direct water away from the scuttle area. One of mine was filled with crud and likely blocking a lot of things from draining out. I’d never have noticed this unless I’d removed them.
Ultra simple, just a small push down clip and they slide out. They might need a bit of a wiggle but nothing more.
Removing grease from the motor.
The cap that covers the motor in step 12/13 has a copper pickup on it, mine had 2 prongs. I noticed a bit of light grime on those prongs so it’s worth giving these a quick wipe for a belt and braces approach.
Clean and regrease the linkage.
My joints in the linkage still had some old grease on but it was full of grit and pretty manky. I cleaned them up and put some fresher stuff in. I tried to pack it in to the joints as best I could and cleaned up any excess after.
Test it all works before putting the tray back on.
It’s been said before but it’s worth saying again. For the sake of a few minutes make sure it’s right before clipping in the tray. You don’t want to stress those clips any more than you need to!
Put something on the spindles.
Given what a nightmare many of us have with these wipers welding themselves to the spindles, make sure you put some kind of anti seize on there before you button it all back up. Your future self will thank you.

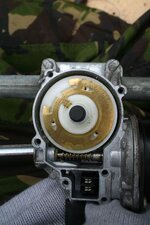
Yes, fine to use any degreaser, but don’t degrease the worm gear. Your part is a different to the one in the reference picture (count the holes in the plastic backing plate). The part number appears to have changed in 2006. Your copper part does not look worn, just greasy.