How to- Starter Motor replacement

bigwinn

Lifer
Hi all

Symptoms- very laboured starting for a while- as I drive the car only once a week I presumed the battery was on the way out- wrong!

Once or twice I was greeted with a click and no turnover. When it did this at work I started to look at the starter motor- especially as it went from click to start after tapping the motor with a BFH.

Replacement bought using myriad of discount codes from EuroCrapParts- decent price of under £60 when I take the old one back for reconditioning.

Onto the car:

Disconnect battery.
Had a good feel around the areas- decided against taking the airbox, intake boot and intake manifold off. Note a lot of guides suggest this needs to be done- mine being a 2.2 I DIDNT need to do this with adequate space to work.

Here is the business end of the starter, tucked under the intake manifold. Have a look and move/unclip any hoses that might get in the way. I moved very little.
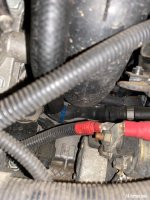
IMG_8608.jpeg

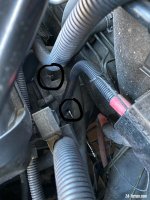
First task- undo/loosen the bolts holding the starter motor to the bell housing- I used E12 Torx spanner to break the grip then undid with a 10mm normal socket once moving. Once they were loose I then focussed on the electrical connections. From this photo you can see the torx spanner on one and arrowed is the other. Easy to get to from the top of the engine. Note the rear of the car is to the RIGHT.
IMG_8610.jpeg

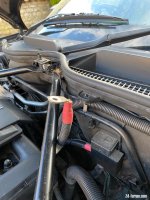
The electrical connections- 13mm BIG bolt held on 2 heavy duty electrical wires, mine were red. Once off and safely stowed I undid the 10mm low volt wire. Likewise I safely stowed this away out of the way.
IMG_8612.jpeg

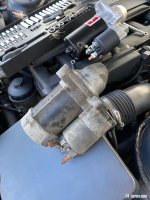
Time to get the motor off- it separated with a bit of wiggling, moving toward the front of the car. With some manoeuvring around hoses out it came!
IMG_8613.jpeg

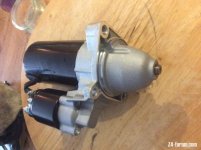
The new one ready to go in- now this was about 10mm longer in the body than the old one but there was plenty of clearance. I tweaked up the bolts to hold it in place, then connected and tightened (NOT overtight on the 10mm low voltage that felt a bit fragile). Put all the hoses and clips back on, reconnected the battery and done!

Any questions please drop me a line- 45mins start to finish on a cold December day- minimal tools and maximum satisfaction!

Cheers

Stuart
 
This is why I joined this forum :) . Plenty of great tips and advice to help keep our Zeds on the road and save our hard earned cash. :thumbsup:
 
Hi Stuart,

Good timing as my starter motor gave out the other night and I need to tackle this. Can I ask how many bolts held your motor on? Most of the parts online show 3 bolts, but on another Starter Motor thread on here the guy's photo of the starter only had 2 bolt holes for mounting - but that was on a N-series engine I think.

Hoping 3 is the correct answer as there seems to be many more options for replacement motors with 3 mounting holes rather than 2.
 
parabolica said:
Hi Stuart,

Good timing as my starter motor gave out the other night and I need to tackle this. Can I ask how many bolts held your motor on? Most of the parts online show 3 bolts, but on another Starter Motor thread on here the guy's photo of the starter only had 2 bolt holes for mounting - but that was on a N-series engine I think.

Hoping 3 is the correct answer as there seems to be many more options for replacement motors with 3 mounting holes rather than 2.

3 holes on the starter motor. The two threaded holes are for the bolts through from the bell housing; the unthreaded (middle) for a locating pin.

The mounting on the N52 engine is completely different.

This one is about to go in a pre-facelift 2.5i. Less than £50 on carparts4less.
 

Attachments

  • F546DC8D-8891-4262-B980-5E303FFDAC48.jpeg
    F546DC8D-8891-4262-B980-5E303FFDAC48.jpeg
    114.9 KB · Views: 7,828
Well I have to say I'd be stuck these last two weeks without Stuart's ([ref]bigwinn[/ref]) input.
This how-to is another fine example.
Supposed to be wfh, so nipping out and doing a bit at a time to remove the dead starter before quickly checking the emails, then back out again. :D
Only extra bits I had to do was remove the sound generator for access.
Started the mounting bolts with the socket as advised, but found access too restricted for the lower one: ratchet wedged on the bell-housing.
I did find though that an old 3/8 AF ring spanner is a perfect fit.
I have two thin black wires, one to the top (8mm nut) and one to the bottom (10mm nut)

What Stuart has failed to mention is the guy with the welder who installed the motor in the first place!!!
Nearly an hour to remove it once all unbolted.
The locator peg had corroded and did not want to leave it's hole.
I recommend a good dose of WD40 before you start.
 
bigwinn said:
Welded??

Sweet j3sus

Good job matey- spins up well now I trust?

Not actually welded, but it seemed like it for a while!
All bolted in and starts better than ever. Old one never span that fast since we had it.
Appreciate all the advice Monday night.
Stuck with the back end on ramps, blocking access to my E89, with Vall needing to use the daily and me needing to get to work!
Glad you knew how to get the auto box moveable. :thumbsup:
 
enuff_zed said:
bigwinn said:
Welded??

Sweet j3sus

Good job matey- spins up well now I trust?

Not actually welded, but it seemed like it for a while!
All bolted in and starts better than ever. Old one never span that fast since we had it.
Appreciate all the advice Monday night.
Stuck with the back end on ramps, blocking access to my E89, with Vall needing to use the daily and me needing to get to work!
Glad you knew how to get the auto box moveable. :thumbsup:
always a pleasure

Will deffo pop over soon- keeping an eye on Liams race dates
 
bigwinn said:
enuff_zed said:
bigwinn said:
Welded??

Sweet j3sus

Good job matey- spins up well now I trust?

Not actually welded, but it seemed like it for a while!
All bolted in and starts better than ever. Old one never span that fast since we had it.
Appreciate all the advice Monday night.
Stuck with the back end on ramps, blocking access to my E89, with Vall needing to use the daily and me needing to get to work!
Glad you knew how to get the auto box moveable. :thumbsup:
always a pleasure

Will deffo pop over soon- keeping an eye on Liams race dates

So why did mine have 2 thin black wires and yours only one? Was yours a manual? Maybe its something to do with the gear selector on the auto?

Also, for anyone else attempting this, my replacement starter was longer than the old one too.
I pulled the old one out connector end first, but to fit the new one I had to put the 'drive' end in first and push it a little way into the housing to get room to swing the other end in.
 
enuff_zed said:
bigwinn said:
enuff_zed said:
Not actually welded, but it seemed like it for a while!
All bolted in and starts better than ever. Old one never span that fast since we had it.
Appreciate all the advice Monday night.
Stuck with the back end on ramps, blocking access to my E89, with Vall needing to use the daily and me needing to get to work!
Glad you knew how to get the auto box moveable. :thumbsup:
always a pleasure

Will deffo pop over soon- keeping an eye on Liams race dates

So why did mine have 2 thin black wires and yours only one? Was yours a manual? Maybe its something to do with the gear selector on the auto?

Also, for anyone else attempting this, my replacement starter was longer than the old one too.
I pulled the old one out connector end first, but to fit the new one I had to put the 'drive' end in first and push it a little way into the housing to get room to swing the other end in.

Possible due to auto/manual diffs I suppose?

I'll have a look on the 3L auto later on see what thats got on it
 
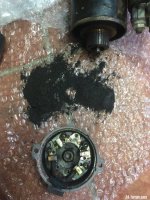
Out of interest, I thought I'd see what had caused my starter motor to fail.
It was the original, marked up as 2003, so it hadn't done badly.
I know it's the brushes that wear, but I didn't think they'd look like this!
Starter motor.JPG
 
Edit- I’m doing this on my 3.0 with sound generator and it’s nowhere near as easy

I’ve found that to get to the start point on the 2.2 you have to take the sound generator kit out leading up to the bulkhead
 
bigwinn said:
Edit- I’m doing this on my 3.0 with sound generator and it’s nowhere near as easy

I’ve found that to get to the start point on the 2.2 you have to take the sound generator kit out leading up to the bulkhead
Yup, that's what I found with mine too.
But it's 5 minutes extra work and then you have all the access you need.
 
I must say thank you for this guide. Helped me out big time today.

Ended spending longer than I would have like doing the job. But that's my fault. I was wrestling to get the guide hole to sit flush with the nipple. After about 45mins I took it off and tried again. Went in right away!! :headbang:

Top tip: if you have trouble having the starter sit flush. Take it off and try again!!

Thanks again Big!
 
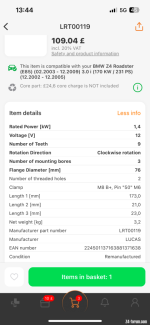
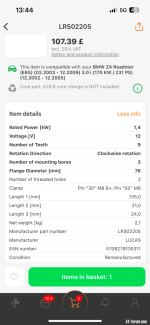
Thanks for this guide. I need to do the starter motor on mine, but I’m failing at the first hurdle in that there seem to be several listed as compatible with the e85 Z4 (2003 3.0).

These 2 are similarly priced and have the same output but seem to be different sizes. Can anyone give me a categorical answer on which one to buy? Many thanks.
IMG_6143.png
IMG_6142.png
 
Back
Top Bottom