How to properly restore your headlights - tutorial

Nelly Welly said:
Sim_simma

A fabulous post and the only thing that is unclear are my headlights but seeing such detailed instructions I think they may be clear very soon.

Thanks for a great "How to"

:D :rofl: :D :rofl: :D

:rofl: as I typed clear I half expected a joke like that haha glad to be of service :) going to post a few pics later on how to remive the lens as well.
 
Nice job but a question. . .

Can they be done by hand in situ on the car? Do you need to split the lenses from the case?

:driving: :thumbsup:
 
Cracking tutorial, but I can't but think you started FAR To harshly... 500 is the most I'd ever consider, and that'd have to be serious. 800 is normally OK.
 
paulgs1000 said:
Nice job but a question. . .

Can they be done by hand in situ on the car? Do you need to split the lenses from the case?

:driving: :thumbsup:

Yes it can be done by hand on the car. I split the lens on this headlight as its a donor light for my hid so has nothing to do with the lens restoration :) if you're doing it by hand id start with 800 as well. Will take longer but will be easier to do in the end.
 
RJS-Z4 said:
Cracking tutorial, but I can't but think you started FAR To harshly... 500 is the most I'd ever consider, and that'd have to be serious. 800 is normally OK.

As I mentioned in the first post I started with 320 because the lens had some deep storage scratches and pits from stones. It makes no difference to the end result because if I'd have started with 500 I would have removed as much material as with the 320 it would have just taken a lot longer. As long as you step up the grades right it doesn't really matter as the 500 removed the scratches from the 320. Then the 800 removed the scratches from the 500 etc...
Also remember I was using a da sander with an interface pad with light pressure.

I'd suggest anyone trying this out use the same method as machine polishing when determining what grade to start with. Maybe try starting with 800 or higher, if it's not working try 500 and so on. With this lens I actually tried 500 first but it wasn't removing the deeper scratches.

Just out of interest are you a detailing enthusiast or a painter or anything like that? Just wondering what sort of experience you may have :)
 
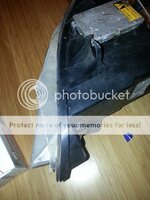
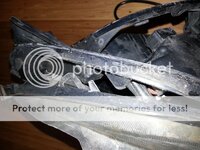
So I took what was left of the lens off my damaged headlight today and took some pics on a method which allows you to reuse both the casing and lens and eliminating the need for donor headlights.

Before
20131021_101212_zps67a94e05.jpg
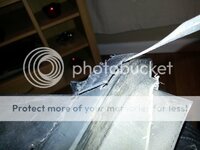
Use a dremel with a cutting disc to score a line along the edge of the lip
20131021_102146_zpsf959624e.jpg
Then use a thin chisel/scraper like tool to lift the edge of the lip up which will then snap along your score line
20131021_102331_zpsb40bcde8.jpg
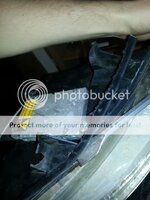
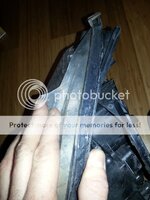
When when the whole top edge has broken away from your score line run your scraping tool under the edge to cut the glue and discard the outer plastic lip.
20131021_102610_zpscf072c7a.jpg
Then use the scraping tool to get under the lens and run it along the lip to cut the glue.
20131021_103156_zps4771c504.jpg
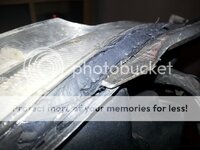
This will seperate the lens leaving you with the inner lip intact to reglue the lens back on
20131021_104033_zpsa7060356.jpg20131021_104052_zps348d1b24.jpg

This is only a quick guide but I'll be opening a complete headlight again sometime soon and I'll take plenty of pics and do a proper write up in a separate thread.
 

Attachments

  • 20131021_104033_zpsa7060356.jpg
    20131021_104033_zpsa7060356.jpg
    120.3 KB · Views: 0
Crazy that you can sand it down that far and go that dull/grazed and bring it back to a shine like that - very impressive!
 
Sim_Simma said:
RJS-Z4 said:
Cracking tutorial, but I can't but think you started FAR To harshly... 500 is the most I'd ever consider, and that'd have to be serious. 800 is normally OK.

As I mentioned in the first post I started with 320 because the lens had some deep storage scratches and pits from stones. It makes no difference to the end result because if I'd have started with 500 I would have removed as much material as with the 320 it would have just taken a lot longer. As long as you step up the grades right it doesn't really matter as the 500 removed the scratches from the 320. Then the 800 removed the scratches from the 500 etc...
Also remember I was using a da sander with an interface pad with light pressure.

I'd suggest anyone trying this out use the same method as machine polishing when determining what grade to start with. Maybe try starting with 800 or higher, if it's not working try 500 and so on. With this lens I actually tried 500 first but it wasn't removing the deeper scratches.

Just out of interest are you a detailing enthusiast or a painter or anything like that? Just wondering what sort of experience you may have :)

You're quite right there, the grade of paper is defined by the severity of the marks. Only reason I mentioned it is because I've seen some that apply far too much pressure with a harsh grade and end up making a right state of things. Detailing background here, y'got me :)
 
RJS-Z4 said:
Sim_Simma said:
RJS-Z4 said:
Cracking tutorial, but I can't but think you started FAR To harshly... 500 is the most I'd ever consider, and that'd have to be serious. 800 is normally OK.

As I mentioned in the first post I started with 320 because the lens had some deep storage scratches and pits from stones. It makes no difference to the end result because if I'd have started with 500 I would have removed as much material as with the 320 it would have just taken a lot longer. As long as you step up the grades right it doesn't really matter as the 500 removed the scratches from the 320. Then the 800 removed the scratches from the 500 etc...
Also remember I was using a da sander with an interface pad with light pressure.

I'd suggest anyone trying this out use the same method as machine polishing when determining what grade to start with. Maybe try starting with 800 or higher, if it's not working try 500 and so on. With this lens I actually tried 500 first but it wasn't removing the deeper scratches.

Just out of interest are you a detailing enthusiast or a painter or anything like that? Just wondering what sort of experience you may have :)

You're quite right there, the grade of paper is defined by the severity of the marks. Only reason I mentioned it is because I've seen some that apply far too much pressure with a harsh grade and end up making a right state of things. Detailing background here, y'got me :)

Haha nahh only light pressure used here and would only use a grade that harsh when strickly necessary. The right tools can make a mess in the wrong hands though I suppose!
 
Back
Top Bottom