Gauge sender units

im using a cheap set shown in the pictures, they wont look like that when im finished but if they look like something from Hellfrauds when im finished they were cheap enough to bin them and start again.
i also have the option to remove the LED chip from the main circuit board this would allow me to remotely mount the main boards out of the way and fit the two led chips in the ashtray insert, that part is only 30mm diameter and 12 mm thick.
as you might guess i like playing but i wont keep it on the car if it looks crap and i wont do anything thats not reversable
 
alfamale said:
im using a cheap set shown in the pictures, they wont look like that when im finished but if they look like something from Hellfrauds when im finished they were cheap enough to bin them and start again.
i also have the option to remove the LED chip from the main circuit board this would allow me to remotely mount the main boards out of the way and fit the two led chips in the ashtray insert, that part is only 30mm diameter and 12 mm thick.
as you might guess i like playing but i wont keep it on the car if it looks crap and i wont do anything thats not reversable

Really looking forward to seeing ur setup!!! Post pics as you get parts!!
 
Parts arrived this morning so I started to look at the install, it looks like I need to remove the complete intake box back to TB's is this correct?
I checked the TIS and it says you need a special tool to remove the clamps holding the box to the TB is this correct?
As I'm remote mounting the sender I'm not forced to use this point, are there any other options to getting a source of pressurised oil?
I can't find any diagrams of the oil path on this engine
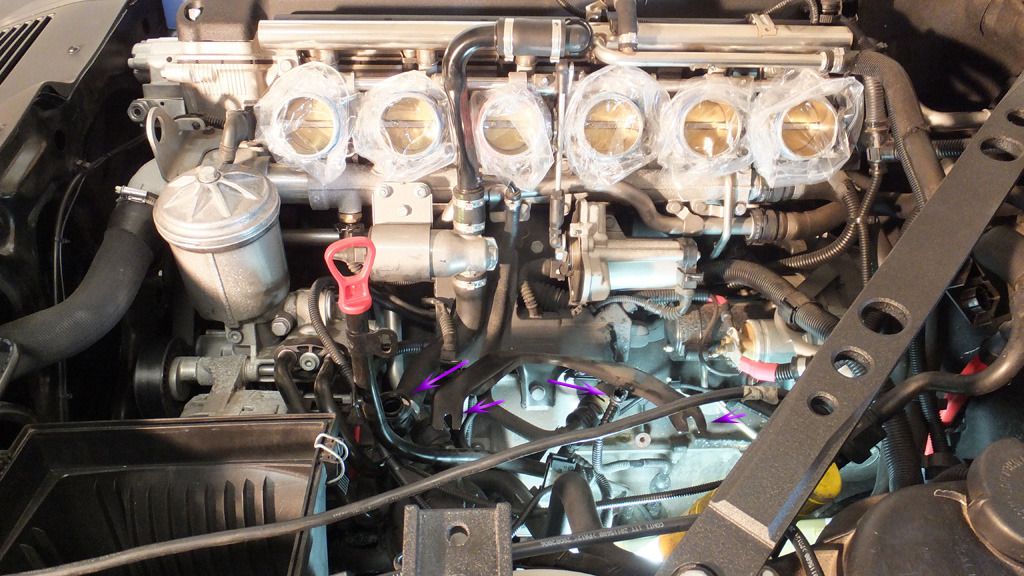
What's the hole just above the two feeds to the oil cooler? Could this be used?

Untitled by oxhouser, on Flickr

Is it easier to remove the complete filter housing than remove the intake box?
 
alfamale said:
Parts arrived this morning so I started to look at the install, it looks like I need to remove the complete intake box back to TB's is this correct?
.......
It should be easy enough to get to with the filter box & tube removed.
I'll be doing mine in a couple of weeks and will definitely find a way w/o removing the intake . :)
 
I have tried today to get the clips off, 4 came off no problem but I cannot get the other 2 clips to unfasten, I think I will quit with this for now as I'm frightened to damage the clip.
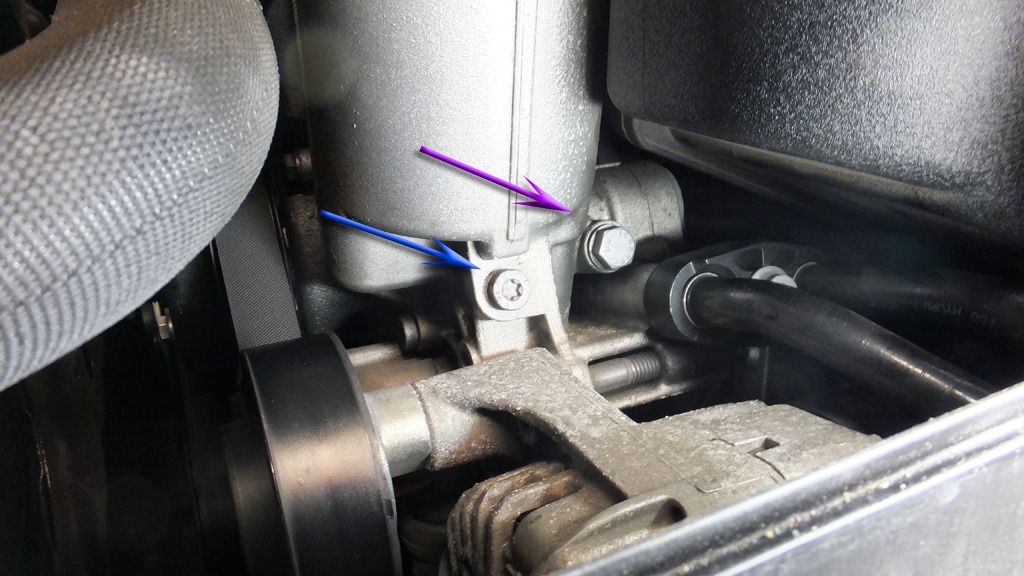
Whilst I have a lot of the bits off I have a good chance to look at this and I note there is a drain bolt for the filter housing (if you look on the last photo it's the star socket bolt on left of photo) the bolt is M8 x 1 mm pitch
Why can't we fit a hose to this tapped hole? This must have oil under pressure at this point as its connected to the filter bowl
 
not to sure i can help on that one alpha but bmw use the spare port or the filter lid to test oil pressure..... not that port that your point out here, i know its a pain in the bollox to get to but its worth the effort to get to that lower port...............
 
alfamale said:
Parts arrived this morning so I started to look at the install, it looks like I need to remove the complete intake box back to TB's is this correct?
I checked the TIS and it says you need a special tool to remove the clamps holding the box to the TB is this correct?
As I'm remote mounting the sender I'm not forced to use this point, are there any other options to getting a source of pressurised oil?
I can't find any diagrams of the oil path on this engine
What's the hole just above the two feeds to the oil cooler? Could this be used?

Is it easier to remove the complete filter housing than remove the intake box?
Have you gone any further with this?????

I see now what you are talking about.
With the OE airbox there is far less access space than what Beedub has under his ESS airbox.
Its not really a workable solution w/o a LOT of work.

I see the two ports that you have in the above pic.
....there may be two possibilities there.
The one with pink arrow looks to go right into the oil gallery.
It's fairly tight to the oil cooler lines, so no room for the sender. ...but you might be able to install an oil line and remote mount the sender.

The other possibility is the blue arrow location.
It looks to be a drain down for the filter housing.
I've not yet fully explored, but there is lots of room for the sender, but it may be a little small.

The kicker is that it has to be a pressurized port , not just a return gallery.


19533dd5.jpg
 
Tried the purple one and the bolt goes very loose as if it's a nut on the back, didn't want to go any further in case something dropped off inside.
I have ordered a flex coupling with M8 x 1 banjo and Will use this to remote mount the sender from the blue arrowed bolt.
I figure this will be direct connected to the main filter bowl and as such be under pressure with engine running
Worst case is its on the dirty side of filter so will read slightly higher if the filter is dirty ( not something I'm planning on, and if my gauge starts reading high I know it's time to change filter)
There are adapters on the market that replace the filter bowl cap and have fittings for temp and pressure so I know the bowl is pressurised.
Hopefully the flex arrives this week so if you can hang on I can trial it and let you know
 
I looked for a detail in TIS for the purple one & couldnt find one.
I wondered about the pic you posted.... There didn't look to be any threads in the port.

I also couldnt find any oil flow circuit diagram to discern where the filter is in the circuit.
If the secondary side goes to the return gallery, it won't give us full oil pressure.
What makes me wonder is the special tool that BMW uses to measure oil pressure.
It replaces the center stem bolt on the filter top & measures the primary side of filter.

It makes me wonder if the secondary side goes to return.
In which case these after market filter tops may not be all that accurate for pressure.

I'm curious how you make out with your plans.
I'm leaning towards pulling off the air box myself.

Here's a couple of interesting old threads....

http://www.bimmerfest.com/forums/showthread.php?t=166682

http://www.bimmerfest.com/forums/showthread.php?t=186337
 
alfamale said:
Tried the purple one and the bolt goes very loose as if it's a nut on the back, didn't want to go any further in case something dropped off inside.
I have ordered a flex coupling with M8 x 1 banjo and Will use this to remote mount the sender from the blue arrowed bolt.
I figure this will be direct connected to the main filter bowl and as such be under pressure with engine running
Worst case is its on the dirty side of filter so will read slightly higher if the filter is dirty ( not something I'm planning on, and if my gauge starts reading high I know it's time to change filter)
There are adapters on the market that replace the filter bowl cap and have fittings for temp and pressure so I know the bowl is pressurised.
Hopefully the flex arrives this week so if you can hang on I can trial it and let you know
As far as I can tell the oil flows from outside of filter to inside and as such is full pressure in the bowl, it's always full of oil until you remove the lid bolt, I think the bolt we discuss is to drain the bowl in case it does not drain as intended
Flex pipe should be here this week and for £25 I'm willing to take a punt
 
alfamale said:
...................
Flex pipe should be here this week and for £25 I'm willing to take a punt
do you think there will be any issue bleeding the air out of a flex line?
 
Slight set back, parts arrived today but I specified the incorrect banjo bolt, that's what you get for xcutting corners, correct thread pitch is 1.25 not 1.0
 
...going the under airbox location.
removal is much easier than it first appears.
It took me 15-20 min tops.

...I'll post a few pics later

added benefit; the left side engine mount bolts are full exposed for preemptive mtce.
 
inTgr8r said:
...going the under airbox location.
removal is much easier than it first appears.
It took me 15-20 min tops.

...I'll post a few pics later

added benefit; the left side engine mount bolts are full exposed for preemptive mtce.


told you!!!! .... enjoy!!!!! post pics!!!
 
Beedub said:
inTgr8r said:
...going the under airbox location.
removal is much easier than it first appears.
It took me 15-20 min tops.

...I'll post a few pics later

added benefit; the left side engine mount bolts are full exposed for preemptive mtce.


told you!!!! .... enjoy!!!!! post pics!!!
tricky part is the 90°angle adapter.... had to play with a few different washers to get the correct orientation for the sender port.
 
Air Collector removal

I was somewhat reluctant to use the spare port available under the air collector, only because it looked like a BIG job to take it off to gain access to the oil pressure point location.
The thing that I was most concerned about were those flush Oetiker clamps on the intake runners.
As it turned out, it was pretty easy to get the collector off.

The first thing is the air filter box, disconnect the MAF sensor & remove the flex elbow to the air collector.

...then

The Oetiker clamps on the intake runners.
I bought a tool for these & found that it wasn't much good due to the restricted access with all the tubing running through that area.
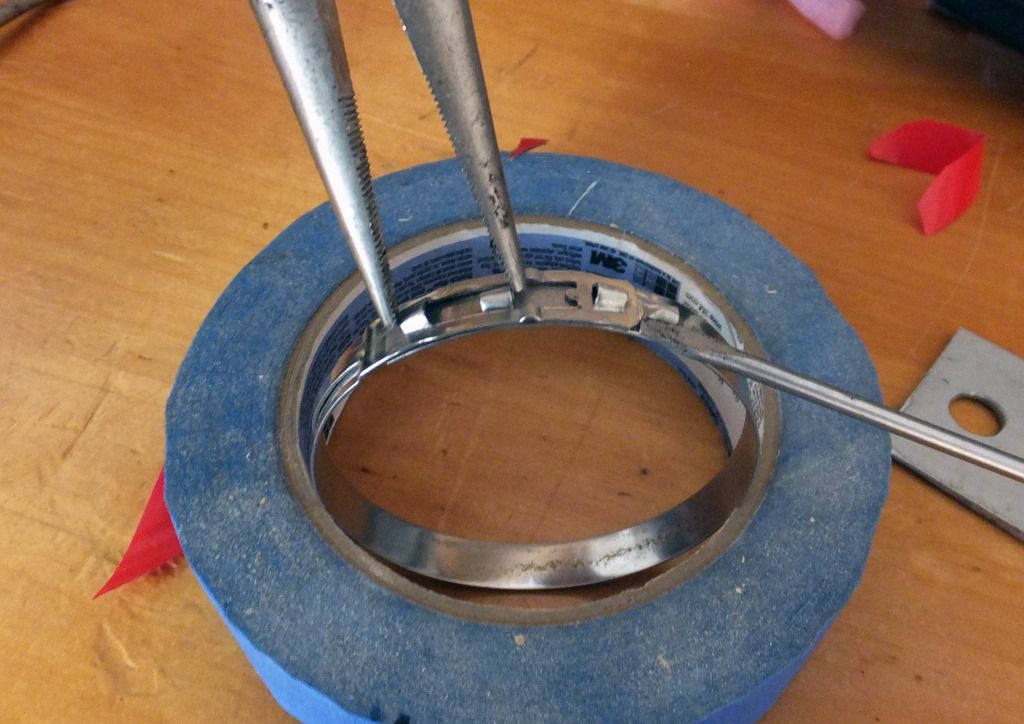
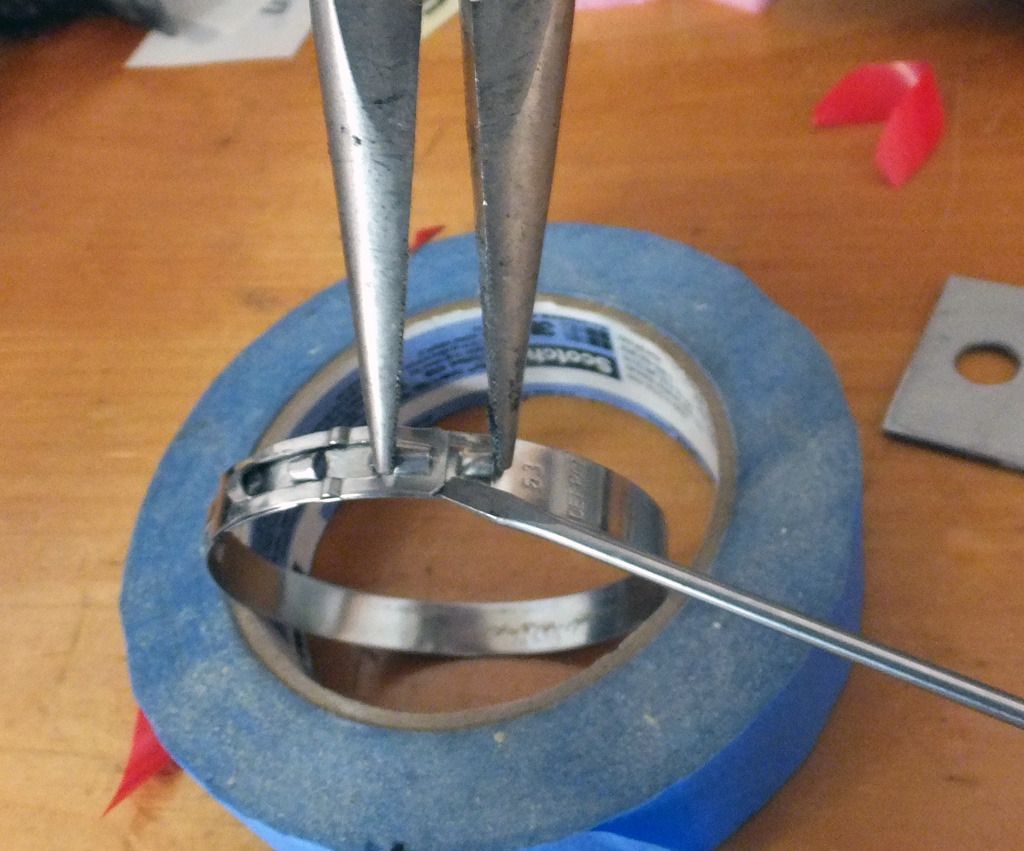
I found that good ole needle nose pliers and a small blade screw driver worked just fine.

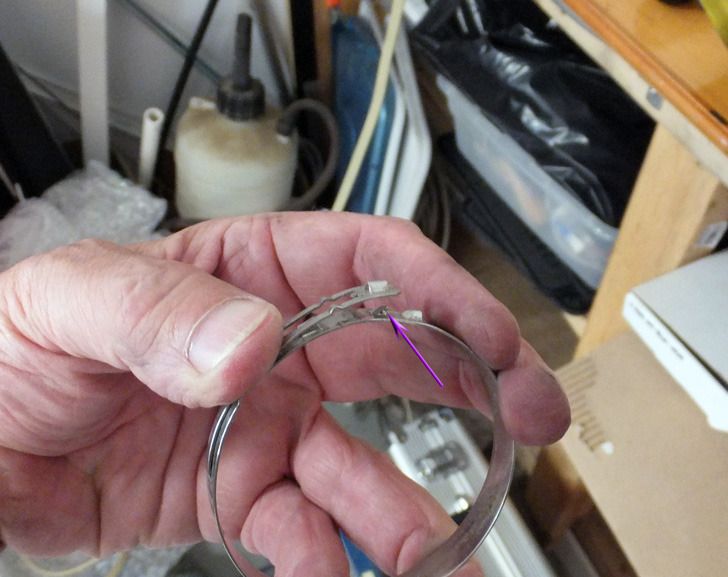
The first thing I had to figure out was how they actually clipped together (thanks google).
This is the first clip I took off, you can see how the lower band locks into the upper....

ff577020.jpg


To release the clamp I found that squeezing the back clips made it easier to release the lock with a small flat screw driver.
My first attempt was to squeeze the front clips but that just kept the pressure down & it wouldn't release very easily.

a3d9fa37.jpg


..putting them back on I will use the front clips. It should make it easier to lock in place.

e7ee0b74.jpg


The air collector...
Once the intake runner clamps are off, there are several other things to disconnect.
- the oil dipstick tube where it bolts to the collector
- the bottom support bracket (2 nuts)
- several tubes, which generally have some sort of quick connect.

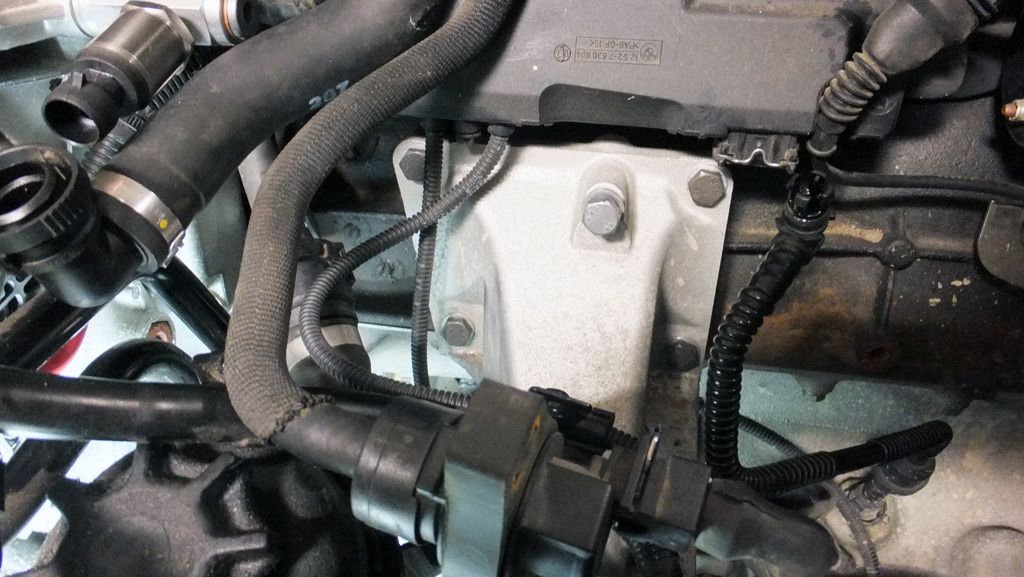
after all that you will end up with this :)
(arrows show bottom tubes & lower bracket)

1a9cc27e.jpg


...the bonus
The left side engine mount bolts are fully exposed.
time for some preemptive mtce.
- my bolts were barely more than snug

10.9 s installed
9f4c2156.jpg
 
Back
Top Bottom