Furniture clinic leather referb - lacquer question

True-Blue

Veteran
 Bristol/Bath
Site Supporter
Morning all,

Quick question for anyone who has used the furniture clinic leather repair/recolour kit on their seats…

I’m at the point where the top coat/lacquer needs to be applied and although I want a Matt look, I’m a bit concerned that using purely the Matt lacquer with no gloss added might look a bit odd… a bit too flat.

How much, if any, gloss did you add when doing your seats? Any photos please so I can get a gauge…

Many thanks :D
 
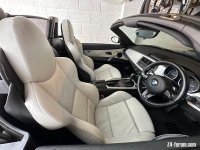
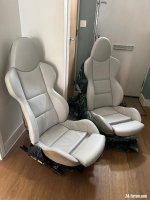
Well I wasn’t at all patient and pressed on :tumbleweed: , I’ll do a mini review in the detailing section, but I settled on 75%mat 25% gloss and the finish is close-ish to factory.

I think any less gloss and it would have looked way too Flat/Matt so I’m really glad I didn’t do that.

Didn’t really have time to faff about too much, but I think upping the gloss to maybe 30-35% may have given a really nice ‘sheen without gloss’ but marginally sheenier than factory.
 
I believe furniture clinic do a satin finish sealer and top coat, I'm about to do my champagne leather seats .so fingers crossed.
Look forward to seeing your results. :thumbsup:
 
TOMGREEN413 said:
I believe furniture clinic do a satin finish sealer and top coat, I'm about to do my champagne leather seats .so fingers crossed.
Look forward to seeing your results. :thumbsup:

Here you go;

IMG_1670.jpeg

IMG_1659.jpeg
 
Wow......they look fantastic.....what was your process ? Did you spray them or dab on the products? Do you have any before pictures?
Excellent work :thumbsup:
 
I didn’t take any before pictures, but the drivers seat had lost a fair bit out colour over the years, the passenger seat wasn’t too bad.

The instructions provided with the kit are pretty decent, there are tutorial videos on their website, and I pretty much followed these.

Remove top coat with ‘leather Prep’ using cotton wool balls in a folded scouring pad - (strong solvent based liquid) and allow to dry
Clean leather with ‘leather cleaner’ - (basically isopropyl alcohol) and allow to dry
I then applied two coats of colour with the sponge provided and allowed to dry
Then three coats of colour with the airbrush
Finally three coats of lacquer 25% gloss 75% Matt

Although I did use a hairdryer after each coat, I then waited a minimum of a couple of hours before applying the next coat. I mainly used the hairdryer to even out the finish, make sure there were no ‘runs’ and to ‘set’ the layer to avoid dust etc settling in the finish.

After the last coat of colour I left the seats overnight to fully cure, before starting with the top coat.

After applying the final layer of top coat, I left them to dry overnight again before reinstalling in the car the next day.

I’ve read that the top coat continues to cure for seven days, so I’ve not used the car yet in the hope that it increases the longevity of the finish - time will tell.

Be aware that the kit comes with a pathetic amount of cotton wool and cloths… you will need more :thumbsup:
 
Really helpful information, my plan is to remove both seats over the winter.
I forgot to ask........did you have any seat damage to fill or repair in anyway?
 
Back
Top Bottom