You are using an out of date browser. It may not display this or other websites correctly.
You should upgrade or use an alternative browser.
You should upgrade or use an alternative browser.
Full 2006 Z4M Refurb & Some Questions Please
- Thread starter jontZ4M
- Start date
I fitted non-M lollipops during a refresh and did 10k miles before replacing them with ///M items. I noticed no difference, albeit was already running higher than OEM caster via adjustable top mounts. Maybe slightly greater steering self-centre, but could quite likely be placebo effect.jontZ4M said:Thanks. Do you think using the centered bushes on a Z4M will be a problem? Not sure how critical caster is.
Hey guys - just an update. The refurb is going well, if not a little slow.

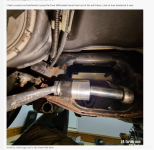
Today I was installing all new bushes and ball joints. There is just one that I can't get in all the way. It's 33172282484 which is the single bush in the rear subframe that accepts the diff. I can't find a way of getting enough pressure on the bush to get it all the way it. I'm using a normal bush installer, BUT critically I can't really use it properly as there is nowhere to mount the opposing part of the tool because of the subframe's weird geometry in this area. Using the angle iron in pic just results in angle iron bending. Reinforcing angle iron results in it still bending.
EDIT - that's a pic of removing old bush BTW(forgot to remove before power coat). New one going in from left to right.
Thanks
jontZ4M said:Hey guys - just an update. The refurb is going well, if not a little slow.
Today I was installing all new bushes and ball joints. There is just one that I can't get in all the way. It's 33172282484 which is the single bush in the rear subframe that accepts the diff. I can't find a way of getting enough pressure on the bush to get it all the way it. I'm using a normal bush installer, BUT critically I can't really use it properly as there is nowhere to mount the opposing part of the tool because of the subframe's weird geometry in this area. Using the angle iron in pic just results in angle iron bending. Reinforcing angle iron results in it still bending.
EDIT - that's a pic of removing old bush BTW(forgot to remove before power coat). New one going in from left to right.
Thanks

Have you wiped a film of lithium or silicone grease round the bush and subframe jont….? If not I suggest you do, it’ll go in then for sure.

jontZ4M said:Hey guys - just an update. The refurb is going well, if not a little slow.
Today I was installing all new bushes and ball joints. There is just one that I can't get in all the way. It's 33172282484 which is the single bush in the rear subframe that accepts the diff. I can't find a way of getting enough pressure on the bush to get it all the way it. I'm using a normal bush installer, BUT critically I can't really use it properly as there is nowhere to mount the opposing part of the tool because of the subframe's weird geometry in this area. Using the angle iron in pic just results in angle iron bending. Reinforcing angle iron results in it still bending.
EDIT - that's a pic of removing old bush BTW(forgot to remove before power coat). New one going in from left to right.
Thanks

I replaced this bush during some refurb'ing I did last year. I did not have any issues putting it in, but I did get something turned specifically for this, and I left the bush in my -18°C freezer overnight and pressed from diff side to bolt side.
You can borrow my tool if you wish. Some pictures here.
john-e89 said:Have you wiped a film of lithium or silicone grease round the bush and subframe jont….? If not I suggest you do, it’ll go in then for sure.
Sure did. Wish I'd used more now though.
lucasxdiniz said:I replaced this bush during some refurb'ing I did last year. I did not have any issues putting it in, but I did get something turned specifically for this, and I left the bush in my -18°C freezer overnight and pressed from diff side to bolt side.
You can borrow my tool if you wish. Some pictures here.
Thanks Lucas. I don't have freezer at workshop but I noted you can buy instant freeze spray. I know metal can become delicate at low temps so was just a little wary about breaking any frozen parts.
I looked through your thread, you are putting my level of detail to shame lols. Well done on yours. I can't see the tool you are talk about? Am I blind?
jontZ4M said:Thanks Lucas. I don't have freezer at workshop but I noted you can buy instant freeze spray. I know metal can become delicate at low temps so was just a little wary about breaking any frozen parts.
I looked through your thread, you are putting my level of detail to shame lols. Well done on yours. I can't see the tool you are talk about? Am I blind?
I don't see it that way, I wish I had been able to remove the sub-frame and done it properly like you. It's this one, nothing fancy, just a bit more compact than yours:
Attachments
lucasxdiniz said:don't see it that way, I wish I had been able to remove the sub-frame and done it properly like you. It's this one, nothing fan
Thanks Lucas
I actually managed to do it today. I re-jigged my tooling around and found an arrangement that works.
Lesson learnt is that I put the bush in from the wrong direction, I should have done it the direction that you did.
Thanks for responding.
Just hijacking your thread for a related question. I am doing a rear axle refresh at the moment, along with installing new suspension, but I am having a lot of trouble with the exhaust.
The centre section needs to come out, and the bolts that connect it to the cats have totally disintegrated. I can probably grind these out without too much difficulty, but the top bolts are totally inaccessible. I think that even with bolts in good condition these would be tricky, is there any way to get access to them more easily?
I could drop this section too, since the front bolts that connect the manifolds to the cat look like they are in better condition, but this means dealing with lambda wiring and other nonsense. Any advice gratefully received")
The centre section needs to come out, and the bolts that connect it to the cats have totally disintegrated. I can probably grind these out without too much difficulty, but the top bolts are totally inaccessible. I think that even with bolts in good condition these would be tricky, is there any way to get access to them more easily?
I could drop this section too, since the front bolts that connect the manifolds to the cat look like they are in better condition, but this means dealing with lambda wiring and other nonsense. Any advice gratefully received
Simon 3.2M
Senior member
Drop the X pipe and cats, there's no other way, disconnecting the sensors is easy too. FYI you have to use new crush gaskets when re-connecting to the manifold.
Thanks guys, I managed to get the four bolts to the manifold undone with only the regular amount of swearing. Picked up an O2 socket from halfords as well to hopefully make the sensors come out easier.
I guess the last step is to remove the exhaust mounts at the rear and use a jack to lower the whole thing until the other connectors can be removed.
Have given the rear exhaust mounting studs another soak in WD40, they are in a right state, hopefully nothing snaps.
I guess the last step is to remove the exhaust mounts at the rear and use a jack to lower the whole thing until the other connectors can be removed.
Have given the rear exhaust mounting studs another soak in WD40, they are in a right state, hopefully nothing snaps.
ed80 said:Thanks guys, I managed to get the four bolts to the manifold undone with only the regular amount of swearing. Picked up an O2 socket from halfords as well to hopefully make the sensors come out easier.
I guess the last step is to remove the exhaust mounts at the rear and use a jack to lower the whole thing until the other connectors can be removed.
Have given the rear exhaust mounting studs another soak in WD40, they are in a right state, hopefully nothing snaps.
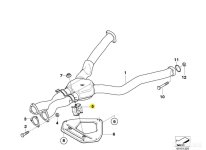
Not uncommon for the highlighted bush to split into two as you're undoing the nut on the triangular bracket. Happened to both of my Z4s.
Here's the part no: 18207832991
I have never bothered splitting the x-pipe from the cat section even though I went through the effort of removing and replacing all the corroded screws. The assess is simply terrible when the exhaust is in the car, so it's quicker to drop the whole thing as one.
Attachments
ed80 said:Have given the rear exhaust mounting studs another soak in WD40, they are in a right state, hopefully nothing snaps.
I believe that this is what's known as tempting fate. Three studs attempted, two broken so far. I tried to be as gentle as possible, frequently reversing direction to let the threads clean up, and attacked with a wire brush and WD40 to try to remove as much rust as possible.
Honestly starting to think I might have bitten off more than I can manage with this job. Everything that can seize has seized so far, and two evenings and about 6 hours in I have barely begun.
What's the fix for broken exhaust hanger studs?
Today went a little better. Went ham with a MAPP torch and got the other exhaust mounts off without any problems. Was not able to remove the lambda sensors, but there is enough slack in the wiring that they can stay connected to the car.
Got the subframe on the floor now, will tackle disassembly tomorrow. Thanks again for all the assistance, and for everyone who made one of the many DIY guides on here that I have been following
Got the subframe on the floor now, will tackle disassembly tomorrow. Thanks again for all the assistance, and for everyone who made one of the many DIY guides on here that I have been following
ed80 said:The centre section needs to come out, and the bolts that connect it to the cats have totally disintegrated. I can probably grind these out without too much difficulty, but the top bolts are totally inaccessible. I think that even with bolts in good condition these would be tricky, is there any way to get access to them more easily?
Hi Ed
I feel your pain. Mine was the same. The bolts in the exhaust seem completely inadequate for the job and are just small lumps of rust.
My solution was to remove the ENTIRE exhaust as one giant section. I split it between the manifold headers and the cat sections, these seem to be the only decent bolts. Then just heaved the entire 9ft exhaust off.
Regards the O2 sensors, I just unplugged the cables/plugs from the main harness and left them in the exhaust otherwise.
It's a pain but I think this is the only decent way to do it.
Thread hijacking again
The last two bolts on my car are behaving weirdly. It's the two M10x40mm screws that fix the reinforcement bars (pull rods in BMW speak) to the sills. The two screws that fix the front of number 5 in https://www.realoem.com/bmw/enUS/showparts?id=DU92-EUR-11-2006-E86-BMW-Z4_M32&diagId=51_4957 to the car.
According to TIS these are 59nm + 90 degrees torque, or REALLY tight. This is the same as all the other M10 10.9 reinforcement bolts, so that makes sense.
On *both sides* the screw appears to have stripped. When tightening with a torque wrench set to 59nm they both seemed to get tightish (maybe 20-30nm) and then the torque dropped off. If it was only on one side I would guess it was just a bad thread that a previous garage didn't fix, but since it has happened on both sides, I am starting to question myself.
All the other similar bolts have torqued up fine, including the other bolts on the pull rods.
Has anyone had this happen, any ideas what I could be doing wrong? Both sides have brand new genuine BMW bolts.
Sounds like both threads have been stripped by someone going ‘Really tight’ which could mean anything as folk often use impact guns etc, that can be extremely powerful. Do you have a tap to wind inside to see how loose the thread is..? If they have stripped you can drill the rest of the stripped thread out and use a tap to wind in a Helicoil.