A
Anonymous
Guest
After one of these if anyone has a spare?

Please PM if you have one.
Cheers.
Please PM if you have one.
Cheers.
I was looking for the same thing as mine are knackered but they're really hard to find, I finally stumped up to BMW for them at £130 each side (ouch :x )Ratcatcher said:After one of these if anyone has a spare?
s-l1600.jpg
Please PM if you have one.
Cheers.
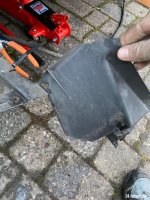
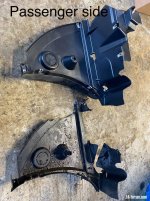
I took the bumper off to removed the headlight and dry it out (condensation inside). Once the bumper was off it was pretty clearly destroyed with bits hanging off it ans held on by a thread of plastic. I’m not sure you can see or access it any other way.Zedebee said:They’re pretty inaccessible as far as I can tell. How do you even know if they’re knackered?
I took the bumper off to removed the headlight and dry it out (condensation inside). Once the bumper was off it was pretty clearly destroyed with bits hanging off it ans held on by a thread of plastic. I’m not sure you can see or access it any other way.Zedebee said:They’re pretty inaccessible as far as I can tell. How do you even know if they’re knackered?
Quite obvious when the cars jacked up and you get underneath. One side of mine had a gaping hole in it, which raised the suspicion so when i checked the other side it was in 3 pieces held together with cable ties. :xZedebee said:They’re pretty inaccessible as far as I can tell. How do you even know if they’re knackered?
Ratcatcher said:Quite obvious when the cars jacked up and you get underneath. One side of mine had a gaping hole in it, which raised the suspicion so when i checked the other side it was in 3 pieces held together with cable ties. :xZedebee said:They’re pretty inaccessible as far as I can tell. How do you even know if they’re knackered?
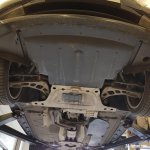
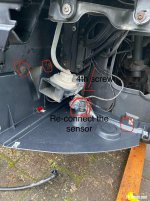
I 'think' (and ill be adopting this method to put the car back together) that these need to be installed before the bumper goes on as theres a couple of fastners that could well be inaccessible once the bumpers in place.
davidmudley12 said:I’ll report back when I’ve put mine back together.


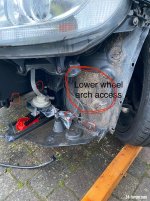
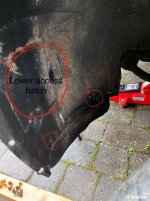
Plenty of access there.Ratcatcher said:davidmudley12 said:I’ll report back when I’ve put mine back together.
Please do, although it'll be a while before mine goes back together so no rush
PXL_20201230_185557639.jpg
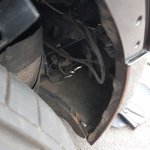
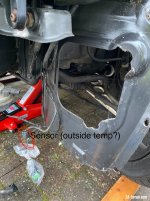
The cut wire looks like it runs to the horn (I assume that’s the horn as there’s the same thing on the other side), I’m waiting on a new connector and will be fixing it. It may be that a sharp edge of the broke plastic cut through the wire, but I’ll never know.Ratcatcher said:Yes, it was those two in your fourth picture that are a pain. With the bumper in place the spotlight is right in the way.
I notice you have two wires cut. I presume thats for the second sensor that sits in the splash guard that you dont have fitted. Any reason why?
Ok, i have two sensors that sit in the guard (you have to pop the round bit out) As mine is a 2003 im presuming yours is a later model without it? Maybe some guru will be along to enlighten us!davidmudley12 said:The cut wire looks like it runs to the horn (I assume that’s the horn as there’s the same thing on the other side), I’m waiting on a new connector and will be fixing it. It may be that a sharp edge of the broke plastic cut through the wire, but I’ll never know.

Ratcatcher said:Ok, i have two sensors that sit in the guard (you have to pop the round bit out) As mine is a 2003 im presuming yours is a later model without it? Maybe some guru will be along to enlighten us!
davidmudley12 said:I’ve done a bit of digging, it looks like that round sensor is also know as the "hockey puck" sensor, it appears to be the thermal switch for the heated windshield washers which I assume is an option I don’t have.