

The previous owner fitted thicker tires on the front. Yes, they’re more comfortable and they protect the rims, especially since the roads around here have potholes and uneven surfaces.
But the downside is that it lifted the front of the car, so the gap under the front bumper was higher.

To bring it closer to the ground, I decided to add a lip to the front bumper.
After I bought the lip, I changed the tires back to the standard size and the front become closer to the ground and the car leveled, so I didn’t really need the lip anymore.
But since I’d already bought it, I went ahead and fitted it anyway.
I picked up the lip cheap off eBay.
Shipping costed me double the item price...
Here’s the tricky part:
The center section of the bumper has an inclined surface. If I fitted the lip directly, it would point upward, and getting the edges to sit flush would be hard because the rest of the bumper sits level to the ground.
So I 3D printed 4 brackets to fill that gap and keep the lip level with the ground.
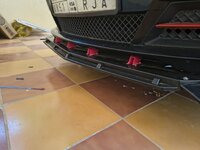
All dimensions and drawings are available in the link below.
I mounted the brackets to the bumper with screws, then riveted the lip to the brackets. Rivets should handle vibration fine. The problem is I couldn’t find the right size, so I used a smaller size instead. A week later, a few rivets pulled through the bracket holes.
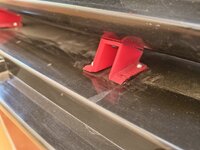
I’ll use the correct size rivets later. For now, I’m switching to bolts and nuts, and I’ll keep an eye on them to see if they loosen. I’m thinking of adding star washers later if they loosen before switch to rivets....
Addition, PLA filament bend with heat and sensitive to UV "sunlight", so I will use ASA which withstand the heat and resist UV.
This is the final look

But the downside is that it lifted the front of the car, so the gap under the front bumper was higher.
To bring it closer to the ground, I decided to add a lip to the front bumper.
After I bought the lip, I changed the tires back to the standard size and the front become closer to the ground and the car leveled, so I didn’t really need the lip anymore.
But since I’d already bought it, I went ahead and fitted it anyway.
I picked up the lip cheap off eBay.
Shipping costed me double the item price...
Here’s the tricky part:
The center section of the bumper has an inclined surface. If I fitted the lip directly, it would point upward, and getting the edges to sit flush would be hard because the rest of the bumper sits level to the ground.
So I 3D printed 4 brackets to fill that gap and keep the lip level with the ground.
All dimensions and drawings are available in the link below.
I mounted the brackets to the bumper with screws, then riveted the lip to the brackets. Rivets should handle vibration fine. The problem is I couldn’t find the right size, so I used a smaller size instead. A week later, a few rivets pulled through the bracket holes.
I’ll use the correct size rivets later. For now, I’m switching to bolts and nuts, and I’ll keep an eye on them to see if they loosen. I’m thinking of adding star washers later if they loosen before switch to rivets....
Addition, PLA filament bend with heat and sensitive to UV "sunlight", so I will use ASA which withstand the heat and resist UV.
This is the final look


 Ohio
Ohio