E85 Flip Up Screen - Broken

Chengy

Member
Warwickshire
Hi all,

Looking for some advice please - the rear screen housing has come out after the left side where the plastic ring attaches to the motor has broken.

Is it a straight swap with a new screen to resolve the issue? Had a look on eBay and can't find anything for sale which was a surprise.

Thanks as always

IMG-6659.jpg

IMG-6660.jpg

IMG-6658.jpg
 
So update on this.

Managed to remove the screen (thanks [ref]big_winn[/ref] for the advice on removing the small plastic flap under the heater controls for access) and had to also remove the circuit board itself so that I could remove the screen completely independent from the cradle.

Used epoxy to repair the broken plastic and it's broken again :( So it looks like a new screen is needed.
 
Mine has gone in exactly the same way. The motor works fine but the hole in the side of the casing has broken away. Mine's a
2003 model and I think that the plastic has gone brittle with age
 
Sludgepump said:
Mine has gone in exactly the same way. The motor works fine but the hole in the side of the casing has broken away. Mine's a
2003 model and I think that the plastic has gone brittle with age

Yep sounds the same. Really not sure what to do now other than superglue the whole thing, but it’s getting that plastic connection to the motor attached properly.

I’ll update when I have more info.

Cheers
 
Sludgepump said:
Mine has gone in exactly the same way. The motor works fine but the hole in the side of the casing has broken away. Mine's a
2003 model and I think that the plastic has gone brittle with age

Any ideas on your end sludgepump?
 
Afraid not. Tried ebay like you but there's nothing much there.
Mine's a Japanese import so I don't want to spend a lot of money just to find out the car thinks it's in Tokyo somewhere!
I did think about getting some really thin steel plate and glueing it inside the plastic housing, but without knowing the shape of the hole or its exact position it's difficult. An old biscuit tin would be perfect.
You almost want a good housing to use as a pattern for the repair.
Maybe one could be borrowed from someone.
The other problem for me is that it looks like someone has already had a go at it. There's nothing securing the cover to the screen and pcb so I suspect that not only is the motor cut-out hole broken but there could be locating tabs missing as well
Might just have to live with it :headbang: :headbang: :headbang: :headbang:
 
Sludgepump said:
Afraid not. Tried ebay like you but there's nothing much there.
Mine's a Japanese import so I don't want to spend a lot of money just to find out the car thinks it's in Tokyo somewhere!
I did think about getting some really thin steel plate and glueing it inside the plastic housing, but without knowing the shape of the hole or its exact position it's difficult. An old biscuit tin would be perfect.
You almost want a good housing to use as a pattern for the repair.
Maybe one could be borrowed from someone.
The other problem for me is that it looks like someone has already had a go at it. There's nothing securing the cover to the screen and pcb so I suspect that not only is the motor cut-out hole broken but there could be locating tabs missing as well
Might just have to live with it :headbang: :headbang: :headbang: :headbang:

Haha you’re right about perhaps having to live with it.

My tabs on the back of the screen cover have also broken off due to brittleness as you said, so I have the exact same problem.

Wouldn’t mind if you could actually get the parts to fix it. I wonder if you could just get a replacement housing and swap the screen over. Will keep digging!
 
Chengy said:
Sludgepump said:
Afraid not. Tried ebay like you but there's nothing much there.
Mine's a Japanese import so I don't want to spend a lot of money just to find out the car thinks it's in Tokyo somewhere!
I did think about getting some really thin steel plate and glueing it inside the plastic housing, but without knowing the shape of the hole or its exact position it's difficult. An old biscuit tin would be perfect.
You almost want a good housing to use as a pattern for the repair.
Maybe one could be borrowed from someone.
The other problem for me is that it looks like someone has already had a go at it. There's nothing securing the cover to the screen and pcb so I suspect that not only is the motor cut-out hole broken but there could be locating tabs missing as well
Might just have to live with it :headbang: :headbang: :headbang: :headbang:

Haha you’re right about perhaps having to live with it.

My tabs on the back of the screen cover have also broken off due to brittleness as you said, so I have the exact same problem.

Wouldn’t mind if you could actually get the parts to fix it. I wonder if you could just get a replacement housing and swap the screen over. Will keep digging!

Is this anything an idiot with a 3d printer can fix(Im an idiot and have a 3d printer)? I don't have one of those screens so cant quite compute where the broken bits in your photo go but I have a 3d printer and depending on how deep into the Shire you are am not far away from you. I cant do the Design part of 3d printing very well but the printing part I got on lock :)

Failing that can you not use Fiberglass epoxy (has flecks of glassfibre in it) and some super thin metal as re-inforcement (coke can?) Rattarossa did something similar to fix the rear lights on his Ferrari F430

Depending on the type of plastic (ABS?) You can get "glue" that doesn't actually stick the plastic it actually fuses it by "melting" the plastic and allowing it to re-bond not sure if that is any stronger than the epoxy method. I guess both are just moving the weak point.
 
Matty,

Thank you very much for the kind offer. Unfortunately I would be completely new to the design part so don’t think that will work. Would be cool to see it print though!

Cheers for the suggestion, I may have to explore the option of just fusing the damn thing together and reinforcing the part which connects the screen to the motor somehow.
 
Hi all,

Just to follow up on this, managed to fix the screen for now. Was thinking of swapping it for an Android set up but wanted to stick with OEM. The cost wouldn't have been worth it either as it's a weekend car really and it doesn't need all the added infotainment.

To fix, I basically superglued the broken plastic together and reinforced further with plastic strips, attached using more superglue. Seems stable enough for now.

It was a pain at first due to the need to disconnect wires and the circuit board, but once you know how it's quite straightforward.

I've tried to show in the pic one of the plastic strips I added to reinforce the part that had snapped off, which was basically the "ring" in the screen which the motor goes into so that when the motor moves it also flips the screen up and down.

Wish I'd taken some better pictures when I had the screen off! Please use this picture in combination with pics earlier. Any questions let me know.

IMG-7586.jpg
 
Sludgepump said:
Mine has gone in exactly the same way. The motor works fine but the hole in the side of the casing has broken away. Mine's a
2003 model and I think that the plastic has gone brittle with age

Just posted my repair above, happy to walk you through it or even come and help if you're not too far.

Cheers
 
Hey Chengy; did your repair last?

My 2004 Z4 suffers the same issue since last weekend

Sucks because you need the screen for alle the setting etc.
 
beschuitfluiter said:
Hey Chengy; did your repair last?

My 2004 Z4 suffers the same issue since last weekend

Sucks because you need the screen for alle the setting etc.

Hi beschuitfluiter,

It actually has lasted which is a relief! The reinforcement plastic strips I think were key. I can try to help with a repair if you need 👍
 
+1 for this repair. Repaired mine the same way (but used plastic welding metal inserts, and extra plastic). Because there is a little extra room between the housing and the pcb, you can reinforce it there.
If you use superglue (which should bond the plastics), make sure not to use too much and leave enough time to dry.
 
Wortmanov said:
+1 for this repair. Repaired mine the same way (but used plastic welding metal inserts, and extra plastic). Because there is a little extra room between the housing and the pcb, you can reinforce it there.
If you use superglue (which should bond the plastics), make sure not to use too much and leave enough time to dry.


Nice - metal inserts would be even better for strength, great shout.
It’s great to repair it and save a lot of money instead of buying a new screen (if you can even find one!).
 
I'm going to have to attempt this fix too - what's the tip on removing it all - screws accessible via the air vents?

Thanks
 
CRAIGO said:
I'm going to have to attempt this fix too - what's the tip on removing it all - screws accessible via the air vents?

Thanks

Yes they are. I was never great at taking my Z4 apart. But removing and replacing the flip screen was pretty straight forward. Take your time and have no fear. :wink:

Take a read of this post from many moons ago.

sk93 said:
it's piss easy to remove dude..

Take out the central vents, and you'll see two screws at the top corners -> take them out.
Back of the screen (windscreen edge) you'll find a central section of the screen housing that will pop off -> Pop it off and remove the three screws
You'll now be able to lift out the screen (start with the right edge -> lift it up and then move the screen right and up to give enough clearance for the motor.
Disconnect the wiring harness and then the screen is out of the car completely.


Now, to get to the actual scree - it'll be piss easy with the back already removed!

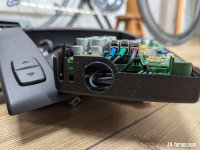
Disconnect the cables from either side of the board that lead out through the side holes, then remove the blue clip you can see in the first pic.
Flip the unit over and on the other side to the motor, you'll see a small black plastic ring that's sort of like a big black washer.
Carefully prise this away from the hole (making sure to release the little back clip - you'll see the one I mean ;)) as you do.
Once removed, you should be able to wiggle the screen up and out, carefully feeding the cables through the holes as you go.


Finally, if memory serves, undo the four bolts holding the top circuit board, carefully lift it and remove the four bolts holding the green screen mounts.
Carefully lift the whole thing, making sure you carefully disconnect the light sensor and any other cables that are getting tight.

And then you're done ;)

All in all - it's about 30 minutes work the first time, and about 5 every time after that!
Really is simple dude :)


Putting it back together is just the reverse, and once all done, simply click the screen cover in place, sit back and enjoy your handywork!
 
Quite straightforward once I could figure out the air vent metal clips!

No what's the best method for reattaching the drive side of the brittle plastic clip that attaches the motor to the panel? I know super glue isn't going to cut it as it's a very poorly designed bit of engineering here!

I'm thinking of some sort of metal clip of brace to overlay and screw in.PXL_20250329_083002942.jpg
PXL_20250329_082945149.MP.jpg
 

Attachments

  • PXL_20250329_082953861.jpg
    PXL_20250329_082953861.jpg
    133.7 KB · Views: 442
Back
Top Bottom