DIY leather wrapped dash

e85van

Member
 canada
Has anyone ever tried to wrap the brushed aluminum section of the dash in leather? I know there are leather kits out there but nothing in the color I want so I’m considering doing it myself. The aluminum section seems pretty flat so laying out the leather should be fairly straightforward. There are also numerous videos/instructions on line to assist with dash panel removal. So I’m thinking it’s doable.

Wanted to check here with the group before ordering materials.

Evan
 
Should have added that I’m also thinking of doing the same leather-wrapping to the (currently) black section of the door card. Again, a fairly flat panel to recover…. But from what I’ve read it a PITA to get at the factory leather on the door card.

If anyone has done this, or can point me ton’leasons learned’, I’d appreciate it.

Evab
 
I have- I did the central section around the gear lever with aftermarket leather from eBay

Was simple ish to do and easier than the other sections as it was convex not concave, plus the metal sits flush to the plastic and is bolted in so was easy to trap and secure
 
Hi Evan,

I've wrapped my aluminum dashboard in Nappa leather - twice!

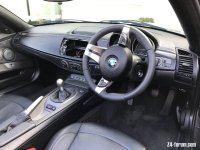
My first attempt was using a a pre-stitched kit off ebay - a special order one in Nappa leather. Nappa is more stretchy than the standard leather they use, but for a beginner like me trying to glue it down and get the stitch lines straight it's a pita of a job. I got a fair result, but decided to do it again with a piece of unstitched leather. Simple reason was my Z has a custom leather dashboard with stitching and the stitching on the aluminum trim was just too much stitching :lol:

I purchased a piece of Nappa on Ebay, lots of suppliers and plenty of colour choice and I have to say I'm well pleased with the result. A few tips that worked for me, but I'm no expert. This was my first effort working with leather and a proffessional leather trimmer would probably approach it differently, but it worked for me.
Use a high temperatrure contact adhesive - I used Wayside Adhesives HTA 1000.
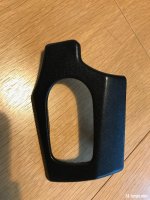
I mounted my Ali trim on a board using bolts screwed into four of the rear fixings and set into holes on the mounting board. This meant I could concentrate on handling/glueing the leather without the trim moving.
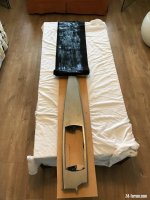
I used 0.7m Nappa - thin and stretchy
I glued the leather down in one go. Line it up, allowing plenty of overlap all round, stick just the very edge down at one thin end and then lightly stretch and apply it down the length - see photos. Stretch and roll the edges round to the back and stick it down. There is a danger that if you stick the main part down in several sections you might not get a totally smooth surface between the different appications of contact adhesive. Any imperfections will stand out like a sore thumb on this trim piece - that's the greatest danger :)
I lightly roughened the Ali trim and cleaned the surface with alcohol to degrease.

It all sounds a bit daunting, but frankly easier than it sounds. Good luck - what colour have you have in mind?
 

Attachments

  • IMG_6243.jpeg
    IMG_6243.jpeg
    192 KB · Views: 2,240
  • IMG_6250.jpeg
    IMG_6250.jpeg
    145.7 KB · Views: 2,240
  • IMG_6253.jpeg
    IMG_6253.jpeg
    126.1 KB · Views: 2,240
  • IMG_6263.jpeg
    IMG_6263.jpeg
    148.9 KB · Views: 2,240
Thanks for the reply! That is exactly what I was thinking of doing. I don’t really want to deal with lining up stitching and was actually thinking of using high quality vinyl/leatherette (see link below). We use this often in the marine environment and I know it’s pretty much bulletproof. Color is called pumpkin spice - goes well with burnt orange accents on the roll hoops, seat belt guides and brake calipers.

One question for you…. Did you have any fitment issues after application of the leather cover? I was worried that whatever is used to cover the dash would increase its overall size slightly, making reinstallation of the panel, the stereo, etc. difficult.

Thanks,
Evan

https://jtsoutdoorfabrics.com/Intrepid_Vinyl_Fabric_Pumpkin_Spice
 
Head light switch trim is only one thats difficult to put back on, the extra thickness of the leather around the stereo actually makes it look a better fit as there is quite a gap round it.
 
Usel said:
Head light switch trim is only one thats difficult to put back on, the extra thickness of the leather around the stereo actually makes it look a better fit as there is quite a gap round it.
Exactly my experience :thumbsup:
 
Mojito - I noticed that your lower dash section (with climate controls) was also leather-wrapped. Did you tackle this job as well or was it done professionally? Reason I ask is because Im trying to decide if it's easier to wrap the top (aluminum) section, or the bottom section in leather/vinyl.

I have found a video blog on removing the upper aluminum dash (https://youtu.be/7rTILZQeCUM?list=PLdqguOMcgFtvMRNkSkpKOp2O__zlvt2C5) but have not found anything showing the removal of the lower dash section.

Thanks!

Evan
 
Mojito I think you're the first person I have seen wrap the complete dash in leather. Have you done a thread on this?
 
Thank Mijito - I'm only going to wrap either the top aluminum dash OR the bottom section with climate controls..... I don't think I'll do both. My inclination is to wrap the top aluminum as it's reasonably flat, and has been done before. I'm also toying with the idea of replacing the black leather in the door cards with the same material. Reseaching that job however, suggests it is a little more involved as the stock leather panels seems to be plastic welded in place (thanks BMW).

As for doing a thread on the project, I may do that when the time comes and I actually start it.

Evan
 
e85van said:
Thank Mijito - I'm only going to wrap either the top aluminum dash OR the bottom section with climate controls..... I don't think I'll do both. My inclination is to wrap the top aluminum as it's reasonably flat, and has been done before. I'm also toying with the idea of replacing the black leather in the door cards with the same material. Reseaching that job however, suggests it is a little more involved as the stock leather panels seems to be plastic welded in place (thanks BMW).

As for doing a thread on the project, I may do that when the time comes and I actually start it.

Evan

Hi Evan,

Wrapping the bottom section of the dash is basically a non starter..unless you want to swop out the entire dashboard - it's an integral part of it :o It's not for the faint hearted! I've done it, as have others here and you'll find details of what's involved and some photos in the following thread:

https://z4-forum.com/forum/viewtopic.php?t=140570

Just wrapping the top aluminium trim is much more managable and many on the forum have removed this part and replaced it/wrapped it. As you say plenty of info out there and I see you've found one link. Sorry can't advise on swapping the door card leather, but sure someone here can help. :)
 
Usel said:
Mojito I think you're the first person I have seen wrap the complete dash in leather. Have you done a thread on this?

Hi Usel,

I keep meaning to do a thread on it, so bare with me, I'll get round to it when time allows. It was a real labour of love and something I never intended to do, but I got a bit carried away :lol: I decided to swop out my dashboard as others have done for sat nav delete. Having gone to all that effort to remove it, it seemed to be the perfect opportunity to cover the replacement dash in leather - well it seemed like a good idea at the time :) As already mentioned I'm not a trimmer, but I had been gaining experience wrapping ali dashboard trims and centre console in leather and had also wrapped the door handles with good results. It took me about a month, just working a bit at a time and I'm well pleased with the result, but at times I wondered what I had got myself into. Would I do it again... probably not, it's a huge challenge and at times pretty stressful as you can't afford to make mistakes :?
 
In general, this is the best I’ve found on interior wrapping. It’s also oddly satisfying to watch.
https://youtube.com/@Cechaflo
 
M@_ said:
In general, this is the best I’ve found on interior wrapping. It’s also oddly satisfying to watch.
https://youtube.com/@Cechaflo

Agreed, watched many hours of his videos :thumbsup:
 
Mojito - one more question.... when you wrapped the aluminum dash, I see you did the top (face) in one-go to ensure a consistent application. Did you do the same for the area where the leather wraps around the dash (like the edges). I was thinking of doing the face in one-go, then, once that completely sets, doing the wrap around edges. My thinking was that the wrap around, while critical, is not cosmetic (you can't see it) so if there is an issue its hidden. Also thought this approach would allow me to concentrate on one job at a time.

Would appreciate your (or anyone's) thoughts based on experience.

Cheers,
Evan
 
e85van said:
Mojito - one more question.... when you wrapped the aluminum dash, I see you did the top (face) in one-go to ensure a consistent application. Did you do the same for the area where the leather wraps around the dash (like the edges). I was thinking of doing the face in one-go, then, once that completely sets, doing the wrap around edges. My thinking was that the wrap around, while critical, is not cosmetic (you can't see it) so if there is an issue its hidden. Also thought this approach would allow me to concentrate on one job at a time.

Would appreciate your (or anyone's) thoughts based on experience.

Cheers,
Evan
Hi Evan,
I did it exactly as Usel recommends in his post. Once you've got the large flat surface glued down you can take your time gueing and stretching around the edges onto the back. That video is excellent - I hadn't seen that one before :thumbsup:
 
Wonderful!! Thanks to you both. That video certainly does outline a number of techniques for navigating inside/outside corners, curves etc. Very helpful!!

I’ll be sure to reply to this string with updates and pics as the project progresses.

Thanks again!!

Evan
 
Spent the last couple of nights trimming my dash pieces in nappa leather. Overall great fun, but definitely some learning points! I found the wayside glue I used dried so quickly, that any accidental overlap with the brush caused the glue to bunch up and become claggy. This has led to some slight undulations and much like when I squeeze myself into my leather minidress (it’s purely a weekend thing, don’t tell the missus) the thin nappa leather is very unforgiving and shows every slight lump and bump.

Pleased with the results though and looking forward to getting them fitted :thumbsup:

20230801-211542.jpg

20230801-211459.jpg

20230801-211402.jpg

20230801-211351.jpg

20230731-082122.jpg
 
Back
Top Bottom