So, I'm going to attempt to change my front discs and pads tomorrow. It should be pretty straight forward, but is there a definitive guide or video people would recommend?
You are using an out of date browser. It may not display this or other websites correctly.
You should upgrade or use an alternative browser.
You should upgrade or use an alternative browser.
Disc/pad change DIY
- Thread starter Angelus666
- Start date
Pelican are always worth checking out for how-to's, having done the job this series looks right? 
e85/6 Index http://www.pelicanparts.com/techarticles/BMW_Z4M_Tech.htm
Pads http://www.pelicanparts.com/techarticles/BMW_Z4M/90-BRAKES-Brake_Pads_Replacement/90-BRAKES-Brake_Pads_Replacement.htm
discs/rotors http://www.pelicanparts.com/techarticles/BMW_Z4M/91-BRAKES-Brake_Rotor_Replacement/91-BRAKES-Brake_Rotor_Replacement.htm
Muckinonthesofa
Member
Ewazix said:Pelican are always worth checking out for how-to's, having done the job this series looks right?
e85/6 Index http://www.pelicanparts.com/techarticles/BMW_Z4M_Tech.htm
Pads http://www.pelicanparts.com/techarticles/BMW_Z4M/90-BRAKES-Brake_Pads_Replacement/90-BRAKES-Brake_Pads_Replacement.htm
discs/rotors http://www.pelicanparts.com/techarticles/BMW_Z4M/91-BRAKES-Brake_Rotor_Replacement/91-BRAKES-Brake_Rotor_Replacement.htm
Thanks for posting this
A
Anonymous
Guest
Pelican is v good
But its plug and play buddy take time
2 bolts on back of calipers hex type i think
Then 2 larger bolts hold on carriers
Take spring off front
Push pads inward to give some room and simply lift out and remove pads
2 screws on disc remove and replace
Gently wiggle disc till off
Give all a good clean
Fit disc making sure correct way round
2 screws
Clean up calipers and pads /touch of copper grease on sliders
Fit carrier
Then calipers and pads
Tighten And tadaa
If you're using the rubber guide bushings don't use copper grease, you need a rubber grease or anything non petroleum based.
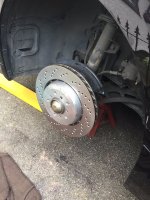
Well, 3 hours later and they're done! Actually pretty straightforward really, only real problem is getting the piston fully back to accept the new pads and fit back over the disc (I used a vice and it did the trick). Quite, satisfying doing the job and even better given that BMW would have charged me over £300 for the labour alone...!
I really love the gold paint in the inners of the discs, looks very premium...shame they won't look that way for long!
I really love the gold paint in the inners of the discs, looks very premium...shame they won't look that way for long!
Attachments
Thanks for all the tips...they all were spot on!
A
Anonymous
Guest
Angelus666 said:Thanks for all the tips...they all were spot on!
Hope helped
Ps mine stay as new as I clear laquer discs
")
Which paint/lacquer do you recommend for it?
A
Anonymous
Guest
I simply used bolt standard high gloss laquer
Put about 3 coats on when they were new
I've had the car with them on since big brake fitment and they've been tested
Still look like new")
Put about 3 coats on when they were new
I've had the car with them on since big brake fitment and they've been tested
Still look like new
A
Anonymous
Guest
Nice, might whip them off during the next month and give them a few coats and see if they stay looking good!
A
Anonymous
Guest
Angelus666 said:Nice, might whip them off during the next month and give them a few coats and see if they stay looking good!
Do it buddy
As dust doesn't stick not etch into them
And a nice box fresh look as we all know how pants a rusty disc and hat looks through a wheel
From what I've seen on YouTube you can actually do that and it just rubs away on the contact area after a short bit of braking, leaving the non-contact areas protected from rust.
A
Anonymous
Guest
Ewazix said:A quick read of this thread left me thinking people were lacquering the disc contact surfaces, presumably not?
Hahaha entire disc buddy including the braking surface
3 coats and left for 2/3 days
The area gets taken off upon first use of brakes and leaves any unswept area nice and shiny
Laquer is hard but not versus new pads and braking
Similar threads
- Replies
- 4
- Views
- 322