Darkangelv2 said:Or £15 on Ebay if you're really lucky

Very good buy

I managed to pick mine up for £45 including slip ring, indicator and wipers stalks.
More bits sitting in a box :lol:
Darkangelv2 said:Or £15 on Ebay if you're really lucky
srhutch said:Darkangelv2 said:Or £15 on Ebay if you're really lucky
Very good buy
I managed to pick mine up for £45 including slip ring, indicator and wipers stalks.
More bits sitting in a box :lol:
") ? Is it different between facelift(2006) and before that ? Thank you.
? Is it different between facelift(2006) and before that ? Thank you.saseinlinie said:Hi guys, do we have a part number for the cruise control stalk to help with the searches for deals
 Thats quite vague, from the right hand air vent to the glovebox is a fair distance - any extra detail here would help - or pics!?
HyperGrade said:
Hi Steve,
Putting this here rather than a PM, to see what interest there is.
I’ve been looking through the instructions and have a few questions, also want to offer to help if I can.
I’d consider myself fairly handy with a lot of jobs, but playing with the electrics just makes me that little more wary (cutting wires or not).
With the fact you’ve sent two sets of instructions which contain different engines/different years, looking through some of the instructions just leaves me with a bit of a question mark over the clarity of some of it. (Don’t get me wrong, you’re doing this for £20, I appreciate it a lot!)
It’s worth saying that I’ve not attempted anything so far, it’s just on first review - maybe it all becomes clear when you start, but I don’t want to start taking stuff apart before I know I can finish it.
I do think the instructions could be clearer for some of us non-electrical savvy folk who know they have competency in DIY jobs, but just that some of this looks a little confusing.
I have the full adobe acrobat software, so can manipulate the two instruction manuals into one. I can also put your instruction parts in between the steps of the BMW pages (which I think is needed) plus remove the unnecessary extra pages that are in there and just taking up space/ cause confusion.
I could make these for different models, different years if needed.
It may just be me being a fanny, but I got the stalk yesterday, opened the two instructions and was a little confused and now feel the need to go to a friend of mine who I hope will know what to do.
My main confusion is the order in which you go from one doc to another, there’s text on some pages which is in reference to the pic on the following page - but you can work that out quickly enough I know.
Random questions that I have are:
Step 1 Disconnect the battery. What are the consequences of disconnecting the battery? I don’t have any books, so will the radio work afterwards?
Step 5 Feed the blue wire over to the glovebox. Removing the panel underneath the A/C controls helps.
Is Page 4 in your manual, the first time that we then look at the BMW instructions, and if so, I assume we go straight to page 11? If so, that makes the rest of the document redundant (ref my offer to cut down earlier)
I have other questions, but don’t want to ramble on more than I have.
Again, VERY pleased that you’ve done all this - not a criticism at all, just an offer to help this good cause for others who may find themselves in the same boat.
2dogs said:Has anyone got the the fitting instructions for this?
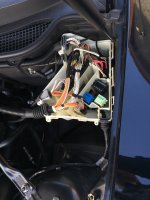
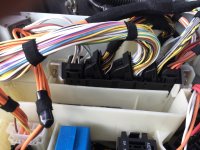
DaiC said:This is my DME unit on M54 srhutch, any ideas Steve ?
Cheers
srhutch said:2dogs said:Has anyone got the the fitting instructions for this?
I’ll send them across terry