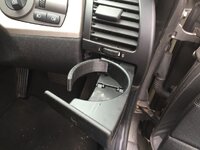
Cup holder fix

srhutch said:
MrPT said:
Nice! :thumbsup:

Think you beat me to it on the "forum hero" front too - been meaning to grab some time on our 3DP at work to make a replacement light switch for the centre storage hatch and a rotary valve for the sound generator opening. Incredible what is becoming possible now - even using free design tools.

Are these design tools easy to use?

Depends on your definition of easy, although I spend all day every day in a 3D design environment at work. I used AutoCad Inventor, which is definitely not free, but there are loads of free versions... AutoCad 123 is really simple to use and only struggles when you get into complex stuff. I'd highly recommend that if your wanting to have a play. Basically you want to find a piece of software that outputs .STL files.
 
Update:

I have found a few little tweaks to make to the design, and the pivot pin hole needs moving a tiny bit, but apart from that all is good.

It survived a test weekend of whacking different sized cups cans and mugs into it.

I have found a way to make it all smooth and shiny, although not tried it yet..... should be revising.

Exams this week, but looking to get the first few knocked out before then end of the month when I go on holiday.

P
 
mj2k said:
Bing said:
srhutch said:
Electric seat cogs, could be a market there though seen a few of those fail now.

Elaborate please - I haven't heard of these going... What are they ?

I recall Pawnsacrifice moulded some after his broke, but not sure I've picked up on others (cue mine going!)

Some of the stuff he turned his hand to was awesome, including fitting the intravee in my old coupe after others failed. :lol:

There has been at least one other on here who had the same issue. Wasn't long ago, think they had to find a donor motor.
 
Just waiting for the smoothed print to dry to see how the surfaces look and then I'm ready to make a few if people still want them.

Printing at the higher resolution has thrown a few issues with the prints which took some time to iron out, but I think I'm there. Long and short a higher resolution (0.2mm layers) gives a nicer finish on the sides, but a slightly rougher top surface, 0.3mm layers gives a rougher side but better top. I think the smoothing irons this out now though. Will get a few photos up tomorrow.

I'll go to the post office tomorrow and see how much PnP will be, but I don't think it will be much. Grand total will be £5 plus PnP.
 
OK guys,

Had a play with the smoothing and it does make for a smoother print, but sadly it also makes it much more flexible, and deforms the very thin walls of the bit where the cam goes. Therefore, I'm not going to offer smother ones, as I can't guarantee the strength of then arm or the fit of the cam bit, which is crucial.

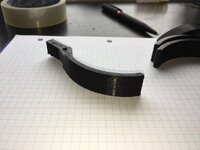
So here is the finished item:

IMG_2115_zpsf36v4szi.jpg

IMG_2112_zps233nf6zc.jpg


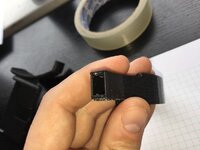
Not as perfect as I had hoped, but it does the job! Turns out my machine doesn't like doing really thin wall's on stuff which is needed in the cam hole which you can see here:

IMG_2113_zpsblqla9zq.jpg

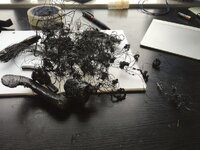
and issues with these thin walls has made many mess ups!!

IMG_2114_zpshtegrvim.jpg


If anyone still wants one, I will send them out at £6 inc PnP..... drop me a PM with what you need, hopefully I can get the first few sent out before I go away on holiday for a week on sunday!

Wattsie
 
Back
Top Bottom