Clear Headlight project now with pix!

Dreamer

Senior member
Im in the middle of a headlight project and have nearly reached the end. Theres only one small hurdle that seems so easy but has left me flumoxed. For 5 hours now i have been trying to work out why the small square box that so easily undid from the back of my Xenon unit wont go back on.
It slots on top but wont go down the extra 2mm to be able to turn and lock. Has anyone done this and knows a secret method i dont as im losing my mind. CJ where are you!!!!!!!!
DSC_0019.jpg
 
I know where you're at and have had one that took a lot of fiddling with.

In my case I discovered that the bulb looked seated but was not and iirc the wire retainer was the obstruction. Try it without the bulb which will eliminate that issue. Also try it 90 degress different position if there's enough cable.
 
Cheers CJ. It was a complete #+&*%$£"^** to get in but i got there!!!! I am over the bloody moon, two days of hard graft and i have at last got clear headlights!!!

I had a lot of issues you wont have had as i didn't have the fronts of the lights. I was swapping all the internals from my xenons into some non-xenon shells. As you know theres a lot of screws and fixings in there and its a very tight space!! I look like i've been self harming now :D

Pics up tommorow
 
Oh - that sounds pretty cool. You should have been a gynaecologist or maybe you could decorate my hall throught the letterbox :)

Guess the biggest challenge will have been to get the xenon reflectors onto the 4 long brass bolts and keep it all aligned. IIRC there are a few nasty wire stabilizer wires that are in the way. Change the wirring out too?

Anyway look forward to seeing hte result and 'respect' :thumbsup:
 
It was basically like keyhole surgery at times!
EVERYTHING from my old lights was stripped out apart from the silver inners. Then the same on the new clear set. This was pretty simple aprt from the main wiring loom socket as the screws are almost impossible to undo from the back of the light. If i had had the fronts of it would have been a doddle.
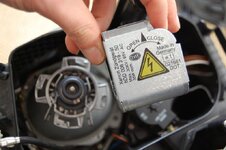
The clear set then had to have the pre moulded hole cut out where the Xenon power unit/ballast (or whatever you call it) plug goes in. This was easy. Then it was a case of filling up the new units with all the bits and pieces from the old set and assembling.

Heres a couple of finished pics....
DSC_0020b.jpg

DSC_0021b.jpg
 
Looks excellent - I have my clear light project next weekend, just collecting all the tools & bits together I need to do it now. Should be fun!

Although, end result definitely looks worth it. :D
 
Would I be right in thinking that you have managed to do what is said to be impossible, ie fit post-facelift headlights into a pre-facelift car.

Did you just use the shells and transfer over all the electrics?

Do you think this approach would work on Halogen's?

What are the real differences between pre & post-facelift?

Cue everyone rushing out depending on the answer's.
 
Dreamer - that looks really good - well worth the effort.

In terms of the darker grilles I'd have to ask why? I think they will look out of place as there is no other black int he scheme that they are picking up on.

RichardG - I'm sure Dreamer will clarify but I don't think this has anything to do with fitting post facelift lights. My understanding is that this is using a pair of prefacelift clear indicator halogen headlights and retrofitting all of Dreamers internals from his original prefacelift amber lens xenons.
 
Looks really good Dreamer! Will be good to see a 'How To' if you can remember it and have the pics. I'm going to do this and replace the amber indicators in mine at some point, but I just want to find an easy way of taking the lights apart. I don't particularly want to 'break' them open and I don't want to put them in the oven. From what I've read so far though, it looks like I may not have a choice.

Also (stupid question) does the clear indicator (clear plastic strip - not the actual light) fit in to pre-facelift headlights? Or would I need to get the clear bit from a set of clear 2005 pre-facelift lights? I hope its not the latter because they are damn rare!
 
ryukin said:
Looks really good Dreamer! Will be good to see a 'How To' if you can remember it and have the pics. I'm going to do this and replace the amber indicators in mine at some point, but I just want to find an easy way of taking the lights apart. I don't particularly want to 'break' them open and I don't want to put them in the oven. From what I've read so far though, it looks like I may not have a choice.

Also (stupid question) does the clear indicator (clear plastic strip - not the actual light) fit in to pre-facelift headlights? Or would I need to get the clear bit from a set of clear 2005 pre-facelift lights? I hope its not the latter because they are damn rare!

To answer your question about the clear insert - it's the same on pre and post facelift lights. In fact in one conversion I've taken a damaged facelift to bits to get the clear indicator lens.
 
cj10jeeper said:
RichardG - I'm sure Dreamer will clarify but I don't think this has anything to do with fitting post facelift lights. My understanding is that this is using a pair of prefacelift clear indicator halogen headlights and retrofitting all of Dreamers internals from his original prefacelift amber lens xenons.

Thats right. It sounds easy but it was a bit of a faf. The only part that was 'impossible' was removing the main wiring loom plug from the socket in my old headlights as they are screwed in from the inside. It would have taken a contortionist to unscrew it so i drilled these out. I still have all the bits from my headlights and the units themselves, so could take some pictures to explain at some point.
I never looked at my headlights too much before this but now i can really see how orange the sidelights are compared to the xenons :( Will have to sort that out soon :)
 
I didn't and can't open them. Using a scarificial set you can keep the lens off one and the rear casing of the other, reassembling to make a single light. Any old scrap lights will do for the sacrificial set Rebuilding whatever you want inside - clear lens, AE, balck or silver inners, etc.

This is really Dreamers conversion thread - where he put his xenon electronics and components into a pair of clear indicator shells, not opening the lights at all.
 
I took a few pictures to help explain. Unfortunately its not a step by step as i didn't take any pictures but this shows all the bits that come out of the lights and a bit of explanation to go with....

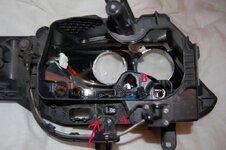
This is the back of the headlight with the rear access panel removed (which just pops of). Nearly all internals have been removed. When i say that i mean everything apart from the silver inner and indicator section as these cannot be removed unless you take the front of the light. The arrow points to where i drilled out the old wiring loom main socket. 'A' is the socket for the motor that levels the lights. 'B' is the mounting point for that motor.
DSC_0025copy.jpg

This is the motor:
http://i6.photobucket.com/albums/y234/ballymagic/DSC_00222.jpg

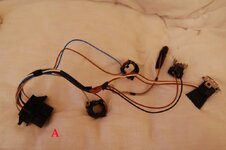
This is the wiring loom that comes out and plugs into the rectangular hole in the previous photo. Plug 'A' screws in from the inside of the headlight, hence why it was difficult to remove and why I drilled it out.
DSC_00212copy.jpg

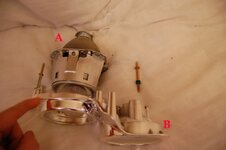
These are the main two parts that are in the unit. Part A is the only real part of the headlight that is majorly different xenon to non xenon. The screws/bolts you see mount 'A' in place onto 'B'.
DSC_00192copy.jpg

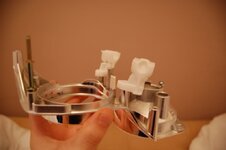
Here you can see the white brackets that hold part 'B' in place inside the headlight case. You can also see one or two of these still in the case in the first pic. One of these attaches to the leveling motor to rock part B to move the lights up n down.
DSC_00202.jpg

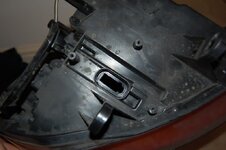
This shows the hole in the bottom of the headlight that the Xenon ballast locates and plugs through into the main wiring loom. This was blanked of in my clear non xenon units and was a simple drill through and then file out the hole a bit. You can see the 3 fixing points for the ballast around the hole.
DSC_0026.jpg
 
Dreamer - Really very interesting now I see some photos.

Due to what I have been doing and swapping clear lenses over I had to remove the fronts, however this is a great direction of 'attack' to do other things than change inners to xenon.

The silver bezel you hold in the 2nd to last picture is one of the places I mount AE, inside of the inner housing. I reckon with a bit of fiddling it would be possible to mount the second AE on the silver/black reflector still left in the housing unit. Woudl take a bit of cutting up but do-able.

Did you manage to reconstruct the ligts so that they are correctly aligned or was that easy enough using the knurled external adjusters?

ps - I hope you cleaned the light out really well else little specs of black plastic will gravitate to the poly clear front - I was paranoind about it
 
Back
Top Bottom