Hopefully you can learn from my misdeeds and NOT end up like me! As others have pointed out, you can't really remove the outer clear plastic lens, it's been glued onto the lens housing and "splitting" it involved a lot of cutting. I've debated doing this a few times to repair my lens but have decided against it.
First the cautionary tale:
I also have a Xenon headlight with dirt inside, from condensation and spiders who made their way inside. I removed the light assembly from the car, and then removed the projector lamp relatively easily -- it is four nylock-lock-nuts, and four green "shock absorber" orings.
I used a microfiber on a "stick" to try and clean the inside of the lens.
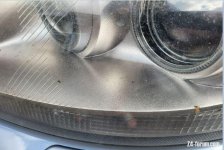
What I didn't realize is the plastic lens material is VERY soft unless it's been coated, which it has been only on the OUTSIDE. On the inside even a paper towel will leave microscratches ! What's worse is the chrome reflective paint is VERY easily removed. I made the mistake of using 99% IPA and REMOVED a lot of the chrome reflective paint!
This light while is 100% functional, definitely looks ugly. All attempts I made to improve it only removed more chrome so I have to replace this light assembly if I care about the aesthetics

.
How you can achieve success and not end up like me:
I read this trick on another BMW forum only recently and smacked my head with a "why didn't I think of that?". You can take the softest cloth you can find (like what's used for eye glasses and camera lenses) and wrap that around a magnet, attach a small string the to magnet and then use the "access hole" from removing the projector lamp to place the magnet-towel inside the light.
Use a another magnet wrapped in the softest material you can find (i.e. another lens / optical microfiber) and you can guide the magnet-cloth on the inside of the lens via the outside and remove any debris, etc.
If you think "well, I'll just use my hands" you'll find they get pretty cut up because the access hole is really a lot smaller than it seems.
Addendum:
I ended up making my own "light vents" to replace the rubber "U" shapped boots that come with the light because repeatedly spiders made their way into the rubber, built webs and prevented moisture from escaping resulting in a "waterfall" inside the housing. Eventually this condensed into the ballast which is BELOW the headlight and has zero means for moisture to escape.
I took pictures and I can document it, but basically I got plastic 90-deg tubing "housing" couplers augered the hole, took some fine nylon mesh material, superglued that, and then used black silicone RTV to glue the new "vents" to the light. This will hopefully prevent any future spider webs from causing more headaches.
 Liverpool