You are using an out of date browser. It may not display this or other websites correctly.
You should upgrade or use an alternative browser.
You should upgrade or use an alternative browser.
Changing out Disa valves
- Thread starter Heebs84
- Start date


raymond.harper
Senior member
https://www.youtube.com/watch?v=B9xwZLJKR-A

Commenting in this thread for completeness - the video linked above only applies to the "silver top" N52 engines (mine is an N52B30A). N52K engines with black plastic valve cover (VC) have the PCV / Oil Separator built into the VC. All our cars have one, but not the same design or location.
The DISA valves are the same between the silver / black top N52 . I used these (BMW OE) on my silver top with 100% success:
11617579114, Genuine BMW lower DISA valve
11617560538, Genuine BMW upper DISA valve
I purchased this set (I'm in the United States and this was the cheapest source) : https://www.bimmerworld.com/Intake-Fuel/Intake-Manifold/330i-Manifold-Upgrade-Intermediate-Kit-Z4.html
If you're doing the DISA I HIGHLY suggest replacing the CCV and ALL the breather hoses. My CCV was trashed and I suspect cause the gasket of my inner DISA to fail. Also I suggest using BMW OE for all breather hoses, and gaskets, CCV, etc. Expensive but I think they're better quality then Rein, etc.
Hi,
I used these guide as a baseline:
- https://bmwrepairguide.com/bmw-n52-intake-manifold-removal-13567x1x3x5z4-6-cyl/
- https://bmwrepairguide.com/bmw-n52-crankcase-ventilation-repair-13567x1x3x5z4/
I was thinking of doing a more comprehensive write-up, I'll quickly reply and then try to go back and take some pictures. The summary is 95% of the work is removing the intake, replacing the DISAs and CCV parts is actually quite trivial and fast.
I'm being a bit detail oriented in my write-up not to scare you, but just to help you see the steps and understand some of the challenges. A few suggestions for "while you're there":
If you have the intake off, now is the time to:
- Replace the starter
- The crank position sensor (located directly beneath the starter)
- Potentially the alternator if you suspect yours needs attention.
When I did this work, I replaced my starter because I experienced a few "long cranks, no start" and figured the crankshaft position sensor ("pulse generator" as BMW calls it) could also be suspect and I didn't want to have to undo stuff just to change this part.
Changing the starter, frankly, was pretty easy (it's two bolts!!!!) but I had some light corrosion in the housing, so I made a small cardboard "blank" where the starter went, and then used a Dremel with a brass brush and a vaccum cleaner to remove oxidization.
Aside: A new Bosch starter was $150 US, a local indepenendant shop wanted $760 to replace the starter IN ADDITION to $2K for the DISAs and CCV which just pushed me to do the work myself.
To re-install the starter you have to angle-torque the bolts, the longer one is hard to see, so you can put a mark on it with a marker and after getting the initial torque, rotate and check with a mirror.
The crank position sensor was relatively easy to replace but I HIGHLY suggest you clean that entire area with swabs and alcohol BEFORE removing the sensor because when you remove the sensor, that hole exposes the engine internals and a few times I almost had debris go in!
The crank position sensor bolt also needs angle torque and the initial torque is small (I think 4 n-m?) and I wasn't carefull and snapped the head bolt on mine. A screw extract thankfully removed it, likely easily because I had cleaned all the thread bores with a swab before doing the new sensor install.
Oh, getting the crank position sensor installed took many attempts because the new gasket doesn't want to compress easily (even with new engine oil) so I had to insert, remove, twist, insert, twist a few times before it "popped" in!
A few notes from memory on getting the intake off and doing the DISAs. Some of this may not 100% apply to you since I have a left-hand-drive car.
== Make sure battery is disconnected and you leave yourself several days to do this properly ==
0. To remove the intake manifold, you have to remove all the plastic tubing after the air filter that runs to the throttle body, intake, sound generator, etc. Take some pictures and be careful because the plastic is softer than you think.
1. Replacing the inner DISA isn't super complicated, but it'd be really hard to do without completely removing the intake. There's three or four screws that hold it on, and after I removed the screws it took a LOT of pulling to get it out. Conversely, installing the new one it was a TIGHT fit and I used new oil to lubricate the rubber before installing.
A lot of places suggest a silicone lubricant but I was afraid that would poison the O2 sensors, so I figured engine oil is OK, though not ideal. I had a PTFE-based "dry" lubricant but I opted for engine oil to be safe.
2. To get the intake off, you have to disconnect a brake booster hose which goes "horizontally" across the intake and "behind" the platsic runners. I disconnected the hose at the brake booster side (it is easy to undo there) and when it came time to lift the intake off, I had to bend the brake booster hose and slide the intake towards the car and up in the air. The hose is anchored to the alternator but that clip is designed to open and realease the hose.
I ended up replacing the brake booster hose on my car with a new when I went to re-install the intake so there was no vaccum leak. I didn't see many guides really talk about the brake booster hose but it's really in the way!
I also suggest replacing the rubber "bushing" that the smaller hose goes to on the brake booster assembly. I did NOT replace the small hose (which has a check valve) because it looked fine and was easy to get to should I need to do it in the future.
The brake booster hose has this stupid "one time" hose clamp and mine had two on it which I had to cut off to yank it off the vaccum pump. The new one came with a "one-time" clip already crimped and I wasn't sure if I needed a second one or not, so I went ahead and bough a new small hose clamp and attached it as well after re-installation.
The brake booster hose took a lot of force to remove (pulling vertically) and conversely alot of pushing and twisting to get it to slide on. I think it's a metal tube inside the rubber that slides onto the metal portrusion on the vaccum pump.
3. I had to disconnect the fuel hose from the fuel rail to get the intake to come off and not snag the rubber hose. It's not difficult to remove, you undo a little cap on the fuel rail, push with a screw driver and rag underneath to catch fuel (ugh) and then you push the rubber hose TOWARD the fuel rail while pushing the plastic clip in the opposite direction. Sounds a bit weird but if you look it up online, you'll see it's not hard.
I ended up getting a small cynlidrical metal slug that I wrapped in teflon tape and inserted into the disconnected rubber fuel line so the garage did not smell of gasoline. Otherwise, get ready for headaches extraordinare! I previously tried capping the fuel line with a plastic bag and rubber band but the smell was still there.
I also got a small piece of rubber hosing and another cylndrical metal slug and I "capped off" the fuel rail as well to make sure smells didn't come from there eithere.
Since doing all of this work rarely happens in one day, you might want to come up with a similar plan for your disconnected fuel rail.
4. The set of electrical connections that go to DISAs, etc are located on a small box at the bottom of the intake and attached via a wide metal plate with two T27 torx screws.
The screws are angled and in a slightly awkward position so you would benefit from a ratched with a flexible head and a small mirror to locate it for the first time -- it's NOT obvious.
Once you undo those two screws (don't lose them!) the plate falls down, and you'll see a sort of octopuss set of cables coming from it.
5. You can go ahead and remove the throttle body before unbolting the intake, it's one electrical connector that's easy to get to, and four bolts 10mm bolts which are pretty accessible.
6. When I had my intake off my car, because my CCV had failed, there was a lot of oil inside and you can't get to all passage ways by hand.
So I bought a large plastic bin, filled it with Dawn soap water, bought a "bottle brush" and basically did my best to clean the hell out of the intake
7. I bought a new PCV heater assembly from BMW ($30) but there's a recall on this and in theory BMW might replace this and some parts of the breather hoses.
It's unclear however if they'd do the entire CCV (one person they did do that for him), but I didn't want to mess with driving my car there, fighting with them, finding out they did or did not replace stuff so I just did this myself.
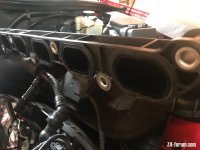
8. My actual intake ports in the engine had burnt rubber + oil residue, so I used a throttle body cleaner (Berryman's) along with blue shop towels attached to some chopsticks that I'd use to clean the intake in the head and even the valves.
I kind of screwed this up because that spray will clean the back of the intake valves (good!) but it removes the oil film that protects the valve seats (bad!). So if you go as far as I did, right after cleaning your intake valves and seats, spray it down with WD40!!
I ended up having to use Evapo-Rust and even a small brass brush (also attached to a chop stick) to try and remove the small rust that developed on the valve seats.
9. I bought new intake gaskets from BMW ($70-USD, OUCH) because it's not worth taking the risk to do all of this work and find the intake is leaking!
10. Some of my intake "studs" had rust on them, so I used some PB Blaster, let it soak and then removed the affected studs and replaced them with new ones.
I was worried these might break, but they're pretty sturdy and come out with a standard E-torx socket.
I used these guide as a baseline:
- https://bmwrepairguide.com/bmw-n52-intake-manifold-removal-13567x1x3x5z4-6-cyl/
- https://bmwrepairguide.com/bmw-n52-crankcase-ventilation-repair-13567x1x3x5z4/
I was thinking of doing a more comprehensive write-up, I'll quickly reply and then try to go back and take some pictures. The summary is 95% of the work is removing the intake, replacing the DISAs and CCV parts is actually quite trivial and fast.
I'm being a bit detail oriented in my write-up not to scare you, but just to help you see the steps and understand some of the challenges. A few suggestions for "while you're there":
If you have the intake off, now is the time to:
- Replace the starter
- The crank position sensor (located directly beneath the starter)
- Potentially the alternator if you suspect yours needs attention.
When I did this work, I replaced my starter because I experienced a few "long cranks, no start" and figured the crankshaft position sensor ("pulse generator" as BMW calls it) could also be suspect and I didn't want to have to undo stuff just to change this part.
Changing the starter, frankly, was pretty easy (it's two bolts!!!!) but I had some light corrosion in the housing, so I made a small cardboard "blank" where the starter went, and then used a Dremel with a brass brush and a vaccum cleaner to remove oxidization.
Aside: A new Bosch starter was $150 US, a local indepenendant shop wanted $760 to replace the starter IN ADDITION to $2K for the DISAs and CCV which just pushed me to do the work myself.
To re-install the starter you have to angle-torque the bolts, the longer one is hard to see, so you can put a mark on it with a marker and after getting the initial torque, rotate and check with a mirror.
The crank position sensor was relatively easy to replace but I HIGHLY suggest you clean that entire area with swabs and alcohol BEFORE removing the sensor because when you remove the sensor, that hole exposes the engine internals and a few times I almost had debris go in!
The crank position sensor bolt also needs angle torque and the initial torque is small (I think 4 n-m?) and I wasn't carefull and snapped the head bolt on mine. A screw extract thankfully removed it, likely easily because I had cleaned all the thread bores with a swab before doing the new sensor install.
Oh, getting the crank position sensor installed took many attempts because the new gasket doesn't want to compress easily (even with new engine oil) so I had to insert, remove, twist, insert, twist a few times before it "popped" in!
A few notes from memory on getting the intake off and doing the DISAs. Some of this may not 100% apply to you since I have a left-hand-drive car.
== Make sure battery is disconnected and you leave yourself several days to do this properly ==
0. To remove the intake manifold, you have to remove all the plastic tubing after the air filter that runs to the throttle body, intake, sound generator, etc. Take some pictures and be careful because the plastic is softer than you think.
1. Replacing the inner DISA isn't super complicated, but it'd be really hard to do without completely removing the intake. There's three or four screws that hold it on, and after I removed the screws it took a LOT of pulling to get it out. Conversely, installing the new one it was a TIGHT fit and I used new oil to lubricate the rubber before installing.
A lot of places suggest a silicone lubricant but I was afraid that would poison the O2 sensors, so I figured engine oil is OK, though not ideal. I had a PTFE-based "dry" lubricant but I opted for engine oil to be safe.
2. To get the intake off, you have to disconnect a brake booster hose which goes "horizontally" across the intake and "behind" the platsic runners. I disconnected the hose at the brake booster side (it is easy to undo there) and when it came time to lift the intake off, I had to bend the brake booster hose and slide the intake towards the car and up in the air. The hose is anchored to the alternator but that clip is designed to open and realease the hose.
I ended up replacing the brake booster hose on my car with a new when I went to re-install the intake so there was no vaccum leak. I didn't see many guides really talk about the brake booster hose but it's really in the way!
I also suggest replacing the rubber "bushing" that the smaller hose goes to on the brake booster assembly. I did NOT replace the small hose (which has a check valve) because it looked fine and was easy to get to should I need to do it in the future.
The brake booster hose has this stupid "one time" hose clamp and mine had two on it which I had to cut off to yank it off the vaccum pump. The new one came with a "one-time" clip already crimped and I wasn't sure if I needed a second one or not, so I went ahead and bough a new small hose clamp and attached it as well after re-installation.
The brake booster hose took a lot of force to remove (pulling vertically) and conversely alot of pushing and twisting to get it to slide on. I think it's a metal tube inside the rubber that slides onto the metal portrusion on the vaccum pump.
3. I had to disconnect the fuel hose from the fuel rail to get the intake to come off and not snag the rubber hose. It's not difficult to remove, you undo a little cap on the fuel rail, push with a screw driver and rag underneath to catch fuel (ugh) and then you push the rubber hose TOWARD the fuel rail while pushing the plastic clip in the opposite direction. Sounds a bit weird but if you look it up online, you'll see it's not hard.
I ended up getting a small cynlidrical metal slug that I wrapped in teflon tape and inserted into the disconnected rubber fuel line so the garage did not smell of gasoline. Otherwise, get ready for headaches extraordinare! I previously tried capping the fuel line with a plastic bag and rubber band but the smell was still there.
I also got a small piece of rubber hosing and another cylndrical metal slug and I "capped off" the fuel rail as well to make sure smells didn't come from there eithere.
Since doing all of this work rarely happens in one day, you might want to come up with a similar plan for your disconnected fuel rail.
4. The set of electrical connections that go to DISAs, etc are located on a small box at the bottom of the intake and attached via a wide metal plate with two T27 torx screws.
The screws are angled and in a slightly awkward position so you would benefit from a ratched with a flexible head and a small mirror to locate it for the first time -- it's NOT obvious.
Once you undo those two screws (don't lose them!) the plate falls down, and you'll see a sort of octopuss set of cables coming from it.
5. You can go ahead and remove the throttle body before unbolting the intake, it's one electrical connector that's easy to get to, and four bolts 10mm bolts which are pretty accessible.
6. When I had my intake off my car, because my CCV had failed, there was a lot of oil inside and you can't get to all passage ways by hand.
So I bought a large plastic bin, filled it with Dawn soap water, bought a "bottle brush" and basically did my best to clean the hell out of the intake
7. I bought a new PCV heater assembly from BMW ($30) but there's a recall on this and in theory BMW might replace this and some parts of the breather hoses.
It's unclear however if they'd do the entire CCV (one person they did do that for him), but I didn't want to mess with driving my car there, fighting with them, finding out they did or did not replace stuff so I just did this myself.
8. My actual intake ports in the engine had burnt rubber + oil residue, so I used a throttle body cleaner (Berryman's) along with blue shop towels attached to some chopsticks that I'd use to clean the intake in the head and even the valves.
I kind of screwed this up because that spray will clean the back of the intake valves (good!) but it removes the oil film that protects the valve seats (bad!). So if you go as far as I did, right after cleaning your intake valves and seats, spray it down with WD40!!
I ended up having to use Evapo-Rust and even a small brass brush (also attached to a chop stick) to try and remove the small rust that developed on the valve seats.
9. I bought new intake gaskets from BMW ($70-USD, OUCH) because it's not worth taking the risk to do all of this work and find the intake is leaking!
10. Some of my intake "studs" had rust on them, so I used some PB Blaster, let it soak and then removed the affected studs and replaced them with new ones.
I was worried these might break, but they're pretty sturdy and come out with a standard E-torx socket.