camber pins

mad4slalom

Senior member
anyone moved the front top mounts to give more camber or is it castor ? heard it makes for more precise turn in but more twitchy ie tramlining etc. any experiences re this ? :driving:
 
I used to rum my E85 for quite a while with teh camber set to max with the pins removed.

It improved the turn in and grip in the corner at the front of the car. overall all when on track it gave a good improvement.

however, be warned. if you alter the camber angle by bring in the suspension struts in, you must have the tracking altered as it also causes a toe out effect.

I didn't and it cost me a set of tyres.


Dario
 
How did you do adjust it? I presume you jack up the front of the car on both sides, loosen the shock tower nuts, pull the camber pins, push the top of the wheels in, then re-tighten the nuts?....Then adjust the tracking
 
BMWZ4MC said:
How did you do adjust it? I presume you jack up the front of the car on both sides, loosen the shock tower nuts, pull the camber pins, push the top of the wheels in, then re-tighten the nuts?....Then adjust the tracking

yes...

currently have mine set to -2.7. with enough high performance driving and wearing of the outer shoulder im getting a pretty even wear, be warned however, the gap between understeer to over steer is gone, that safety buffer is gone, so be careful.
 
what he said, But i never found any issues regarding over / understeer, only a willingness to turn in and track around a bend so much better.
 
Great, thanks guys. I've been working hard to reduce understeer and terrible outer shoulder wear with track use. I've had the shoulder down to canvas with several millimetres of tread left across the rest of the tyre.
So far I've made big improvements with 15mm spacers up front, a strut brace, and changing the fronts to PS2s. This, with trail braking into corners and a heavy right foot on the gas peddle on the way out, has essentially abolished understeer but not all of the the shoulder wear. Hopefully more negative camber up front will deal with this and make for a perfect balance.
If I'm still not happy, I'll be looking to a bigger anti roll bar at the back end.
 
You should'nt just adjust the camber by removing the pins as you are also changing toe. You can adjust toe yourself too its fairly straightforward.
 
I've played around a lot with camber, castor and toe on my Z3MC. If toe has already been set to zero, increasing negative camber creates toe out. Any amount of toe out makes the car become very twitchy, especially on public roads which are far from perfect. However, if you increase negative camber with OEM spec toe-in, this won't be a problem because the increase in negative camber will take the toe-in closer to zero.

If you go for camber/castor plates, then IMO, it's better to increase castor than negative camber because an increase in static castor causes an increase in dynamic negative camber. As such you get improved straight-line stability and self-straightening from the increase in castor and an increase in dynamic negative camber on turning. Best of both worlds.

If you pull the pins of the Z4MC's top mounts to increase the negative camber, make sure that you use the holes for the locating pins and the suspension towers as the way of ensuring that you adjust by the same amount on both sides. If you have a strut brace fitted, you'll need to remove it and then refit the nuts on the top mounts BEFORE you jack up the car so that you can see exactly how much you are moving the top mounts. You'll then need to drop the car again before reinstalling the strutbrace.

Unless you stiffen the front suspension above the level of the OEM front suspension (i.e. upgrade to aftermarket), then you'll never stop outer tyre wear with hard track driving unless you go to excessive negative camber.

If you want to know an easy DIY method of setting front toe angles send me a PM.
 
exdos said:
If you want to know an easy DIY method of setting front toe angles send me a PM.
Yes please!

Twitchy is good - my Westfield has a very fast steering rack and a tiny steering wheel so I'm used to it. I do agree though, on rubbish roads it can be disconcerting.
 
BMWZ4MC said:
exdos said:
If you want to know an easy DIY method of setting front toe angles send me a PM.
Yes please!
I may as well post this here and just do it once.

I've devised this very simple DIY method of checking toe angles.

Park the car on a level surface; smooth as possible is best. When parking, make sure that the front steering wheel is absolutely horizontal by driving forwards and backwards to check that it remains horizontal.

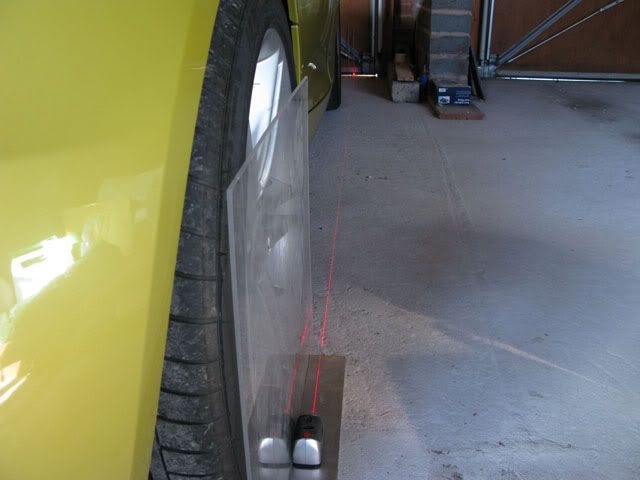
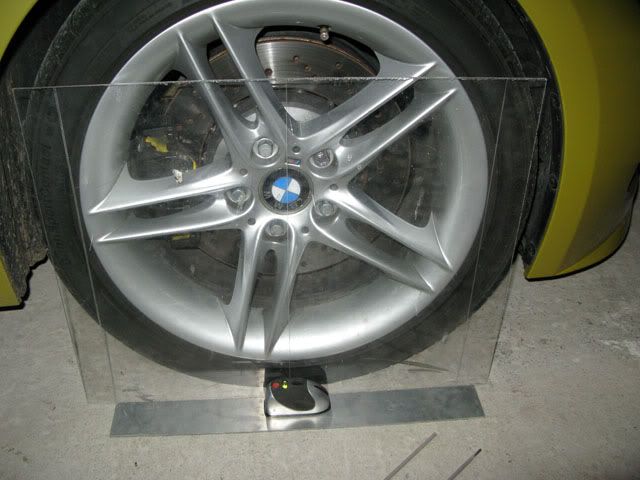
You need a piece of board that fits against the wheel (I use perspex) and place a laser level against the board in the centre as below. I place a piece of flat aluminium on the floor, just to "average out" any irregularities in the floor surface.

IMG_9044.jpg


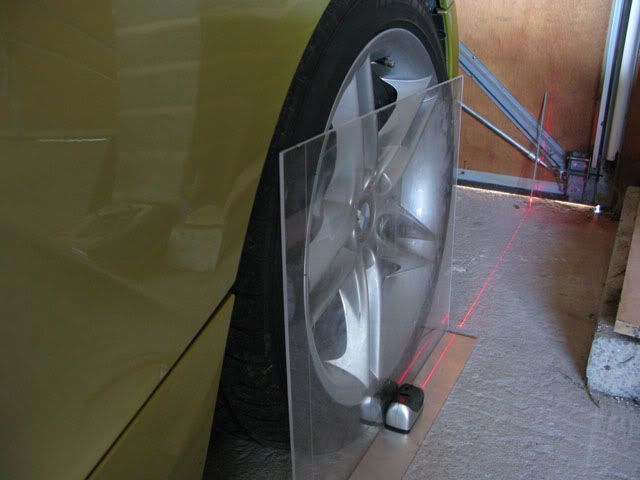
Then switch the laser level on and make a mark or note where the laser light shines at a given point in front of the car. I've used a welding rod here.
IMG_9046.jpg


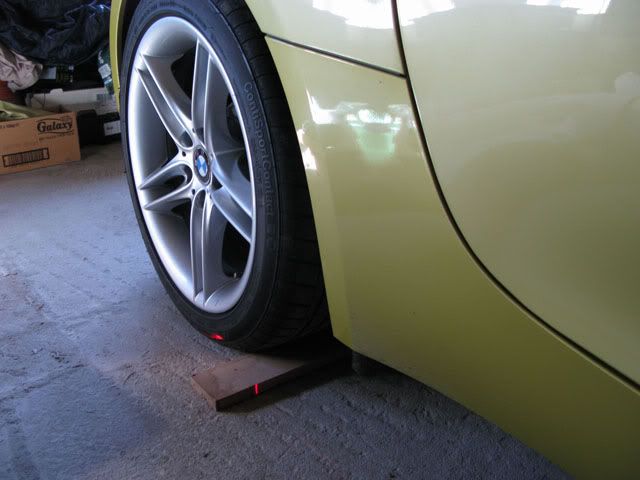
Place a long strip of wood (plastic pipe etc.), which is wider than the rear track width, under the front of the rear wheels. Turn the laser level through 180degrees and mark the point on the strip, as below. Then repeat the process on the front wheel of the opposite side. You then measure the distance between the marks in front of the wheels and also measure the distance between the marks on the strip placed in front of the rear wheels. If the measurement on the strip is bigger than the measurement in front of the car, you've got toe in, and if it's not, you've got toe out. You can calculate the actual combined toe angle if you also measure the distance between the position of the marks made in front of the car to the strip when in position in front of the rear wheels.
IMG_9048.jpg


If you repeat the process for both the rear wheels, you can calculate the combined toe angle at the rear of the car.
IMG_9047.jpg


It's important when checking the alignment, that the "thrust angle" is set at as close to zero as possible. This is possible by measuring the distance between the marks made in front of the car for both front and rear wheels. If the thrust angle is zero, (i.e. the rear wheels are properly toed equally on both sides so that the centre line is along the centre of the car) then the marks ahead of the car should be a similar distance from the marks made from the front wheels, (say, around 40mm) provided that the front toe has been set to be equal on both sides whilst the steering wheel is level (i.e steers straight).

I've been using this method for several years now, and I've found it simple, reliable and repeatable, and doing this has helped me to make adjustments to the geometry as and when I like at no cost.

I'll post a "how to" later on adjusting the tie rods to change front toe angles.
 
Thanks Exdos, I'll read it more carefully when I have a spare moment to think about it properly!
 
Once you know how to check toe values you can start to make adjustments to your geometry. Always record your starting point so that if you don't like any changes you make, you can easily revert to your original values.


FRONT TOE ADJUSTMENT
To adjust toe (in or out) you need to adjust the tie rods on the front wheels.

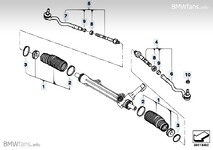
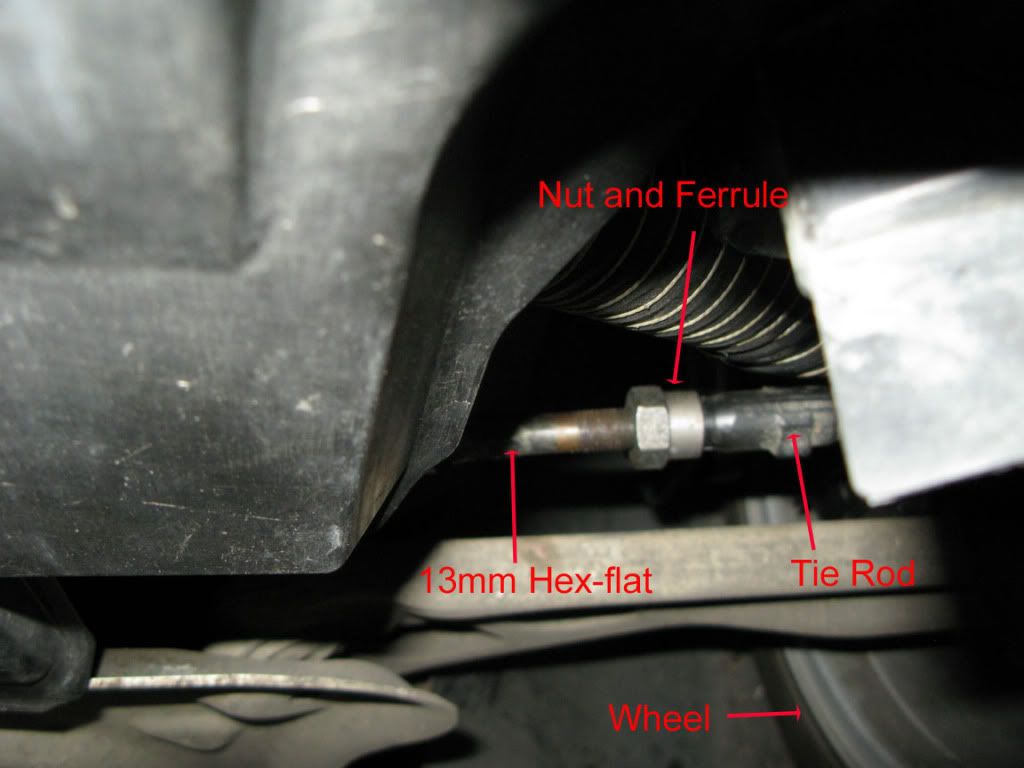
Using the relevant parts diagram and photo below, you need to adjust the steering linkages parts 4 and 5.

MTEzNDkyX3A=.png

Z4Tierodcopy.jpg


The actual linkages that you turn are the most inboard shafts which aren't separately numbered. You need to lift the car safely, either one or both sides at a time before you get under the car. Using a large adjustable spanner, unfasten nut 8 which will release the compression ferrule Part 9. You can now adjust Part 4 or Part 5 on the relevant side. You will see a hexagon shaped section of Parts 4 & 5 on the inner rod which you put a 13mm spanner. To get less toe-in (or toe out) you need to turn the 13mm hex-flat so that the thread undoes, so you need to turn Part 4 or 5 in the same direction that you undid nut 8 on the same side. In order to do this accurately mark the end of the hex section with chalk or put tape around the shaft and mark it with pencil with a positional "landmark" and then use the 13mm spanner to turn the tie rod whilst holding the tie rod. An initial adjustment of 120 degrees on the inner tie rod (=2 flats on the hex) will produce a significant, but not excessive, change in toe angle, which can be measured as the starting point. Once you have the measurement of change, you can then gauge how much to turn the tie rod to make further adjustments, if necessary. When you've adjusted each tie rod, retighten nut 8. Then adjust the opposite side by the same amount to preserve symmetry. When the car is returned to the ground, the steering wheel should still be central and when driving on a flat road, the car should still drive perfectly straight.

Go for a test drive and assess how the car goes with the changes in toe angle. If you find that the steering becomes too sharp, and the car turns-in faster than you'd like, readjust the toe by turning the tie rods back by just one flat (60 degrees) to slightly apply more toe-in. Provided that you adjust equally on both sides, you just can't go wrong! BUT, if you do go wrong and you find that the car pulls to one side, remember that the car will always pull to the side with the shortest tie rod adjustment. So to correct, either lengthen on the side to which the car pulls or shorten on the opposite side.


REAR TOE ADJUSTMENT

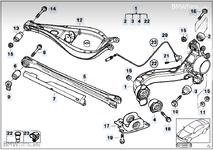
Using the relevant parts diagram and photo below, you need to adjust Part 17, the Rear Trailing Arm Bracket (RTAB), which is found just in front of the rear wheel arch. To see the part, you need to remove the lower front wheel arch liner (with the flap below the cill). It's a bit tricky to remove for the first time, because you need to identify all the fasteners, but it is possible to make the adjustment once you're familiar with the bracket, without removing the liner.

MTUwNjE5X3A=.png


ReartrailingarmZ4copy.jpg


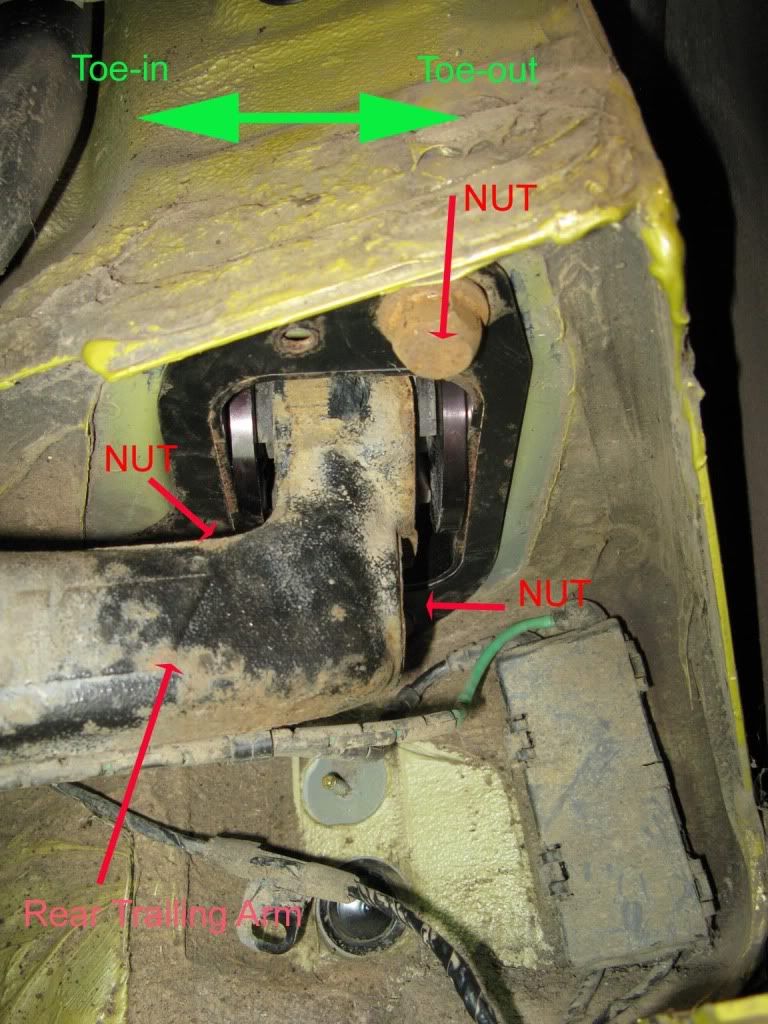
Undo the 3 bolts enough so that the RTAB can be moved laterally. To get less toe-in move the RTAB outwards and then retighten the 3 bolts. I found this easiest to gauge by removing the lower front wheel arch liner so that I could mark the position of the RTAB on the chassis with felt-tipped pen before I made any adjustment and so that I could adjust equally L&R.

It is also possible to adjust rear toe by adjusting the eccentric bolt, Part 10 in the diagram. However, this also adjust rear camber at the same time.
 
Are decent alignment shops hard to find or something? That's one area I wouldn't muck with unless i had proper equipment.

Pulling the pins will net you -1.5 MAX on their own. If you want more you'll need a shim/camber kit. The car can be dialled in perfectly at a good shop, and 'tramlining' won't be an issue if they get your settings correct. I run -2.5f/-2.0r and the car is stable and on rails. Leave it to the pros IMO
 
SweetRide said:
Are decent alignment shops hard to find or something? That's one area I wouldn't muck with unless i had proper equipment.

Pulling the pins will net you -1.5 MAX on their own. If you want more you'll need a shim/camber kit. The car can be dialled in perfectly at a good shop, and 'tramlining' won't be an issue if they get your settings correct. I run -2.5f/-2.0r and the car is stable and on rails. Leave it to the pros IMO
Do you have a problem with others doing DIY on cars? Alignment is just practical trigonometry. Provided that the method is repeatable and accurate, then where's the problem? From the method that I use, the accuracy comes from the fact that the toe angles are measured by "magnifying" the difference in the toe angle at points well ahead and behind the actual wheels. So a measurable change in toe of say 4 millimeteres measured over a distance of around 4 metres (i.e. 4000mm) gives an accuracy of 0.1%. In comparison, measuring toe in units of 1/32" at the wheels only gives an accuracy of 3.125%.
 
Just an update - last weekend I pulled the camber pins on my ///M to increase front suspension negative camber as much as the top mounts would allow (matching left and right, as well as ensuring that no front-rear translation or rotation occurred). The result has been much sharper turn in and a marked increase in attainable cornering speed. The car tramlines on poorly made roads perhaps more than previously, but I have yet to experience any snap oversteer. Indeed, the earliest loss of traction experienced when pushing hard on a large (motorway junction) roundabout is in the form of slight washout at the the front. Before pulling the pins this could be induced at 50+ mph or so, whilst with the increased camber I was accelerating hard at 65 mph when the front started to drift a little. I suspect that driving on a smooth, dry surface with a neutral throttle (less rearward pitch) the loss of traction would occur at even higher lateral g.
 
I found circa 1.5 degrees was enough for me on the road, the tramlining gets old quickly. However, with the toe adjusted properly it will be far better.
 
I haven't measured mine, I just ensured that I made the adjustment in only one plane and matched left with right. I can cope with tramlining as the car has always done this. I just spend more time in the BMW lane :D My only concern was to avoid snap oversteer and so far that's not been evident. I'll know better the true effects in a week or two when I've been back on the track.
 
Back
Top Bottom