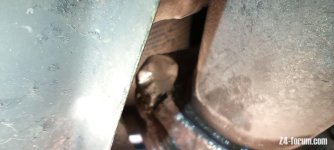
Went to put in a replacement post cat sensor today and despite using a sensor socket and a variety of spanners and breaker bars Sealey socket just rounded off the sensor and just kept slipping around. No heat available to try that very much looks like it will have to go to a professional to have a go at getting it out. Hate having to admit defeat. Access to it is from underneath the car so a lift is the way to go and a decent sensor socket, the Sealy one failed although it coped ok when last used on the Z3 sensors I changed out.
You are using an out of date browser. It may not display this or other websites correctly.
You should upgrade or use an alternative browser.
You should upgrade or use an alternative browser.
bank 2 after cat lambda sensor stuck
- Thread starter colb
- Start date
Update
Had another go at getting the stuck post cat sensor out of bank two exhaust pipe after investing in a 12point lambda socket and a Map Gas blowlamp. Despite heating the sensor boss to cherry red the 12 point socket couldnt budge it at all, its well and truly stuck in there. Interestingly its the only sensor with a grey wire thge rest are black and probably original. I am supposing who ever replaced it lasy probably didn't put anti=seize on the threads when putting it in. Looks like the cat might have to come off to get a clear swing on the sensor which then highlights the remaining two rust exhaust joint bolts on the downpipe from the cat. Replaced two of threm with stainless bolts and nuts but access to the remaining two is a problem I can't get a angle grinder in the cut a slot in the clamp to release pressure on the splined stud/bolt to drift them out like I did with the other two. Link to previous post on joint bolt removal
https://z4-forum.com/forum/viewtopic.php?t=141774
 Attleborough, Norfolk
My go-to for things that won't move is a decent monkey wrench. The harder you pull the more the teeth dig in! Dunno if there's space under there for one but might be a thought when it's on the bench.
Colb, I saw your comment that you'll be taking a break on this - well wishes on time away and healing that finger!
You mentioned that you used an air hammer on the studs you replaced, so you have one and use it. Is there any space so you get your air hammer on the side of a 'crow's foot' style sensor wrench (or on a cut-down box end spanner) as a substitute "impact wrench" ? Apologies if you already tried this and broke the sensor wrench, or if there's just no room. Cheap sensor wrenches can bend open; a box end spanner would be trickier to fit, but stronger. Since you're going to replace the sensor, you could cut the lead to fit the box end spanner.
You mentioned that you used an air hammer on the studs you replaced, so you have one and use it. Is there any space so you get your air hammer on the side of a 'crow's foot' style sensor wrench (or on a cut-down box end spanner) as a substitute "impact wrench" ? Apologies if you already tried this and broke the sensor wrench, or if there's just no room. Cheap sensor wrenches can bend open; a box end spanner would be trickier to fit, but stronger. Since you're going to replace the sensor, you could cut the lead to fit the box end spanner.
Tried the air hammer on the breaker bar attached to the sensor socket already, great minds think alike, it didn't budge a mm. I also gave the exhaust joint stud a good hammering with it but that didnt budge either. Really need to cut a slot across the fitting like I did on the first two to release the tension on the splined end of the stud so it will be drifted out with the air hammer. Space to get an angle grinder in is just not there will have to explore a decent Dremmel tool that can use a metal cutting disc, maybe get on the required positions with a smaller tool.
See how I feel when I get back from Hols and finger better before I attack it again. Might consider putting it out to a proffessional rather than sustain any further injury. Got an independant BMW Shop a stones throw from me but hate resorting to that.
See how I feel when I get back from Hols and finger better before I attack it again. Might consider putting it out to a proffessional rather than sustain any further injury. Got an independant BMW Shop a stones throw from me but hate resorting to that.
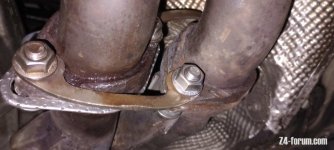
Finger healed up so have returned to the task of getting the next two rusty exhaust downpipe bolts out, started on this yesterday and after much heating with a Map Gas blowgun to cherry red around the splined hole end bset to with the air hammer and it finally popped out, cleaned the hole up with a round file and popped the replacement stainless bolt in.
Attention turned to last remaining splined bolt and nut today, rusty remains of the nut on this one managed to slot it and drift it off the remains of the bolt. Unable to get a grinder or dremmel in to slot the top flange just no room to get at the right position to put a slot in. Repeated heating with the Map Gas Gun and air hammer blows to push it out proved immpossible, it wouldn't move a mm.
Getting nowhere with this last bolt probably going to take it somewhere where they can use oxy on it, got to get that rounded Lambda sensor out as well so will see if I can get them to sort out both and fit the replacements I have.
Picture of the third one I got out, quite why this last one is so difficult beats me.
Attachments
If you can cut the protruding part of the sensor off just leaving the "nut" portion that is stuck in the exhaust. Then hopefully you can get a 6 point socket or a box end wrench (spanner) on it. This will give you a more solid bite and it will have less of a chance of rounding it any more than it already is.
Thanks for the suggestion, already considered that but held off doing any more to the sensor whilst I battle with the exhaust clamp stud removal just in case the exhaust has to be taken down or the Cat removed to get better access to the stuck Lambda. Managed to remove and replace three of those exhaust studs still a battle getting the last one to pop out of its splined end despite heating that end of the clamp cherry red with Map Gas and using an air hammer on the remaining shank that protrudes at the bottom. It refuses to move a mm., only difference with this one is I can't get a grinder on the clamp to put a slot across the flange to release the pressure on the splined end. A last resort will be drilling it out but thats an even more painful exercise which requires a handful of decent drills to do this the bolts are extreamly hard to drill. Raining today so giving it a break today will resume during the next week.
colb said:A last resort will be drilling it out but thats an even more painful exercise which requires a handful of decent drills to do this the bolts are extreamly hard to drill.
Cobalt drill bits are what you want. They're quite cheap in the smaller sizes from Toolstation or Screwfix and will make short work of an exhaust bolt. I had to drill out a 10.9 M10 shock clamp bolt recently and started with a 6 ish mm cobalt bit I'd bought on a bit of a whim.
I didn't hold out great hopes as I assumed the bolt would be tough beyond measure, but it went thru it in very short order and, suitably impressed, I staggered off to buy some larger sizes.
Remnants of bolt:
.jpg")
Colb, Glad to hear you have healed up. I continue to follow your odyssey, because I suspect this same adventure awaits me as well. I may consider it as a winter project, so when the inevitable problems occur I can leave it sit for a day or more each time. I don't think my car has ever seen salty winter roads, but it's seventeen years old, and corrosion never takes a holiday :wink:
Keep tuned in going to have another go and maybe drop the exhaust as there is only one old nutless stud left to get out the other three alrady replaced with stainless bolts and nuts so apart from having to take the rear under panels off to allow access to the exhaust hangers so it can be moved backwards away from the downpipe joint its probably going to give me more room to get the full size angle grinder in to slot the flange to realease pressure on the splined end of the annoying stud and allow the air hammer to finally drift it out. Was hoping to avoid dropping the exhaust so the option of drilling it out has not yet been ruled out.
ITS FINALLY OUT!!!!!
Spent another day working on getting the last exhaust joint stud out of the downpipe, used a small grindstone in the cordless drill and ground the top of the splined captive bolt so it revealed the circular shape of the bolt splined end in the shiny surface now minus its cap. Gave it a good dousing with penetrating spray followed by some heat from the Map Gas blowgun, gave the air hammer a go on the protruding shank of the stud but it didn't move it. Nipped out to local Screwfix and purchased a set of metal cutting blades for my Recipricating Saw and then set to to putting a slot in the exhaust flange deep enough to partially slot the flange end of the stud. Just enough room to get the saw blade in a suitable position to put the slot in. Applied heat again with the Map Gas then back on the air hammer, second tap from the hammer had the now hot and smoking stud free from the flange. Would have been so much easier if I had room to get the angle grinder in there to slot the flange but just no room to get in there for this last stud. This has got to be the worst job I have ever come across after years of working on cars, as I found out the only way of getting these studs out is to slot the flanges so the tension on the splined ends is released, some prople reccommend drilling them out, doable but use Cobolt drills these studs are made from extreamly hard steel, early drilling attempts on some of the other ones I removed failed, my drills just made no impression on them. Slotting and some heat is the way to go if you want to get them out.
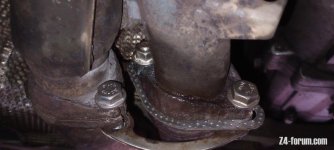
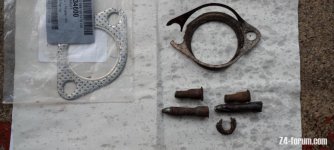
I did have to replace one Gasket and that needed some adjustment to get the holes on the gasket to line up with the flange holes, small grindstone to trim the gaskets holes sorted that. All bolts replaced with stainless bolts and nuts and torqued up tight. Engine started and checked for leaks, all good, thank goodness for that. Added a few pictues of todays efforts now got to work out how I am going to get that rounded off dead post cat sensor out. At least if the Cat has to come off to get it out its going to be a breeze undoing the joint now.
Spent another day working on getting the last exhaust joint stud out of the downpipe, used a small grindstone in the cordless drill and ground the top of the splined captive bolt so it revealed the circular shape of the bolt splined end in the shiny surface now minus its cap. Gave it a good dousing with penetrating spray followed by some heat from the Map Gas blowgun, gave the air hammer a go on the protruding shank of the stud but it didn't move it. Nipped out to local Screwfix and purchased a set of metal cutting blades for my Recipricating Saw and then set to to putting a slot in the exhaust flange deep enough to partially slot the flange end of the stud. Just enough room to get the saw blade in a suitable position to put the slot in. Applied heat again with the Map Gas then back on the air hammer, second tap from the hammer had the now hot and smoking stud free from the flange. Would have been so much easier if I had room to get the angle grinder in there to slot the flange but just no room to get in there for this last stud. This has got to be the worst job I have ever come across after years of working on cars, as I found out the only way of getting these studs out is to slot the flanges so the tension on the splined ends is released, some prople reccommend drilling them out, doable but use Cobolt drills these studs are made from extreamly hard steel, early drilling attempts on some of the other ones I removed failed, my drills just made no impression on them. Slotting and some heat is the way to go if you want to get them out.
I did have to replace one Gasket and that needed some adjustment to get the holes on the gasket to line up with the flange holes, small grindstone to trim the gaskets holes sorted that. All bolts replaced with stainless bolts and nuts and torqued up tight. Engine started and checked for leaks, all good, thank goodness for that. Added a few pictues of todays efforts now got to work out how I am going to get that rounded off dead post cat sensor out. At least if the Cat has to come off to get it out its going to be a breeze undoing the joint now.
Attachments
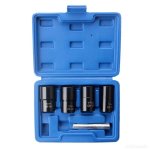
Preperation to get the seized in post cat sensor out I have purchased a set of Extractor sockets which includes the 22mm size for the sensor. Will have to cut the top off the sensor to get the socket on but as the sensor is dead thats not going to be a problem. The sockets have a spiral inside that bites into the flats on the sensor as force is applied so hopefully it won't slip like the cut away sensor tools that failed to undo it did.
Got mine through Amazon but they are cheaper on ebay.
https://www.ebay.co.uk/itm/354897786939?hash=item52a18e783b:g:w8QAAOSw3vhkp42X&amdata=enc%3AAQAIAAAA4C65JVcRVeX4v13cu4Cfx%2BjdfAAiN1uJN0Z1oAGxS4tWuJdfrb3Sim7hs7Q7zJw%2BINNDkU6NtDcoQM0crMNQRInsQdZR7ItFfH0RLyst9smsxCMXriNqMvJWPK9MEsHCt9b%2BBygieDwJXEOnFh2fSTDcczdOnCsrJA003psbM%2Fa6cADT224pHtuTdwVlNcW1vYE4ob0hwBKxinTAX6tH78LycGfn7Q80SY%2BrJPy5XNYPraAD7gDx3OnaM0m904ff4aVGWtfhs9i4qTMZy2dYWR%2BHXLdUspTRptwyfd44PQb1%7Ctkp%3ABk9SR6bHzOioYg
Attachments
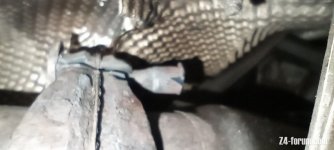
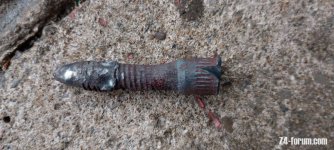
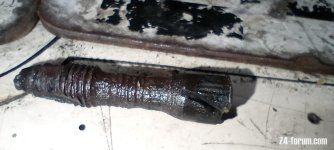
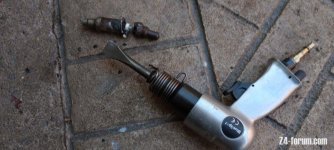
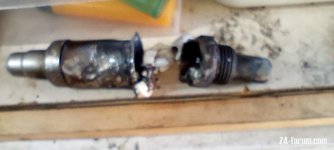
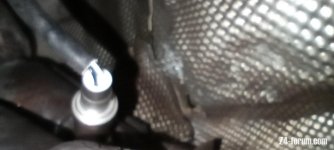
Another afternoon spent on getting the duff post cat sensor out, had a go at sawing the top of the sensor off with my reciprocating saw, that managed to put a slot a quarter of the way through it then no more despite changing saw blades twice, no room for an angle grinder to get at it so had a think and decided to use the air hammer with a flat chisel in it. Put the chisel in the slot the saw left and pulled the trigger. After a few blows it gave up and parted itself from the hex fitting at the base. Now it was preety rounded off from all the previous attempts to get it out so hammered the new 22mm Extractor socket onto what was left of the Hex and got a long breaker bar on it, just enough room to get the breaker bar in. A good pull on the breaker bar and low and behold I hear a crack reposition the breaker bar and give it another pull and yes the hex is unscrewing. Quick douse of penitrating spray and continue unscrewing it, well impressed with the bite these extractor sockets exert on a rounded off hex. At last its out, ran a thread chaser down the hole to ensure the threads were clean then screwed the replacement sensor in by hand followed by using a good fitting 7/16 open end spanner between the two exhaust pipes to complete the install and finally tigten it home. Ran the sensor wire up to the top of the engine and connected it to its plug under the beauty cover.
Cleared up the array of tools I had amassed and started the car, quick check underneath for any leaks then broke the Launch Scanner out to monitor the sensors. Clean bill of health all sensors performing as they should what a relief.
Pictures show Sensor installed, Old sensor removed and Air Hammer and its Victim.
I would advise owners to bolster their toolbox's with a set of those Extractor Sockets for times like this they are far better than the standard cut-away Lambda Sensor sockets which slip and round off the Hex, the only downside being you have to cut the old sensor down to get them on, not seen any deep extractor sockets on offer so far. Be warned hacksaws powered or not struggle to cut through these sensors, air hammer and chisel is the way to go.
Attachments
Bloody hellfire, that was a battle and three quarters! That makes me feel better about the times where I've ended up with a stack of tools a foot deep!