You are using an out of date browser. It may not display this or other websites correctly.
You should upgrade or use an alternative browser.
You should upgrade or use an alternative browser.
Atacama Yellow 35is build thread
- Thread starter B21
- Start date
 Attleborough, Norfolk
enuff_zed said:Have to ask, is this where the expression 'clusterf**k' comes from.
I was thinking ‘Bastard ball ache’ myself but yours is good too…. :fightwall:
…..or. cut all the binnacle plastic away so you can mock up the whole unit installed and looking finished on your bench, build a wood frame around the hardware leaving as much gap between the wood and hardware frame as possible, wrap the unit in masking tape, then fill the void with expanding foam, leave to set, then you’ll have something to make a fibreglass mould from which will fit the hardware part perfectly.
 Scottish Borders
john-e89 said:Square peg rou…….

Could you cut away all the plastic around the back of the binnacle so you could perhaps install an upper and lower plate mounted to the bulkhead to slide the hardware into, rather like a radio head unit into one of those aftermarket cages…? Dremel cut modify it, maybe buy two cages so you could butcher one to make mounting plates to self tap screw to the bulkhead for the modified main cage to attach to. Looking at the hardware I’d think you could screw a few small self tappers into it’s edge at certain points to mount it securely to the cage, short ones shouldn’t hit any circuit board inside as you normally have a good few mill gap between that and the hardware frame. So basically you’d be using the plastic bulkhead as pure cosmetic trim and not for any mounting duties. Won’t be easy obvs due to where you’re working on the car, but it seems any thought of an easy life has long flown the nest here… :lol: :wink:
It would seem come selling time you’ll have to sell this car modified so you’ll not lose anything by destroying the original mountings for the original binnacle, :?
Keep going….its trailblazing…
John..thnx for the option..I’m nearly there on my mind…I’ll nibble it away tomorrow..but I’m going in that direction…

john-e89 said:…..or. cut all the binnacle plastic away so you can mock up the whole unit installed and looking finished on your bench, build a wood frame around the hardware leaving as much gap between the wood and hardware frame as possible, wrap the unit in masking tape, then fill the void with expanding foam, leave to set, then you’ll have something to make a fibreglass mould from which will fit the hardware part perfectly.
John, again, thanks, I’ll keep both thoughts as options ..I’m in deep..
My Italian buddy is swearing too!
Attachments
enuff_zed said:Have to ask, is this where the expression 'clusterf**k' comes from.
One of your better ones

Had to happen eventuallyB21 said:enuff_zed said:Have to ask, is this where the expression 'clusterf**k' comes from.
One of your better ones
How can the company say just minor modification needed when you have so much trouble to get it to fit? I think I would have returned the unit when it became obvious that the whole dash needed to come out. On the other hand it's odd how different this unit is compared to the cheaper Chinese unit that Dave (Anubiszed) fitted which required much less work.
Silverstar said:How can the company say just minor modification needed when you have so much trouble to get it to fit? I think I would have returned the unit when it became obvious that the whole dash needed to come out. On the other hand it's odd how different this unit is compared to the cheaper Chinese unit that Dave (Anubiszed) fitted which required much less work.
Yes we just didn’t think how difficult it could be…my Italian AY 35is buddy thought he could piss it..he’s crying now…
The primary problem is that the hardware panel is used on E70,71, 90, 8x, 6x most of these have much bigger dash panels ..the E89 instrument panel is physically much smaller…of course all the install videos show on 3 series , X5 etc..no video of an E89 install..
The Chinese one is custom made for the E89 or it’s just smaller..
ronk said:Is returning it and fitting a Chinese version an option or have things moved on to far now?
Looking as the photographs I think I know your answer!
[/quote
Too late Ron..I’m pregnant!
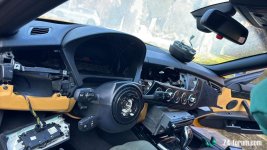
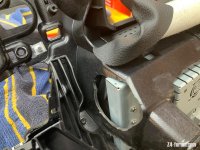
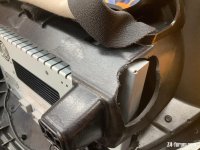
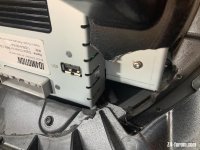
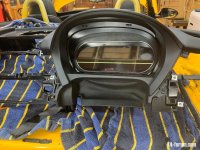
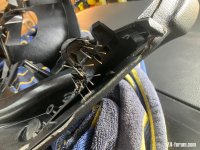
Day 3..finally got a trial fit..my poor dremel has had a few tiring days…
Here’s a few static pics plus a YouTube link…. https://youtu.be/q2z9V6H6chE?si=8waufCWyKE_RDpTe
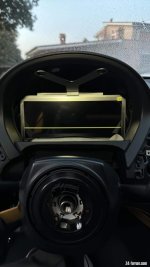
The key point that emerges is you have to take the top cowl off the instrument cluster, then fit the new ID4 cluster to the removed top cowl, then refit the top cowl to the dash..
The issue is the 4 of the 6 screws are hidden..two are easy, one difficult, three almost impossible..
My friend in Italy fitting his to another Atacama Yellow LHD 35is has lost his temper and butchered the fittings and glued the whole thing together.
Here’s a few static pics plus a YouTube link…. https://youtu.be/q2z9V6H6chE?si=8waufCWyKE_RDpTe
The key point that emerges is you have to take the top cowl off the instrument cluster, then fit the new ID4 cluster to the removed top cowl, then refit the top cowl to the dash..
The issue is the 4 of the 6 screws are hidden..two are easy, one difficult, three almost impossible..
My friend in Italy fitting his to another Atacama Yellow LHD 35is has lost his temper and butchered the fittings and glued the whole thing together.
Attachments
Inspirational work and great thread B21. When I'm struggling with a part fitting issue on some minor project, I will take heart and remember it takes perseverenceB21 said:Day 3..finally got a trial fit..my poor dremel has had a few tiring days…
Mojito said:Inspirational work and great thread B21. When I'm struggling with a part fitting issue on some minor project, I will take heart and remember it takes perseverenceB21 said:Day 3..finally got a trial fit..my poor dremel has had a few tiring days…
The darkest hour is before the dawn…total eclipses excluded..
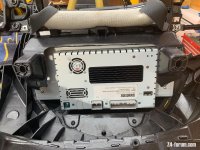
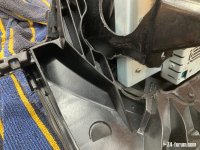
I broke the two outboard lugs off the dashboard when I removed it..on one side my defence was that some Germanic hand maidens had attached a set of GPS leads to part of it..
I decided to buy a second hand one..on arrival it too had the lugs broken..and unlike mine no sign of the broken bits..plus two other major bits damaged ..not bad for £400…
So decided to try and repair mine.
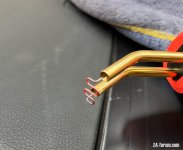
I super glued the lugs back on and then attacked it with a ‘welder’…
Basically it’s a glorified soldering iron head..two off…that uses the current through the metal pin to heat it to red hot..it then melts into the plastic and you let it cool whilst in situ..then you remove the ‘gun’..the pins are push fit into the end so the gun simply detaches itself from the now embedded pin.
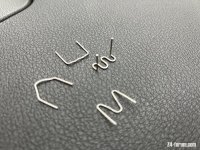
There are several versions of the pin.
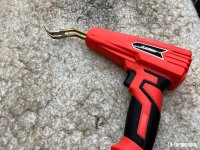
There is a spatula device to warm bars of material anc melt them as well.
It’s not pretty and needs a degree of finishing but compared to a glued joint much much stronger.
It’s the same effect as re-bar in concrete..
We’ll see how it goes on re-installation..
I was so impressed with it I used some scrap plastic to restructure / add some support to the area in the dash where I had dremeled (with the benefit of hindsight) too much material away..
For areas that are not visible it seems a possible salvation for all those broken clips etc..
There are some videos showing super glue ..the liquid version with binders like cotton wool, bicarbonate of soda, even cigarette ash to support broken parts..but in this case there isn’t the space to use that technique…..
I decided to buy a second hand one..on arrival it too had the lugs broken..and unlike mine no sign of the broken bits..plus two other major bits damaged ..not bad for £400…
So decided to try and repair mine.
I super glued the lugs back on and then attacked it with a ‘welder’…
Basically it’s a glorified soldering iron head..two off…that uses the current through the metal pin to heat it to red hot..it then melts into the plastic and you let it cool whilst in situ..then you remove the ‘gun’..the pins are push fit into the end so the gun simply detaches itself from the now embedded pin.
There are several versions of the pin.
There is a spatula device to warm bars of material anc melt them as well.
It’s not pretty and needs a degree of finishing but compared to a glued joint much much stronger.
It’s the same effect as re-bar in concrete..
We’ll see how it goes on re-installation..
I was so impressed with it I used some scrap plastic to restructure / add some support to the area in the dash where I had dremeled (with the benefit of hindsight) too much material away..
For areas that are not visible it seems a possible salvation for all those broken clips etc..
There are some videos showing super glue ..the liquid version with binders like cotton wool, bicarbonate of soda, even cigarette ash to support broken parts..but in this case there isn’t the space to use that technique…..
Attachments

Orac said:I've read your thread here,took me 3 days.
I'm looking at a 35i or 35is so shall return to this well of experience.
You should have called yourself Captain Kirk.
I never intended to go where no man has gone before!
To be fair almost everything I've done has been done a few times before..most of these guys are on the more hard core sites..this forum is a lighter weight affair..certainly on E89s..less so on E85s.
Waiting for the dash..using 6mm foam under the leather trim was apparently too bulky..now being done in 3mm foam..so more delays.
After the first attempt wasn't so good the new roll over shell with real c/f looks very good!
After the first attempt wasn't so good the new roll over shell with real c/f looks very good!
Attachments
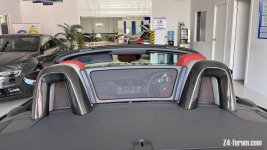
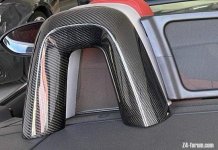
B21 said:Waiting for the dash..using 6mm foam under the leather trim was apparently too bulky..now being done in 3mm foam..so more delays.
After the first attempt wasn't so good the new roll over shell with real c/f looks very good!
They look better on my car than yours, can I keep them?
Silverstar said:B21 said:Waiting for the dash..using 6mm foam under the leather trim was apparently too bulky..now being done in 3mm foam..so more delays.
After the first attempt wasn't so good the new roll over shell with real c/f looks very good!
They look better on my car than yours, can I keep them?
Hopefully now cleared Spanish air space…