Any electrical experts? Headlights not working

tomTVR

Active member
It all started with a sidelight stopping working a week ago and at the same time my headlight (on the same side) started flickering. The headlight died shortly afterwards. Now the computer has switched my main beam to be used as the headlight and the indicator is permenantly on in place of the sidelight (not flashing).

I took the hatch off to check the bulbs and they are fine. (apart from the sidelight which i havent checked yet). There is a huge puddle of water and sludge (leftover from a failed attempt to cure my condensation problems with a bag of silica crystals) coating the wires.

Any ideas what i can do? I am going to take the headlight off and dry it out at the weekend. Other than the water causing a short-circuit i cant think what the problem could be, considering the bulbs are ok.

Car is an 04 with halogens. The opposide side of the car is fine.
 
Think i would do the same-disconnect battery and get a hair dryer on the wires and give them a good clean up-must be a good place to start
 
andysat said:
Think i would do the same-disconnect battery and get a hair dryer on the wires and give them a good clean up-must be a good place to start

Agree - thorough clean of all connections, components ewtc is a good start.
 
Headlight out, clean and dry it fully and ensure the connections are good. It will likley work again unless the water has caused some internal corrosion damage.

Indicator on is just reporting a bulb or circuit failure
 
cj10jeeper said:
Indicator on is just reporting a bulb or circuit failure

I'm not sure this is the best idea. I have a bus pull straight out in front of me last night on a mini roundabout because he thought i was turning left!


Ok i'm going to take it out now and clean/dry everything. Will report back :)
 
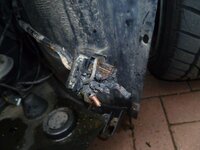
Oh dear, things havent turned out well:

P1000018.jpg

P1000019.jpg

P1000017.jpg

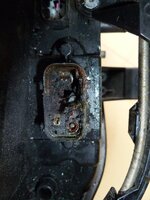
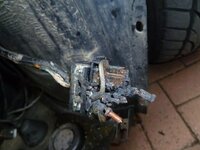
It seems the dehumidifying crystals in the bag i put in the back of the campartment were infact made out of calcium chloride. It eventually dissolved into a huge pool of brine submerging my electronics. When the current was passed though i seem to have turned my wires into copper hydroxide through electrolysis.

The plastic block connector is totally destroyed, it turned to powder, as has the female connector in the back of the headlight housing.

I hopefully have some replacement headlights on their way. But does anyone know if you can buy the block connector in the 1st photo. Or better still find me a part number? This is going to be the difficult but.
 
Wow - what a mess. So you've created your own accelerated salt bath corrosion system.

As far as the connector's concerned I'd buy the piece of loom that runs from the light back, as looking at it even that's shot
 
cj10jeeper said:
Wow - what a mess. So you've created your own accelerated salt bath corrosion system.

Pretty much :(


cj10jeeper said:
As far as the connector's concerned I'd buy the piece of loom that runs from the light back, as looking at it even that's shot

Good plan. Any help on part numbers? I'm a bit stumped.

I could always get one from a breakers yard and solder it in. But im not sure is breakers prefer to sell the whole loom as one..
 
I'd just cut that mess off as far back as some good undamaged cable, as both the headlight connector and the loom one are screwed i'd just buy a pair of generic connectors that look appropriate with enough pins and hardwire one to the cars loom and the other to the undamaged wiring from the headlight (chopping off that connector too). It wont be original but if you solder and heatshrink the connections it will be as good as, just make sure you use appropriate guage wiring and plugs for the current in use.
 
Kiowan said:
I'd just cut that mess off as far back as some good undamaged cable, as both the headlight connector and the loom one are screwed i'd just buy a pair of generic connectors that look appropriate with enough pins and hardwire one to the cars loom and the other to the undamaged wiring from the headlight (chopping off that connector too). It wont be original but if you solder and heatshrink the connections it will be as good as, just make sure you use appropriate guage wiring and plugs for the current in use.

Thank you thats pretty good advice. It beats my other idea of simply soldering the wires directly together with a length of cable sans connector block bodge style! Is it reasonable to expect that the wires exit the block in the same number/order as they enter?
 
Without looking at the connector block I cannot say but usually the entry pattern (if it's obvious) is the same as the exit one. As it's only lighting circuits you should be able to figure it out by mixing and matching, you won't do any damage as it's a basic circuit. Just switch various lights on (obviously making sure no wire ends are touching) and find out which wire becomes live then match it up with the right wire from the headlight, what's left will be earth wires. Maplin should have all the bits you need.
 
Not looked, but would not the connector on the other side show you what goes where asumming you can peel the insulation back without causing more damage.
 
don't know if these photos of the wiring order will help...
20032010422.jpg


002.jpg


001.jpg
 
The replacement harness is going to set you back around £116 based on this part number:
http://www.realoem.com/bmw/showparts.do?model=BT52&mospid=47797&btnr=61_1663&hg=61&fg=10

Not really cost effective.

My concern about the 'Maplins' connectors, is that you still need to plug into the rear of the headlight, so for this reason I believe the best repair/compromise is to call a few breakers and get them to sell you the last metre off the loom and graft that on yours with solder joints and heat shhrink wrap, at a dry spot up in the engine bay. The loom needs to come from a halogen car to be the same configuration.

Kiowan is correct in that ther is nothing fancy and the in/out pin configuration is straight through
 
Thanks everyone. CJ - at least the part is available to buy, this gives me a 'worst case senario' to fall back on. The breakers yard seems to make the most sense though, its never a part anyone is going to want.

RichardG said:
Not looked, but would not the connector on the other side show you what goes where asumming you can peel the insulation back without causing more damage.

That isnt a bad idea. I have made a drawing from the charred remains of which wire went where into the outside block connector. Its just the wires on the inside of the headlight which i need to match up,luckily these are clearly colour coded :thumbsup:
 
Bad news with the breakers, they wont split a loom as they prefer to sell it as a whole lot.

I'm going to try and hardwire the knackered headlight back together this afternoon. Problem is there appears to be 8 wires going into the block connector and 7 coming out (into the light). It appears to be the yellow wire (from the loom side) which doesnt go anywhere.

Any ideas? :?
 
You may just have a later loom. I have halogens (later clear lights on a 2003 car) and have 7 pins used on each, so I wouldn't worry about the missing one - can't remember the pin number but it is one of the corners.

I just had a quick look at the online WDS, which won't show me what I need to see. However, it does appear that the wiring is the same for left and right headlight, so I'd possibly look at the other side as a template.

Rather than hard wiring them in, I'd get a waterproof connector, or two. It may seem like a hassle now, but I think it would be worth using connectors in case the light needs to come off in future. I bought my connectors from a local car parts supplier - more / better choice than Halfords. Motorbike connectors are a good bet as they tend to be made to withstand the elements.

Take this or leave it, and I'm not sure what your plan it, but I'd cover the existing connector hold with a sheet of plastic, and stick if on tight. Make a hole to pull the wire through, as tight a fit as possible. Then put you connectors on each side (loom and light). Tape down the wires inside the light so they can't move too much then on the outside seal around the wire hold with silicone. Probably also apply around the edge of your blanking plate, for good measure.

If you want I can send you pictures, smaller scale, of something that I've done - will be writing up later this week when finished anyway - just PM me an email address to send them too.
 
PawnSacrifice said:
If you want I can send you pictures, smaller scale, of something that I've done - will be writing up later this week when finished anyway.

Good man. I wondered how you were getting on with it!!! :thumbsup:
 
Back
Top Bottom