Another E89 iDrive Retrofit

Mojito

Member
Hi,
I’m a newbie on the forum, but have recently introduced myself
https://z4-forum.com/forum/viewtopic.php?f=11&t=123597 - “Mojito”, Kevin.

I’ve been posting on AnubisZed’s thread “My current project – Retrofit iDrive” as I am also going to retrofit iDrive in my E89. I could see that continuing to post my experiences with this project on his thread might become confusing, hence I’ve decided to post my own thread. I will undoubtably pepper it with many references to his research and installation as, without his inspiration, I would never have considered taking this project on. Anyone else contemplating a retrofit along these lines, should definitely reference his thread and YouTube channel. I’m no expert, far from it, just someone following his lead and learning as I go - thank you Dave.

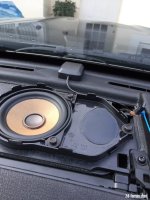
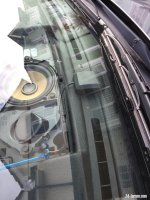
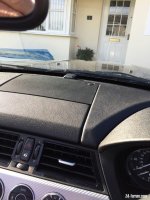
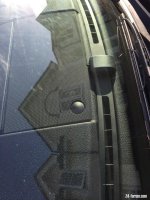
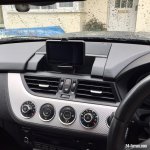
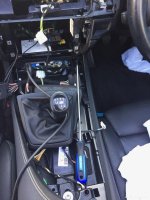
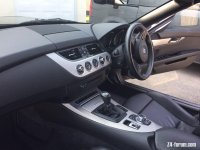
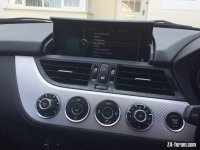
I’ve had my 2015 E89 2.0i for three months now and love it. It’s reasonably well specd, but only has the “TomTom by BMW” sat nav. – see photo. Actually that works well, but I hate the way it looks. I’ve considered going down the Android route, but actually I wouldn’t use most of what that offers and I can always add Apple CarPlay/Android Auto box to the iDrive system if I feel the need. Call me old fashioned, might be illogical, but I want an original iDrive system. I like a challenge and this is certainly going to provide it.….

I had been watching the two iDrive systems for sale on ebay – both in Lithuania. For some strange reason Lithuania seems to be the car breaking capital of Europe! Most importantly, Dave had highlighted the fact that the cage/mount for the iDrive head unit is different to the standard one and is a rare find. It doesn’t even have a part number, as it’s part of the main dash assembly. It would be nigh impossible to complete this installation without the correct cage. As I said I’m following his excellent research and would never have known this without his post.... a potentially very costly mistake!

Neither set as advertised had a cage, both either crushed or sold separately previously. It took 3 weeks, but one of the sellers finally came up with the correct cage. If anyone else is looking to source similar parts, I’ll gladly forward the breakers contact details. He was excellent and a pleasure to work with.

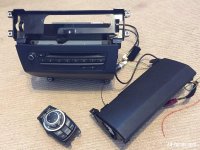
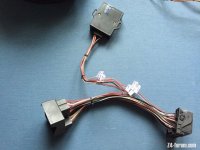
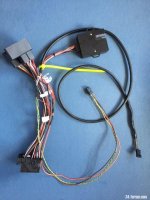
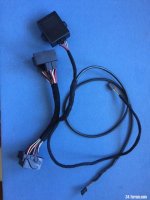
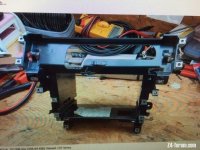
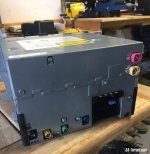
A week later and UPS have now delivered the Screen, iDrive Controller, CIC head unit, glovebox USB socket, assorted cables and the Cage. See photo, head unit mounted in the cage. It’s from a 2014 RHD car and at least cosmetically, is in excellent condition. It was sold as in fully working condition, so I’m keeping my fingers crossed…… It cost £990 delivered. There are undoubtably cheaper ways to source the parts individually, but I feel confident that at least I know that all the components are compatible, having come from the same donor car. What’s more I know the VIN for the donor car, which I think is going to be key when I come to update the maps – more on this point to follow.

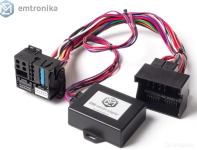
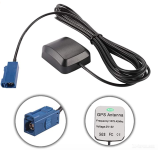
My car is 2015 and has combox, ( Multimedia spec : S6NH Hands-free system with USB interface, S6AC Intelligent emergency call, S6AE Teleservices, S654 DAB Tuner, S676 HiFi speakers, S663 Radio Professional) I’m certainly going to need a GPS receiver and I think an emulator adaptor – also more on this to follow. I can get the head unit coded locally.

This is going to be a Winter project, so plenty of time to source what else I need and to suss out the wiring. I plan on updating this thread with my progress as it happens in the hope that it will help others. It may take a while….

Cheers,

Kevin
 

Attachments

  • BMW by Tomtom.jpg
    BMW by Tomtom.jpg
    229.6 KB · Views: 1,362
  • Sat Nav Components.jpg
    Sat Nav Components.jpg
    196.1 KB · Views: 1,362
Mojito's iDrive Retrofit continued:

I have previously posted the above introduction to my retrofit project on AnubisZed’s excellent thread “My current project – Retrofit iDrive”. Thank you for the warm welcome Dave and great advice which included the following:

- Details on how to remove the dash trims and old cage. He has a great YouTube video detailing an Android E89 installation, which shows the dash removal and iDrive controller fitting in great detail.
- Wiring runs
- GPS Receiver. I didn’t have one and was unsure as to whether to retrofit an OEM one in the correct place or to use an aftermarket one like that used in an Android installation. I’ve now purchased an aftermarket one and will mount it under the grill on the top of the dash. Cost £10 from Amazon – see photo
- Connecting the screen and iDrive controller into the loom …. which takes me to CIC emulators!

Now my understanding is that if you install a second hand CIC into a vehicle where one wasn’t previously fitted, then the Nav. function will not work without 3 x FSC codes from BMW. I’m sure others will comment on this, that’s only my understanding.

Extract from BMW technical bulletin on this:

SUBJECT Enabling Codes (FSC) Required After CIC Replacement

The following functions are inoperative: Navigation System/Voice Recognition. Enabling codes (FSC) are required to activate the navigation and voice recognition systems. CIC enabling codes are VIN-specific and if installed in another vehicle, the Navigation System and the Voice Recognition System (SVS) will not function. Do not swap parts from donor vehicles. The enabling codes are: CIC Navigation Enabler Release Code (to activate Release Code functionality), CIC Navigation Application Release Code (to activate the navigation function), CIC Voice Repair Release Code (to activate voice control SA620)

Getting FSC codes to enable this from BMW is said to be exceedingly difficult/impossible/expensive and they are VIN specific. So to get round this problem the options appear to be to fit either an emulator or script activation. Now my technical ability only goes so far and script activation is beyond my understanding at the moment. Fitting an emulator is however fairly simple and has been used successfully for retrofits on many other BMW models. What’s more as Dave pointed out, the emulator is wired between the existing car loom connector and the CIC. If you purchase a ‘plug and play’ emulator as I have done (see photo) you don’t have to alter the car wiring loom AND it gives a very convenient sub loom to tap into for connecting the iDrive controller and screen cables for power and connection to the canbus. Great tip! Essentially I can make a sub loom which is ready just to plug in when the hardware is physically installed. No trying to tap into the existing car loom when I’m upside down under the dash!

On the topic of FSC codes it appears that another one is required to update maps. Providing you have the VIN for the CIC donor vehicle this can be generated…. and I have mine!

Another update, when the emulator arrives and I’ve made the sub loom. Currently I’m trying to confirm the iDrive and screen wiring connections, having scoured forums and photos for hours, for what I thought would be a simple task!
 

Attachments

  • Emulator.png
    Emulator.png
    849 KB · Views: 1,343
  • GPS Receiver.png
    GPS Receiver.png
    247 KB · Views: 1,343
The Emulator has now arrived and I've sorted the sub wiring loom.

As previously mentioned I had thought that working out the wiring for the iDrive Controller and Screen would be simple. How hard can it be when we are talking about just 4 wires from each to the CIC (plus the LVDS cable from the screen to CIC, but that's just a plug in fakra connector) Well I was thrown a red herring here as my iDrive had the correct connector plugged into it.... but with only three wires coming out of it, not four and cable colours that meant nothing. It finally dawned on me that these 4 pin connectors are used for many things on a BMW and that when the iDrive had been removed from the donor vehicle another connector must have been pugged into it from elsewhere on the loom :lol: Anyway just to make sure I contacted Dave through his iDrive retrofit thread and he of course came up trumps with links to the wiring diagrams for these components. Thanks Dave. Links on his thread, or you can find the wiring diagrams on 'newTIS.info'...together with the complete wirings diagrams for the rest of the car. A great resource.

So I've now made up the sub loom which will neatly connect both the iDrive Controller and Screen into power, ground, K-Can High and K-Can Low via the emulator loom. That's the wiring for the project sorted. In principal 'ALL' I've got to do now is take the car apart, plug it all in and get the CIC coded :lol: Photos below showing loom being modified and the finished piece wrapped in fireproof automotive tape.

It's going to be a couple of weeks before I have time for the actual installation, but I'll update when there is more progress.
 

Attachments

  • Emulator Loom as receieved.JPG
    Emulator Loom as receieved.JPG
    45.1 KB · Views: 1,276
  • Labelling up Emulator loom.JPG
    Labelling up Emulator loom.JPG
    52.1 KB · Views: 1,276
  • Emulator Loom soldered up.JPG
    Emulator Loom soldered up.JPG
    53.6 KB · Views: 1,276
  • Emulator loom finished item.JPG
    Emulator loom finished item.JPG
    43.8 KB · Views: 1,276
You're making great progress on it all bud :thumbsup:
Nice tidy loom 8)

As you already have the combox along with multi-media and handsfree you shouldn't need any additional special coding apart from removing $663 and adding $609 :thumbsup:
As you've seen in my post I've now got the ICOM so should be able to sort my MULF for Bluetooth (I might even add in a combox in the future just because! :D )
 
Have you tried any of the FSC code generators?

https://www.google.co.uk/amp/s/www.car-auto-repair.com/how-to-generate-bmw-nbt-cic-fsc-code/amp/

No idea if these actually work, but would be cool if they did!
 
Deepseaskateboard said:
Have you tried any of the FSC code generators?

https://www.google.co.uk/amp/s/www.car-auto-repair.com/how-to-generate-bmw-nbt-cic-fsc-code/amp/

No idea if these actually work, but would be cool if they did!
FSC code generators do work and in fact I still needed one (when I updated to 2020 maps) even though I had an emulator in-line. But then I also used my emulator loom to make up the screen and controller loom sections (same as above). :thumbsup:

EDIT** there are much simpler ways to get hold of your FSC code (for free) than that :wink:
 
Hi Dave,
Thanks for the continued encouragement. I'm slowly getting my head round it all now and have earmarked a day next week to fit the hardware. I will be armed with one of your YouTube videos, countless trim removing tools and a mate who likes taking his Z3 to pieces :lol: I'll take a few photos as I go along, but you've already covered it so well. Looking forward to hearing you've cracked the bluetooth issue. I like your comment about possibly adding a combox in the future... "just because". i think it's the best reason for taking on these projects :)
 
Hi Deepseaskateboard,
Thanks for the FSC code generator link - interesting. As Dave points out a code is needed for updating maps, even with an emulator. I have the VIN for my CIC donor car and know that armed with this I can get the FSC code from several different companies online very cheaply. Looks like a bit more research needed as might save a few pounds :)
 
A couple of days this week with no great commitments, so following Dave’s excellent Android video on YouTube, I started on my iDrive installation. This video details really clearly how to take the centre console and dash apart for an Android installation. Now that’s really helpful as it takes you through removing the old head unit and dash box where the screen goes, which is most of the disassembly needed for the iDrive installation. So good is this video that even going very slowly and carefully I had it apart in an hour - time for morning coffee :D

That’s when things got a bit more difficult. As mentioned earlier in this thread the old head unit and CIC are mounted in different cages/mounts. So to install the CIC, the old cage has to come out and be replaced with the new one. No YouTube video for this bit :( 
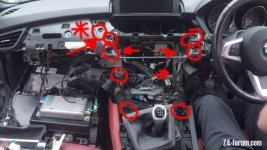
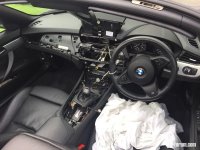
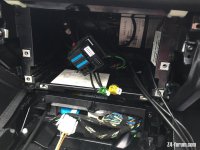
Photos below of both cages. They measure aprox 32cm x 25 cm x 16cm (width, height, depth) and are each held in place by 10 torx head screws. Four of these screws are right at the back, in awkward positions, but can be accessed with aid of a long torx head screwdriver. Useful if magnetic like mine or you will loose the screws for sure :o Amazon sell a set of six 260mm long for £10 – perfect for jobs like this.
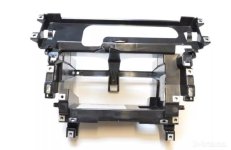
Removing these screws is the easy bit and undoubtably the most difficult part of the whole retrofit is actually removing/fitting the cages. The problem is that the cage is inset into the front of the dash and there are parts of the dash frame in the way, not to mention trim on either side by ignition key slot and glovebox on left side. There are also two metal lugs/pins at the back which locate the cage in the correct position. My cage just wouldn’t come away at the bottom, despite having unscrewed the two screws holding the cage to the centre console. I gave up after a few hours, had a beer and called Dave :thumbsup: True to form he quickly came to the rescue – many thanks yet again. Dave’s photo clarifying screws to undo on post above.

Like all these things, simpler when you know how. You also have to remove the central bolt under the handbrake and the two 100mm bolts at the rear of the central console. You can then pull the centre console towards the rear of the car and the bottom of the cage will come free. Then ALL it takes is twisting, bending and pulling the side trims back after unscrewing them and the cage will come out. I actually got a friend to help, easier with two pairs of hands. Putting the new cage in was to be fair much easier, as we had an idea of what was needed and only took about 20 minutes. Again two pairs of hands help. Tilt the back in first, then twist, manouver, twist again and try to position it vertically until it finally sits on the two lugs on the dash frame at the back.

That’s the difficult part of the retrofit done and I don’t wish to put anyone off doing this retrofit, simply because of the cage swop. It is a pig of a job, but it can be done….just care and persistence. It’s worth it…. My iDrive is installed and working :) More soon.
 

Attachments

  • Incorrect cage.jpg
    Incorrect cage.jpg
    61.3 KB · Views: 1,053
  • Z4 Idrive Sat Nav cage.JPG
    Z4 Idrive Sat Nav cage.JPG
    59.9 KB · Views: 1,053
  • Long Torx screwdriver.jpg
    Long Torx screwdriver.jpg
    149.3 KB · Views: 1,053
  • Ready for installation 2.jpg
    Ready for installation 2.jpg
    141.7 KB · Views: 1,053
Good write up...it’s one of the issues when buying an E89..so many did not have idrive / usb support etc..maybe will help someone buy an under spec z4 and then do their own upgrades :thumbsup:
 
Thanks Pbondar. I came across your post that featured photos of your Aero Banbi . Wow... now that was quite some project :) Made me smile thinking how very simple swopping the cage was in comparison to the many challenges you undoubtably faced building it :thumbsup:
 
Mojito said:
Thanks Pbondar. I came across your post that featured photos of your Aero Banbi . Wow... now that was quite some project :) Made me smile thinking how very simple swopping the cage was in comparison to the many challenges you undoubtably faced building it :thumbsup:

Yes that was one hell of a project...I went in as a boy and came out a man.. :rofl:

In reality without the old boy at the airfield who had already built 50 aircraft it would have been impossible..to call it a kit was a bit of an euphemism...bit like a car kit supplied with rolls of sheet aluminium for the body.. :tumbleweed:
 
So with cage installed it was down to the fun bit – connecting it all up and putting everything back together :)

I was a bit nervous about turning the car ignition back on with so many parts unplugged (handbrake, aircon etc.) so I fitted the iDrive screen in place, fed the cables, reconnecting and refitting the dashboard and centre console parts as I went along. I didn’t secure the centre console or CIC properly in place though …… just in case there was a problem :roll:

• Screen cable plugged into the power and K-Can feeds on the emulator loom and with the LVDS interface cable from the screen, fed down between the air vents to behind the cage.
• The GPS receiver (photo earlier in thread) was secured with thin sticky pads under the dashtop grill. My car has a speaker here, but there is just enough room to the left of that to snuggly fit the GPS receiver. The height of it was also just low enough for the grill to refit as originally. The cable was run through the same hole as that for the sensor mounted in the grill and down to the back of the cage.
• Glovebox USB socket clipped into existing cut out and cable fed to behind cage
• The two MOST fibre optic cables on the car quadlock connector (a black ‘corrugated’ one and a green one) which were originally clipped into the back of the old head unit, moved to the quadlock connector on the emulator wiring loom. It’s a simple clip in plug within the quadlock, released by depressing a lug.
• The emulator loom was plugged into the car quadlock connector and the back of the CIC.
• The GPS cable, USB cable, Screen LVDS cable, AM/FM aerial, 2 x DAB aerials all plugged into the back of the CIC. Plugs are all colour coded.
• IDrive controller cable fed to back of cage and plugged into power and
K-Can feed on the emulator loom

As previously mentioned the great advantage of having the emulator ‘plug and play’ loom was simplicity of connecting everything up and not altering in any way the original car loom. It is however a bit bulky, so as Dave pointed out, care was needed to tuck it down neatly behind and below the back of the CIC.

The moment of truth…. ignition on…. and the screen popped up with the home menu :thumbsup: Much to my amazement and without any coding so far, the radio/aux/usb, Bluetooth/phone and car information systems all work, together with the iDrive controller. Also the parking sensor screen. It’s even got the previous owner’s music collection on the drive…. not all to my taste, but good to broaden one’s horizons :D

I can see that the GPS receiver is also working as the Nav points correctly to North, but clearly Nav needs the CIC coding to work, not a surprise. Coding is beyond me at this point and alas I can’t tie up with the person who is sorting it for me for a few weeks, so I’ll have to be patient, but I’m very pleased :) What’s more everything went together perfectly and you would never know it’s not factory fit.

Thank you Dave for your inspiration and help, couldn’t have done this retrofit without you. I’m ‘the student ‘ here, but by sharing our knowledge, I hope it will inspire others. For anyone else considering an iDrive retrofit, I would say go for it.

I’ll post again when the coding has been done.
 

Attachments

  • Finished.jpg
    Finished.jpg
    137.3 KB · Views: 965
  • Screen installed.jpg
    Screen installed.jpg
    132.5 KB · Views: 965
  • IMG_2270.jpg
    IMG_2270.jpg
    129.7 KB · Views: 965
  • CIC Fitting.jpg
    CIC Fitting.jpg
    128 KB · Views: 965
  • Quadlock Fibre Optics.jpg
    Quadlock Fibre Optics.jpg
    132.7 KB · Views: 965
  • CIC.jpg
    CIC.jpg
    143.4 KB · Views: 965
Congratulations brave man! :thumbsup: Im sure if I attempted it I'd end up with some spare screws (luckily I already have it).... so the big question from me is now that you've fitted the idrive what modifications could you do to it (maybe Dave could add to this)?
 
Hi Zed Baron,
Thanks for that. Have to admit there was one moment when I did wonder if I had bitten off more than I could chew, but the good news was no spare screws when it all went back together :D
I know that Dave has fitted an MMI box for CarPlay/Android Auto. Suspect I will follow suit in due course. Also probably add a reversing camera... just because I can :)
 
Great job Kevin, and a great write-up :thumbsup:
Nice to see it's all working as it should.

Sorry bud, I'll send you the map info later :?
 
Hi Dave,

Thanks for that..... would be great if others followed suit with an iDrive retrofit. I'm so pleased with it that I went for a drive today.... just for the sake of a drive. Sun was out, music on, felt good to be out and about :D

No urgency on the map info. Going to get the coding done first and that's alas still a couple of weeks away.

Cheers,
Kevin
 
Apologies for the delay in updating my iDrive retrofit thread, but finally it’s all up and running exactly as it should :D

Delay was down to finding time to get over to my local 'Indie', an ex BMW technician, who I trust and know from my previous dealings and has a wealth of Z4 knowledge. As it turned out he had never actually coded a retrofit iDrive before, but completed everything quite quickly, all working.... except the NAV, which of course is what the coding was all about :( He phoned another BMW tech. who remotely checked everything and confirmed all correctly coded. Interestingly, menu options on NAV which weren't working before now were and I could set routes etc. Looked like the car was recognising NAV function, but it was positioned in the middle of Africa :?
We accessed the ‘hidden’ service menu on iDrive and entered location and at least the car was now where it should be on the map. Alas it also showed no satellite locks at all :? Looked like a duff GPS Receiver was the problem, so I ordered another with the intention of fitting the next day………..

New GPS receiver arrived promptly, but before I fitted it I had a little play.... removed the grill on the top of the dash……. Instant lock on!!! Went for a drive and all working exactly as it should :D

Now I’ve read that most people mount their Andoid system GPS receivers under the dashboard grill, but it just doesn't work in this position in my car. I can only summise that the metal grill is grounded and it's working a bit like a Faraday Cage. Any thoughts - perhaps I'm missing something here? Anyway at least for now, I’ve mounted the receiver with sticky pads on the dash, right in front of grill where it slopes down to the windscreen. Filed out a very small groove in the front edge of the dash grill to feed the wire. Works well there and frankly barely shows – see photos. I like originality though, so if I can work out how to take off the screen surround trim to feed the cable through, I might move it up to the oem position. Alternatively I might buy another grill, remove most of the metal and cover it with a nice piece of matching speaker grill fabric that I just happen to have lying around :roll: Depends how bored I get this winter, might add a MMI box and a reversing camera…. I'll update this thread if I do.

I'm really chuffed it's all working, just got to upgrade the 2013 maps, which I’ll do next week. Most importantly another thank you to Dave
( AnubisZed “My current project – Retrofit iDrive” ) for all his help and for sharing his hard won knowledge. I couldn't and wouldn't have taken on this project without his enthusiasm and help. Thank you.

Oh, one final thing to mention. The guy that coded it, gave me some printouts from the coding session and it clearly shows that my system thinks it has the three FSC NAV enabling codes.... clever things these emulators, as I don't :)
 

Attachments

  • GPS 1.jpeg
    GPS 1.jpeg
    246 KB · Views: 714
  • GPS 2.jpeg
    GPS 2.jpeg
    152.5 KB · Views: 714
  • GPS 3.jpeg
    GPS 3.jpeg
    175.4 KB · Views: 714
  • GPS 4.jpeg
    GPS 4.jpeg
    195.6 KB · Views: 714
  • GPS 5.jpeg
    GPS 5.jpeg
    286.4 KB · Views: 714
Back
Top Bottom