Back to my old Z - time for an overhaul

Following on from my new member ‘Back in the Z’ post, I bought my old E85 Roadster back and picked it up today (I sold it to a friend in 2017).

Yes, I had a great big smile on my face driving it home 😊😊😊! Still super-smooth and punchy, love it.

Here it is now, warts and all before I start any work (note the rain is helping to hold up the appearances)!
IMG-4771.jpgIMG-4769.jpgIMG-4770.jpg

IMG-4786.jpgIMG-4787.jpg

Thankfully the servicing has been kept up to date (although it's due) - but to start with, it needs some serious cosmetic love.

Where to start!!?

First jobs at a glance, for this weekend:

-Deep clean inside and out, treat roof.
-Polish headlights
-Rub down and re-paint the scuffed rims (wheels are Rota MXR) not overly keen on replica type alloys, but they will be ok for a winter set. I’ll be looking for a different set of alloys, it’s good to have options!

Question it's currently got Laufenn S Fit EQ's tyres fitted - I've never heard of them before,https://www.laufenn.com/uk/front/uk_front/sfit_eq_plus. does anyone have an opinion on these? I previous ran Goodyear F1's on it for comparison.

-Fit centre caps (with BMW badges)
-Oil and filter change, repeat x times until it stays clear and golden like it was always before (and so I know exactly what's in it)
-Clean the air filter (aFe S1 cold air intake)
-Get the dent man booked in for the three dings I’ve found so far (done. booked for next week).
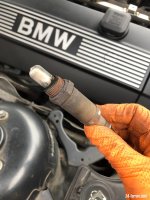
-Check and fix any oil leaks, it doesn't appear to be dropping on the floor, but the MOT mentions it (probably the usual suspect cam cover gasket?).
-Sort key fobs out, one dead, one doesn't unlock remotely (lock and boot release work).
-New wipers (flat blades),
-Once it's looking tidier, it will be time for an extensive fast-slow-twisty-straight-test drive to identify all the 'opportunities' for improvement!

Next up, will take some more time:

-Remove the aero front bumper for repair and re-paint.
-Find some decent OE wheels or top brand quality non-standard alloys with decent premium tyres.
-Replace all suspension bushes.
-Replace gearbox and diff oil
-Restore the leather (slightly worn / lost colour on drivers bolster)
- *maybe* replace the headlights (xenons) with facelift clear type if this is possible? (that's if I can find any at a reasonable price)? - but I may just embrace the ginger-cators! :D

I'm sure this list will keep growing once I get some time on it!
 
Well it doesn't look that bad tbh. I'm sure you'll soon have it back to a good standard.
Seems the bonnet alarm switch has 'migrated'. Not sure it's worth replacing but I'd suggest would look tidier with the bracket removed?
Try these for your infill panel at the front of the engine bay:
https://www.ebay.co.uk/itm/371743089000
Be interesting to see what you make of the handling? Pretty sure you'll be considering new shocks before long??
Good luck with it all. Always a risk taking back a car you owned before, but hopefully 4 years is enough time to make it seem like its new to you.
 
Thanks for the info, not sure what’s happened to the bonnet switch. Looks like the radiator has been replaced recently too, so suspect a few missing or broken fixtures on the bumper. Good call, I’ll get a replacement *set for the* infill panel. The drive is harsher than I remember (maybe because I’ve been driving new cars ). Springs and shocks could be super old by now - although they feel pretty good. I’ll go front to back in slow time changing everything that’s not A1. I’d like to hear recommendations on replacement suspension (I don’t need it any lower)?
 
“Replace all suspension bushes”

Can you please keep me updated on this, as it’s an early 2022 job for me (well the garage)! 😉
 
Sure - I’ll share the progress. Has anyone had good results with poly bushes (power flex) on the Z4? From experience, poly’s can be a bit harsh / noisy on some cars.
 
That's a good list to get through. :thumbsup:

My car needed new rear trailing arm bushes last year and Ross at RBM (bowser134 on here) recommended Powerflex polybushes - but he didn't recommend fitting Powerlfex anywhere else as they would probably feel too harsh on a road car.

So far as suspension goes I'd start by trying to find out what is has on it now. The Eibach/Bilstein kit seems to be very popular on here, but I'm pretty sure it is lower than the OE Sport suspension.
 
I managed to get some work done last week/weekend, here's the latest with a few before and after pics.

Body & Wheels

First job was to polish the faded headlight lenses, which was quick work with the drill, buffer pad, and headlight polishing compound. For a few minutes work each side, the results are great.
Lights.png

Good stuff! In the past, if the lights are really bad / UV damage , I've started with G3 fine compound first, then finish up with the Meguiar's.
buff.JPG

I also touched up the big scratches on the front bumper corner (it will come off eventually for a full repair and paint).

Next job was to do an interim mini-refurb of the wheels to take care of the nasty curb rash. Wheels off to sand and dress the rim edges, then used the tyre paint cards to mask the tyres (these are really handy) - and a few coats of black on the rim edge to make it acceptable for now.
Wheels.png


Time to clean up and the rest of the car, and fit the wheels, with new centre caps :)
Wheels5.jpg

IMG_E4803.JPG


Service
Next up was the oil and filter change. Whilst draining the sump, I tool the opportunity to clean the block, under tray and surrounding area so I can start to identify the source of any oil leaks. I can't stand a dirty engine / bay so it felt good cleaning it up! Looks like the oil filter housing area is a potential culprit - it's just seeping slowly after a run from somewhere in that area.


Filter_housing-seal.png
Hopefully that will do the job (no.6, Part no. 11421719855). Otherwise I'll keep cleaning and observing!

Interior

Also gave the interior a deep clean and fixed a sharp edge on the drivers handle cover, it looked like the metallic plastic/paint finish has cracked and started to peel, with sharp edges felt. I removed the handle, quick rub down on the edge then touched up the clean edge with silver paint. Nice and smooth now. Simple things like that make a big difference to the 'feel' of the car.
Handle.JPG

The main key didn't lock with the button, and the spare (very nice condition) was dead. I read about the electric toothbrush base method to charge the key - so gave that a try overnight, before doing the key initialisation, thanks to this post: https://z4-forum.com/forum/viewtopic.php?t=33506. It worked after a few tries, so now have a nice fully functional key :)

Dents

Now I've cleaned up the car some more and gave it a first polish, I found lots more parking door 'dings' on all but 1 panel, including 3 wheel arches faces and a deep pin point dent in the boot lid (all but the rear O/S quarter panel had multiple small dents and creases).
I booked up the dent man (Warren at Dentex https://www.mydent.co.uk/) - for those located on the south coast/Hampshire, I can't recommend him enough, every panel is now perfect, dent and crease free. A fantastic job considering how many dings I found. It's difficult to show in photos, but here's some of the locations as a before pic. The after pic drivers door, which was particularly bad, had small dents all over.

Before (locations)
Dents5.png

After (door)
IMG_4847.JPGIMG_4850.JPG

More wheels....
After having the wheels on for a few days I've decided they are now getting a full refurb, with a slightly lighter colour and full glossy finish! Hence the reason why it's up on stands in the garage. Wheels should be coming back today ..... stay tuned for the update :)
 
Shiny wheels!! Smoked chrome is the name, it’s black with a few passes of silver to give it the glossy graphite look. Great job by the Wheel Specialist in Fareham. I’ll get some decent pics when I’ve fitted them.

8CAA4423-624B-4BE3-A31A-654591545578.jpeg76A10706-F523-421D-8178-31D36CD641FF.jpeg92473F6E-21E2-4971-8161-595D2BE530A4.jpeg
 
Great stuff, really restoring a somewhat battlescarred Z back to health. Like the wheels, look forward to them fitted with some sunlight on them (fat chance this time of year :lol: )
 
Your car looks much better already, and I really like that finish on your wheels. :thumbsup:

Looking forward to seeing them on the car!
 
Update: Wheels on, bumper touch up, oil leak

Over the weekend I repaired and re-painted the badly chipped scratched and cracked bottom lip of the aero bumper, with base coat 472 + clear lacquer.
This is a tidy-up to make presentable before the bumper comes off for the full paint job.

4389DA3F-A3ED-4BE1-9661-E66A768B4F0A.jpeg

C5515972-2235-46F7-8A00-003A53DE38A9.jpeg


Also fitted the fresh wheels with new shiny bolts. Today its been up on the ramp to work out which bushes need replacing at the back, and to sort the oil leak at the front. It was the oil filter housing flange seal, replaced the vanos hose too.

4F769167-5D6F-4952-9089-F42AC6C915F9.jpeg

The worn and slack bushes at the back are the subframe to body mounting bushes,

Rear subframe bushes OE part numbers
0CBF619B-AFD6-4A63-82E5-E2C398CF79B8.jpeg
33316770815 rear subframe, front left #2 on diagram
33316770816 rear subframe, front right

33316770781 rear subframe, rear left or right #4 on diagram

I’ll order these up and get it sorted after Christmas along with the poly diff bushes I already have.

For now, it’s time to drive and enjoy :) :)

Festive pictures to follow!
 
Oh my god, lot of work but what a difference, looks like a completely different car now. Great job. :thumbsup:
 
Thank you :), it’s been fun tinkering in my spare time.

Since my last post, I’ve replaced the intake hose (part no. 13547514867). It was perished and split on the small corrugated hose which connects to the idle valve. I’m surprised it ran so well before.

314E2EE8-9DE3-4A6E-B1DF-41575F4FDF83.jpeg

I’ve also cleaned the roof (Autoglym kit) and applied the treatment. Nice results.

I have a new airbox to fit next (standard oem), to replace the aftermarket aFe intake (it’s good and sounds great - but a very heavy metal heat shield), and I prefer the oem set up.

I’ll get some pictures of the car on sunlight if we get any soon!

Next big job is the the rear subframe bushes, I’ll do write up on that.
 
Update since last post …Rear subframe and diff bushes are done !!!
A very big job, but worth the effort - the results are amazing. The bushes were probably the 2003 originals and the subframe to body mounts were completely hanging and separated.

486BB6ED-BE6A-46EA-9E4A-90B50A012E21.jpeg

I decided to go for the Powerflex poly bushes (subframe and diff), easy to order the right parts from their website, but very expensive!

https://www.powerflex.co.uk/products/Z4+E85+%26+E86+%282003-2009%29-1203/1.html

I’m happy to say the results are worth it, brilliant - a night and day difference in the feel of the car, especially when pulling away, accelerating, on and off load in gear, or changing gear. No more clonks!

It’s really tight now, but not noisy or harsh, which can be a concern with some poly bushes.

It took a whole day on the ramp to do this job. I’m lucky the have friend who runs garage - for ramp access and labour help! All underside heat shields support braces, and rear exhaust need to be removed out the way. Prop disconnected, wheels, callipers, carriers and brake discs, handbrake shoes off, and disconnect the handbrake cables to enable lowering of the complete subframe. It could still be done without a ramp - would need decent stands to get it up high enough.

4B480D9F-B2B9-4BC1-B4B7-447A761B9041.png

02DAEBE5-EF01-4668-AB38-FC8E13F64947.png

A decent bush pulling kit is required as some of the the bushes are big and not willing to come out easy. Also needed the air chisel to encourage one of the metal bush casings out.

F6FF8F49-93A2-4F1A-BC04-72764749467E.jpeg
I got mine from eBay link here, good quality kit, and needed to use the largest cup size!

https://www.ebay.co.uk/itm/Universal-Press-Pull-Sleeve-Bush-Bearing-Removal-Silent-Bearing-Set-27-Pc-/264087766603?mkcid=16&mkevt=1&_trksid=p2349624.m46890.l49286&mkrid=710-127635-2958-0

Once the old bushes are out, the Polybushes go in easy, theres four subframe bushes and three diff bushes to replace.

8A9BCEF6-C967-4B9E-ACBD-96BC9D318D5D.jpeg
8EC470AF-DB23-4F5A-BBA4-8C9A5C30A6BD.png
Now I can enjoy a nice solid and controllable back end!

6AED9590-2C27-47D4-9D84-B036D79B552F.jpeg
 
Intermittent hesitation/ running issues

I’ve only had the chance for a few runs out recently, and each time I’ve noticed an intermittent hesitance when at wide open throttle pulling through the rev range. No Engine light, and not bad enough for a misfire - but just enough to notice it’s there, mainly through the intake noise. Time to investigate!

I started with changing the plugs, since I’d not changed them since my re-ownership. I went for the NGK-R multi electrode , OEM standard fit BKR6EQUP.

Another thing I like about the Z4 is how accessible the engine is to work on💪💪

The old plugs that came out were quite light in colour on the tips, showing signs of a lean mixture - although the split intake pipe (already replaced) could explain this.

A few days passed before I got the chance to test it out, but unfortunately when I did , symptoms were still there.

I scanned the OBD codes (once I cleared the history) there was one live code for P0036, O2 sensor heater circuit, Bank 1 sensor 2 (the sensor after the cat for cylinders 1-3). I ordered a decent Bosch sensor to pick up the next day, but this fault usually doesn’t cause running issues. I’ll cover the O2 sensor change in the next update.

Therefore I was still suspicious looking for the cause of the intermittent hesitation under full load.

After some digging , I think I’ve found a likely suspect, the DISA valve….
Symptoms:

Rattle heard from the inlet manifold area
Running issues, power delivery not consistent
Lean mixture fault code (I cleared this before changing the plugs) but could also be the split inlet pipe already replaced.

36D34A82-7C1E-4064-A645-6D4ABD17EAB7.jpeg

I ordered a new genuine OEM replacement PN. 11617544805 which I’m glad I did as when I removed the DISA valve it was in a terrible state! Definitely beyond the repair/upgrade kit. The flap and pin were rattling around and the mechanism that operates and holds the flap sprung open was completely shot, the flap was just flapping about:

43A316AB-9DA4-4475-82E4-BD73C438E8F1.png

Removal is super easy, remove electrical plug by press the metal clip on the rear, and lift off.
714B8C91-F4E9-4FD1-A9B4-ACAC48B937FC.jpeg

Two torx bolts , and gently pull the part from the inlet manifold.

BB6F800D-7D05-47DF-B076-911EACF7F008.jpeg
837065B4-0ED6-4804-9CD9-A48A59AC8E99.jpeg

Then i cleaned up the inside of the inlet manifold and fitted the shiny new DISA valve.

At idle it’s super quiet now, I just need to drive it to confirm if fixed - but I need to do the next job and change the O2 sensor first.
 
P0036 fault code fix

Now the DISA is replaced, I got on with the O2 sensor change to hopefully fix the fault code P0036. The code points to O2 sensor (bank 1 sensor 2) heater circuit, this is the sensor after the catalyst for cylinders 1-3.

To change the sensor, it’s a pretty straight forward job. This is my approach:

An O2 sensor removal socket (with cable slot to fit over the sensor) makes it much easier, enabling it in this case to be loosened from above, using a long extension bar with wobble end.

C7EE03F3-555C-4796-B550-90D714A0B6EA.jpeg

I used the 3/8 O2 socket for this job.

Firstly removed the small engine cover to access the sensor plugs. The one nearest the front is Bank 1 Sensor 2 , the rear plug is Bank 2, sensor 2.

Unplugged, ready to release the cable:

7EFACE1B-F589-40E0-8FFC-09FA9AFE78E6.jpeg

The electrical plug releases with a gentle pull, then you need to free the cable from routed behind the other plug, then the 3 clips at the rear of the engine (this is fiddly). The clip nearest the top is a cable tie, the next one down is a fiddly metal spring clip, then one support bracket clip directly above the sensor. Once the cable is free, you can start to remove the sensor.

With the car on stands, find the sensor (bank 1 sensor 2 is the one on the inside exhaust manifold pipe), [on the left in picture below], whilst underneath fit the socket on the sensor, rotated so you can attach extension bar in from above.

8AA23BCF-AA5D-4613-B280-C5C5CDA9BD56.jpeg

Attach the extension from above (position the wobble end at the right angle to marry the socket) and loosen of the sensor just a half or quarter turn to free it up. If need be, rotate back and forth to loosen up a rusty thread.

EC58FAE8-510F-42A0-8BA4-0C4990C3DEAD.jpeg

The cable will need to turn with the sensor as you’re unscrewing it, so make sure it’s completely free. Then get underneath and unscrew the sensor by hand.

Sensor removed:
See how light (white) the exhaust has deposits are, it’s definitely been running lean.

9742EA5F-A02F-4C6B-919A-B32C801A2277.jpeg

Refitting

To refit the new sensor, remove the plastic cover and dangle the sensor down into position from above. Then tighten by hand before finishing up from above with the socket and extension. Then it’s a case of routing the cable properly with the cable clips (with the other sensor cables) and re-make the electrical plug.

1F28BF54-A8A3-4C30-B0C6-B718F0FC1AB9.jpeg

New sensor fitted

E109EC52-5E1E-413A-A8D1-07BA5AC541F7.jpeg

View attachment 2
Re-fit the engine cover and that’s the job done! Just needed to clear the stored codes, and fire up the engine to be greeted with no more codes! Now I really need to drive it (tomorrow). 😊😊😊

52A43B7C-7758-4E7D-90E8-BD29103E0A55.jpeg
 

Attachments

  • BE8D0C87-3F80-43FA-9A69-9525BAB1F2A8.jpeg
    BE8D0C87-3F80-43FA-9A69-9525BAB1F2A8.jpeg
    120.1 KB · Views: 590
Back
Top Bottom