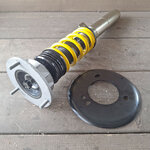
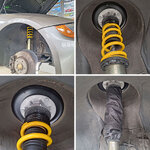
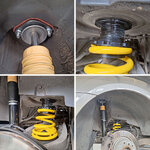
Anyone used ST XA coilovers e86 3.0si?

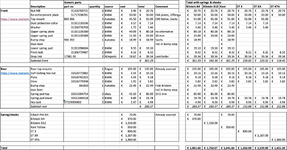
Are your rear subtotals correct in the middle-right-hand table? Perhaps the rear top mounts have not been included in the calculation?
Yes, you are correct. Added those later and forgot (and as I already bought them no more real impact on the money yet to spend... :rolleyes:). Sharp eye!

Updated sheet added.

1779105145138.png
 
Updated my comparison Excel
  • Added droplinks to the ST options as according to the website it looks they are not included.
  • Added ST X and ST XA into the overview, and hopefully added/removed the correct generic parts needed to fit them.
Of course, you can get the generic hardware for better price on Autodoc etc, but these savings will transfer over most of the options, so the difference will remain the same.

Looking at this, my thoughts are:
  • Either go with the Eibach/Bilstein B4 or ST X option as the more ‘affordable’ option, as price difference isn't that massive. The ST X might be a better quality solution, but maybe a bit too hard for daily use.
  • Or go for the ST XTA with the adjustable top mounts, the ST XA after adding the the extra parts needed doesn’t seem that much of a saving.
And apologies for bothering you with all these contemplations, it helps me organise my thoughts. And maybe it helps some others!
View attachment 294389
nice sheet..

noticed for the ST setups you dont have plates, pads or bump stops. I get the top plates but dont you still need pads and bump stops or do they come with the kit?
 
nice sheet..

noticed for the ST setups you dont have plates, pads or bump stops. I get the top plates but dont you still need pads and bump stops or do they come with the kit

I believe that the kits come with those parts included, and the STA also with (adjustable) top mounts.
 
I’ve got XTA coils. So adjustable front top mounts as well as the one way adjustable coilovers. They’re linear spring rate and camber + castor adjustable at the front. I’m running only a bit below sport suspension height to keep good ground clearance for B roads. Is about perfect height I think so no grounding but arch gap is good. I run the stock SE from arb and a sport rear arb to balance it out a bit. I’m running 2 degrees camber up front and about 2.2 rear. Castor I’ve increased from stock 5 degrees to 7 degrees. This latter change makes a big and positive difference to the steering. Much more positive, less twitching and easier to hold and line and place on a bumpy road

In terms of shock performance I’m very impressed. It is firm but I wouldn’t say any more so really than my b6 dampers on stock springs I had before. But with the much higher spring rates on the coils it resists roll and pitch/dove so much better. It feels very tight now, but well controlled. Deals with big bumps effectively and uses its travel well. It is firm though and you bounce around a bit on rough roads. I run dampers a couple of clicks softer than the recommended settings when on the road. Have done a couple of track days and firmed the dampers up and that works well. Changing the balance of damping front and rear definitely had a noticeable impact on corner entry balance.

Overall I’m very impressed and have had no problems. It’s garaged so no corrosion issues but it’s been out in the wet and no sign of any rusting still.
@DaveD, firstly thanks for sharing your experience.

Looking at the ST XTA top mount, I just have one (probably stupid) question. I can see how you can change the camber by sliding the mounting point laterally in the top mount. But how do you adjust castor (as the benefits seem clear), as that would require a front-back adjustment in the top mounts?

18220804_003.jpg
 
@DaveD, firstly thanks for sharing your experience.

Looking at the ST XTA top mount, I just have one (probably stupid) question. I can see how you can change the camber by sliding the mounting point laterally in the top mount. But how do you adjust castor (as the benefits seem clear), as that would require a front-back adjustment in the top mounts?

18220804_003.jpg
Hi mate

You can move the pins around the holes int he top cap so you can either go fully side to side (so camber only) fullly back and forward (castor only) or somewhere in between. It’s not as adjustable as a proper sliding castor rig but it works. I’m running it in the front to back position so camber is broadly stock (with pins pulled) and I’ve maxed the castor
 
Hi mate

You can move the pins around the holes int he top cap so you can either go fully side to side (so camber only) fullly back and forward (castor only) or somewhere in between. It’s not as adjustable as a proper sliding castor rig but it works. I’m running it in the front to back position so camber is broadly stock (with pins pulled) and I’ve maxed the castor

Thanks, that makes sense! I was trying to wrap my head around how it would work mechanically...

From reading feedback, for road use more castor seems to make more sense than more camber.
 
Well, after a look a debating, back and forth, and faffing about I just ordered a set of ST XA’s. Was planning to install myself, but the shop I ordered does a lot of them and has quite a decent offer on install and alignment.

Was planning on XTA’s, but he recommend XA’s as in his experience the solid top mounts for the XTA can be a bit too much NVH for daily road use. Still looking for more castor based on experience, so now looking at installing some Z4M lower control arm bushings at the same time.
 
Finally got my ST XA set installed last weekend. Was planning to do it myself, but found somebody who specialises in it and offered a very fair rate including alignment, so chickened out and let them do it. For any Dutchies on the forum, I can highly recommend Stroeve Motorsport for suspension work. You can watch while they're installing it, ask question, very interactive and you learn a lot.

With the suspension I did some small improvements as well.
  • On the rear I installed the Rogue Engineering top mounts. That means the shocks can now be removed from the wheel well, and it offers reinforcement for the rear shock mounts. As the E85 has a small bracket in that area, I needed to make a small notch in the reinforcement plate.
  • On the front I added the E46 strut tower reinforcement plates. There is discussion if they're really needed on the E85/6, but for the small costs and the ease of installing them now while the struts are changed, a no-brainer to add these in my view.
  • For the front I also used the E9x Xdrive top mounts. These are about the same height as the E85 mounts, but look a lot sturdier and less prone to sagging and tearing.
The car is set up at about the standard M-sport reide height, that is 15 mm lower dan SE/standard. With the ST set you could go about anothr 25 mm lower if you want. But I'm not a fan of the 'slammed look', and living in center of Amsterdam with many speed bumps, and sidewalks to cross, I do like a bit of ride height.
The dampers are adjusted to two 'clicks' softer than the ST recommended setting for the E85. I find it ok for daily use, I might experiment with 2 clicks or so softer as it is 100% a street car I use daily. I'm now fiddling around how to make the rear adjustment (on top of shock) easily accessible from the boot.

1.2.jpg
3.jpg
4.jpg
7.jpg
8.jpg
10.jpg
 
Excellent work, and a tidy looking install.
I'll be interested to read your thoughts after you get used to it, these are the dampers I'm looking to change to in the near future.
 
Excellent work, and a tidy looking install.
I'll be interested to read your thoughts after you get used to it, these are the dampers I'm looking to change to in the near future.
Will do, for now it is a bit early days to form a balanced opinion. Also as my old dampers (the original M-sport Sachs from 2003...) were truly shot, it will be a bit hard to make a fair judgement. A lot of how the car drives better is coming just from having new dampers.
 
Today I’ve been fiddling around how to access the top of the ST XA dampers to adjust them. The fronts are easily reached in the engine bay of course.

The rears are basically hidden under two pieces of plastic. On top part of the water collection and drain area of the roof. Underneath that the parts that form the hinges of the parcel shelf.

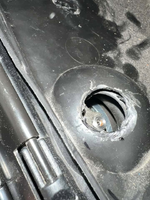
The water collection area is not easily removed, neither is making a hole in that from the top easy. So we drilled a hole from below from the wheel well when the dampers were removed, kind of following the angle of the dampers upwards.
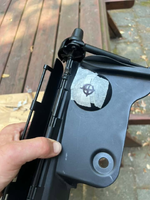
The hinge part is easy, that is removed anyway to undo the nuts that hold the dampers (unless you have installed a reverse type top mounts such as the Rogue Engineering one). With the hole in the water collection plastic already there, I temporary installed the hinge part, draw the outline where the hole should come, removed it again and drilled it.

My initial idea was to add the KW adjuster extensions and route these somewhere. But I realised I would then have a permanent opening in the water collection area. As the hole is a bit higher in the damper ‘bulge’ I don’t think there is a real risk of water leakage, but I didn’t like the idea. Secondly I would have the KW extensions somewhere in the area the roof retracts, and I was wary of interference or possible damage.

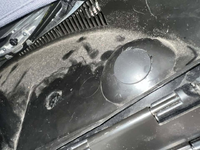
I also noticed that the adjustment of the dampers was quite easy to reach with a 2 mm allen key. So now chose to have a more semi-permanent seal of the hole I made, that I could remove whenever I wanted to adjust the dampers (my guess, very rarely...). I measured the hole we made, which was 20 mm, so I ordered some 20 mm silicone ‘bungs’ to seal off the holes.

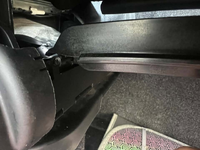
The dampers are just about reachable through the parcel shelf area. It is a bit tight, but for the rare occasions I want to do this I assume it will be ok.

The hinge part with the hole outlined
1784989786351.png

After drilling the hole
1784989819613.png

Both pieces of plastic with holes, and top of damper showing. Top plastic is the water collection area, botto, the hinge part.
1784989849538.png

With the 'bung' in place. The bung is 20 mm in diameter so fits the hole perfectly, and the top is a bit wider so covers it well. I assume it will hold out any water quite well.
1784989914941.png


Everything back in place. Tight area, but hope good enough for the occassional adjustment.
1784990024261.png
 
Last edited:
Back
Top Bottom