 Te Awanga
Hood not working.No fault code.I need to manualy lift rear shell to replace broken wiring or microswitch.I have boot axcess,Windows go down,pump starts but thats it,Have tryed shorting pin 7 and 10,no joy,released pump bypass 1 1/2 turns no joy.It appears to be locked hydraulicity or electricly.I have been googling for 10 days to find answer,someone must know how,regards Lyn in New Zealand
You are using an out of date browser. It may not display this or other websites correctly.
You should upgrade or use an alternative browser.
You should upgrade or use an alternative browser.
e89 rear shell manual open
- Thread starter mcflin
- Start date
Hi, ther's a contradiction in your description:
If the pump get's activated ('runs"), the roof ecu CTM has pre-checked all wirings to the different roof sensors (plus a lot of other pre-conditions) and didn't identify an issue! If so, it never would activate the 2 salmon relays to run the pump.[...]pump starts but thats it
What's the base of this diagnosis?...to replace broken wiring or microswitch.
THANK YOU Robbi,.I have read a lot about being THE MAN,so what do you suggest the next step,the battery is 100% I still think lifting the rear shell would be a good idear,as I dont know where else to turn,Mind you I llove the car as a hard top and if all else fails can live with that.
regards Lyn
regards Lyn
⌛ E89: Collection of the 9 typical age-related defects in the roof environment
1st step independent of your issue is to replace the two salmon relays with new ones to avoid misfunctions due to worn internal contacts.
2nd step is to remove the black metal bracket (13mm tool) and lift the pump out of it's foam housing. Grab under the pump with your hand to separate it from the foam if it's "baked" on.
Place it onto the battery as a stable platform.
3rd step is checking the oil level in the reservoir, there are min/max markers on it. If it's not on the middle marker, there must be a leak in one of the hydraulic hoses
We are talking exclusively about the internal contacts!!salmon relays taken to peaces and checked ,points cleaned

4th step is to check the pump's motor of corrosion on the lower side. If it's wet in the foam or the metal surface is corroded, water can be catched IN the motor and it has to be opened & dryed up.
[...]pump starts but thats it
To manually unlock the rear roof shell, BMW provides a special tool to be used with a wrench from the inside of the car.

PartNo 83300496597
It's to unlock the two "hooks" of both "arms" that move the roof shell.
The front(!) brass screw on the hydraulic pump has to be opened lfor a max of 2 turns!!) to release the hydraulic pressure in the hoses.
This tool has to be inserted into the two eyelets from the inside of the car. Turning it with a wrench will lock/unlock the mechanical part of the arms.

Last edited:
Is this the same story written on anther forum with a different nick name?
I have seen photos of that tool,and if I new where it went I could make it,which is my trade as a engineer,But thinking last night your comments and the pump under pressure,MAYBE the pressure is going nowhere cause one of the electric solenoid valves is not opening,
but previously I had removed and checked and saw no fault while on the bench,so please tell or photo where that tool fits
regards Lyn
but previously I had removed and checked and saw no fault while on the bench,so please tell or photo where that tool fits
regards Lyn
 Scottish Borders
I assumed so…two people in NZ with a certain way of doing things..?Is this the same story written on anther forum with a different nick name?
It's extremely rare that one of these 3 or 4 solenoids fail. I'd say never.MAYBE the pressure is going nowhere cause one of the electric solenoid valves is not opening
Important:
there are complex sequences on several solenoids in parallel combined with the different directions the pump's motor is running in the different phases of the roof movement controlled by the CTM.
I've updated the post with the tool's picture.so please tell or photo where that tool fits
You have been so helpful Robbi,I have been waylayed with not being able to get into the boot,googled and tried all the idears non worked till I found the one.
Firstly I got this info elsewhere, I didn't put it together but I have followed the process and it works. Keep in mind doing this is at your own risk! It's a hack but it could get you out of a tricky situation.
Step one - get to the fuse box and locate the connector shown on the underside of the fuse box, it's a long black one with a slide release on the back next to the firewall - X14270.
connected- a length of wire between pin 12 and a 9 volt battery,herd click but no movement so 12 volts,yep im in,so so happy.
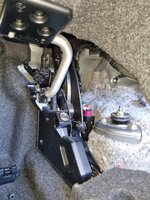
Now to make the tool you sent photos of but I cant find the place to fit it on to,photo below am I in the right place


"
Firstly I got this info elsewhere, I didn't put it together but I have followed the process and it works. Keep in mind doing this is at your own risk! It's a hack but it could get you out of a tricky situation.
Step one - get to the fuse box and locate the connector shown on the underside of the fuse box, it's a long black one with a slide release on the back next to the firewall - X14270.
connected- a length of wire between pin 12 and a 9 volt battery,herd click but no movement so 12 volts,yep im in,so so happy.
Now to make the tool you sent photos of but I cant find the place to fit it on to,photo below am I in the right place
"
Attachments
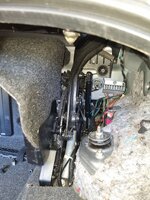
The silver tool is to unlock the rear roof shell! You are searching anything in the trunk.To manually unlock the rear roof shell, BMW provides a special tool to be used with a wrench from the inside of the car.

PartNo 83300496597
It's to unlock the two "hooks" of both "arms" that move the roof shell.
The front(!) brass screw on the hydraulic pump has to be opened lfor a max of 2 turns!!) to release the hydraulic pressure in the hoses.
This tool has to be inserted into the two eyelets from the inside of the car. Turning it with a wrench will lock/unlock the mechanical part of the arms.

")
Can be found here in this forum as well:Firstly I got this info elsewhere, I didn't put it together but I have followed the process and it works. Keep in mind doing this is at your own risk! It's a hack but it could get you out of a tricky situation.
Step one - get to the fuse box and locate the connector shown on the underside of the fuse box, it's a long black one with a slide release on the back next to the firewall - X14270.
connected- a length of wire between pin 12 and a 9 volt battery,herd click but no movement so 12 volts,yep im in,so so happy.
Now to make the tool you sent photos of but I cant find the place to fit it on to,photo below am I in the right place
B21 said:AnubisZed said:No it doesn'tB21 said:I assume this doesn't get around the problem of a failed normal boot release mechanism in any way?
Ah well..just need to make sure I have you and Robbi on speed dial!

Here you go


Rob
Which screw? 
Never recommended to touch a screw on the roof shell.
Update:
Okay, I did it after all:
Never recommended to touch a screw on the roof shell.
Update:
Okay, I did it after all:
2nd step is to remove the black metal bracket (13mm tool) and lift the pump out of it's foam housing. Grab under the pump with your hand to separate it from the foam if it's "baked" on.
Place it onto the battery as a stable platform.