What roof product are people using these days? My last autoglym session has just about worn off and in keen to try something new to see if it's any betterProtected my roof in readiness for winter and touched up a stone chip..
You are using an out of date browser. It may not display this or other websites correctly.
You should upgrade or use an alternative browser.
You should upgrade or use an alternative browser.
What did you do to your Z4M today?
- Thread starter RedUn
- Start date
As the suns back out in the south. Decided to give the interior carpets a proper cleaning. I’m £2:10 up from the previous owners, money under the seats.
View attachment 285023
@P40L VX I was looking for a wheel trolley just to help refit alloys super carefully so as not to damage anything. I wondered why they all came in pairs or fours and were rated for such weights. Now I realise! Great solution and car looks stunning as always.
Does it move around quite easily on those, or require a lot of effort? Doesn’t damage the floor at all?
I wondered why if I can just get cheaper version of these dolleys anywhere just to support a wheel being changed?
That's pretty neat.how do they look fitted?
Thanks buzyg and sorry for the late reply .
If you page down on this thread you will see a photo but it is hard to get a decent one due to reflection https://z4-forum.com/threads/tony-s-z4m-coupe-supercharged-dual-clutch-transmission.151473/

And today I will replace the battery as I beds the old one to power an electric fence. Is there any specific procedure I need to follow here or just remove and install. Will anything need to be done/reset afterwards other than the clock? I am wary of triggering BMW warning lights….
Only your clock (time) and possibly one touch windows may need resetting. Other than that all good.And today I will replace the battery as I beds the old one to power an electric fence. Is there any specific procedure I need to follow here or just remove and install. Will anything need to be done/reset afterwards other than the clock? I am wary of triggering BMW warning lights….
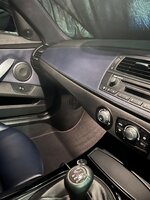
Wow never seen before, looks lovelyTook pics of my Syrah blue interior as there are only four Ms in Syrah in the world and only one with a Syrah dash. Here it is.

 North West Surrey
That's a stunning colour combination.Took pics of my Syrah blue interior as there are only four Ms in Syrah in the world and only one with a Syrah dash. Here it is.


3002 tii
Active member
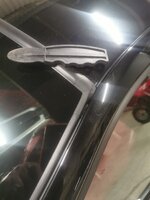
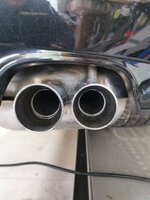
What is the bypass pipe?Fitted HEL vanos oil pipe, replaced windscreen rubber, changed my plates over and while doing that spotted this cheeky bypass pipe (both sides) which explains the subtle but noticeable difference between this and my 85. Happy days
A length of open and unrestricted pipe spanning the entry to and exit from the muffler, thus allowing a percentage of UN silenced exhaust to come into contact with our ear drums and make us smile and suffer huge pleasure. And easy to doWhat is the bypass pipe?

3002 tii
Active member
A length of open and unrestricted pipe spanning the entry to and exit from the muffler, thus allowing a percentage of UN silenced exhaust to come into contact with our ear drums and make us smile and suffer huge pleasure. And easy to do
Ahh the “OEM muffler mod” - yes that’s something I’ve wanted to do but few local quotes I got to cut the back of and redo the piping came in stupid high.
Be sure to post video clips, curious how it turned out for you.
No it's not that complicated, there is no change to the mufflers at all, just remove the box, drill a hole in the top of the exhaust pipe on either side of the box and weld on a pipe to connect the two holes running close but not touching the top of the box. Slap it back on and enjoy. Even a Monkey should be capable of this one so should only cost you peanuts.Ahh the “OEM muffler mod” - yes that’s something I’ve wanted to do but few local quotes I got to cut the back of and redo the piping came in stupid high.
Be sure to post video clips, curious how it turned out for you.

Was that on your E86? If so, how did it go?replaced windscreen rubber,
I've bought a new OE seal for mine but haven't found enough bravery to try replacing it yet!
Fairly easyish, I just felt around for the loosest bit to start on and teased it out nice and slowly, it was a bit brittle and cracked in places and sometime a bit gluey. Sounds scary but I had to carefully use a Stanley knife (only on the glass side using the glass as a guide) with a new blade in some stubborn places to ease away enough rubber to get my plastic tool thingy to help clear out the space below the glass. Once it was all out and as clean as possible I sprayed a bit of pledge along the channel and starting at a corner, just pushed the new seal in. This was a bit of a pain to get spot on but the plastic thingy made it a lot easier and running it along the edges made it a loot tidier. This is the plastic tool thingy and I ain't got a clue what it is or where it came from bit I needed it. Good luck.Was that on your E86? If so, how did it go?
I've bought a new OE seal for mine but haven't found enough bravery to try replacing it yet!