Fellow Zedder who breaks Z4's has devised a way of extracting the handbrake lever from inside the car, it requires a few bends to be made to the bodywork around the handbrake mounting hole in the centre tunnel to allow a long socket to get on the lever unit retaining bolts, the bends can be easily bent back after installation of a replacement or refurbished lever.
Sure beats having to drop the exhaust and propshaft on the underside.
Seems the most common issue with these levers is the wear on the ratchet teeth, once extracted from the car some delicate filing the teeth to a sharper profile will usually restore the ratchet to reliable working. Before and after pics of the method.
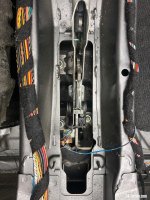
Pic 1 Before removal, centre console removed.
Pic 2 Access bends for access to unit securing bolts.
Bends achieved using a suitable crowbar.
To avoid premature wear of the ratchet teeth in the first place people should get into the habit of pressing the lever button in when applying the handbrake, seems simply pulling the lever up without pressing the button and hearing a reassuring clicks of the teeth on the ratchet takes its toll on the not so hard teeth on the lever.


 UK
UK