>

MMI installation - question for the master

Timmyboybunter

Senior member
Bristol/Bath
Thought I'd make a start on getting the MMI installed today. Followed Dave's most excellent guide on YouTube:

https://www.youtube.com/watch?v=jY-pSPUz0IU

All gone fairly well, though for some reason I had trouble dropping the glove box after undoing everything. It felt like something was still attached on the right had side though I was sure I couldn't see anything remaining - in the end applied more force, half thinking something was going to crack, and it came free (not sure if there is something in there which 'pops' together and hence needs popping out before it will drop).

Anyway, as per Dave's suggestion I tested the kit before installing properly and all working well.

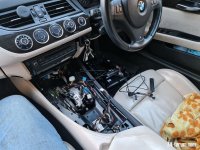
Box is now installed above the glovebox area internally, USB running through into the glovebox itself, all other wires run through to the head unit and re-installed, head unit stuck back in place. Here's where I'm now a little confused.

The main head unit hole where the actual unit slides in is 'sealed', in other words once the head unit is replaced and screwed in place, there is no where to run any wires through to the front of the car.

There are a few channels below this main hole however, so I've run the wireless antenna, microphone, and aux lead through one of these channels and into the cabin - available where the gear shifter trim will eventually be replaced. Attached picture shows where I am currently. 3 things left to do therefore.

1) Wireless antenna: will be installed as per Dave's video in a suitable place under the gear shifter trim. No problem.

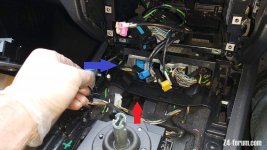
2) Aux lead: need to run back to the aux port. The method in Dave's video for simply routing the aux lead around the back and underneath of the center console - is this done right through the middle of the console once it has been loosened, or should the lead be run underneath either the left or right hand length of the center console (tucking under, next to the tunnel carpet I mean i.e. NOT running under the removable trim panel), starting right under the head unit?

3) Microphone: I want to do the 'full' install and utilise the existing factory microphone, again as per Dave's video. What is the best path to route the microphone wire from the MMI box to the factory mic location? (put another way: can I get the mic wire to where it needs to be bearing in mind its current location sticking into the front of the cabin - or does it need to route BEHIND the steering wheel area to meet the OEM microphone loom and hence needs come come from behind the head unit area - in the same way the wires between the MMI box and head unit travel, just in the opposite side? The answer may be obvious once the microphone housing is removed from the column but I've been at it for hours now and am cold, annoyed and sore :D
 

Attachments

  • 20210123_160605.jpg
    20210123_160605.jpg
    222.2 KB · Views: 2,587
Hi Tim :rofl: Nice work bud :thumbsup:

OK, let me see......
1) To be honest it is better to run all of your wires before placing the headunit back in place and also while the centre console is loosened and free to be moved back and up to allow you to run them far easier.
2) Once you have loosened the centre console you can feed the WiFi antenna and AUX cables through the area under the black plastic bar between the blue and red arrows (photo attached)
3) Once you remove the lower steering shroud and lift the upper one you'll see there is plenty of room to run the wire back over to the passenger side behind the dash, although you may still have to pull the headunit out.

Hope that helps, youi know where I am if you need me :D :thumbsup:
 

Attachments

  • 20201024_125638x.jpg
    20201024_125638x.jpg
    128.3 KB · Views: 2,571
Be careful when pushing the head unit back in place to pull the slack wiring from the glove compartment side. I think the first time I installed it the MMI just sent a red screen to the display so I may have put pressure on a connection.
 
Up to now I have been using the MMI box without the wifi antenna and it's been working fine, however whilst doing the recent subwoofer install I had to dismantle practically the whole car again so I decided to attach the antenna (while I was down there). I just stuck the antenna to the underside flat plastic part of the glove box.

The Aux cable you can fish it through the areas marked out in the photo by Anubiszed, I tried to do that just today but gave up cause it was still a pain to do, in the end I stuck with my original routing which is as you mentioned tucked up under the side of the console where it meets the carpet, once tucked in there it won't move. You just snake it around to the rear open the lid of the console and fish it through to the Aux port (as Dave shows in his video). As for the mic cable you can fish it through from the passenger side behind the head unit to the other side. I used a wire coat hanger to fish the wire through.

EDIT: Regarding the glove box, on the bottom right hand corner there is a tab which slots into the frame of the dash, this is why it feels stuck. I had trouble fitting the box back again because of this tab, left it overnight and faced it the next morning fresh eyed and saw the tab, once you know it's there it's a doddle.
 
AnubisZed said:
2) Once you have loosened the centre console you can feed the WiFi antenna and AUX cables through the area under the black plastic bar between the blue and red arrows (photo attached)
3) Once you remove the lower steering shroud and lift the upper one you'll see there is plenty of room to run the wire back over to the passenger side behind the dash, although you may still have to pull the headunit out.
Hope that helps, youi know where I am if you need me :D :thumbsup:

Ok great, thanks for the reply Dave. I've got the wires coming through the bit with the red circle currently:

20201024_125638y.jpg

So I think the antenna and aux lead are good to go - I'll just poke them under that bar as you say, but I'm fairly sure they will be able to be poked there from where they're sitting currently.

On the mic lead then, it sounds like I do need to poke it BACK through and route from behind the head unit over to the steering column - thanks for clarifying.

Yoghurt said:
Be careful when pushing the head unit back in place to pull the slack wiring from the glove compartment side.

Thanks - yes it took me a couple of attempts to get the head unit sitting flush - managed to poke all the additional wiring back and down into that space behind the head unit in the end.


Silverstar said:
The Aux cable you can fish it through the areas marked out in the photo by Anubiszed, I tried to do that just today but gave up cause it was still a pain to do, in the end I stuck with my original routing which is as you mentioned tucked up under the side of the console where it meets the carpet, once tucked in there it won't move.

EDIT: Regarding the glove box, on the bottom right hand corner there is a tab which slots into the frame of the dash, this is why it feels stuck. I had trouble fitting the box back again because of this tab, left it overnight and faced it the next morning fresh eyed and saw the tab, once you know it's there it's a doddle.

Thanks - sounds like if I take the 'tuck' option it means I don't need to loosen the center console; as long as no leads are on display anywhere (don't mind the rear of the center console) might be a good option. Will investigate tomorrow.

I thought it might be something like a tab on the glovebox - as when I was reassembling everything again and snapped it all back into the 'correct' postion, it was again stuck fast and wouldn't budge on the right hand side. Good to know.

Thanks all for the help :thumbsup:
 
Timmyboybunter said:
Thanks - sounds like if I take the 'tuck' option it means I don't need to loosen the center console; as long as no leads are on display anywhere (don't mind the rear of the center console) might be a good option. Will investigate tomorrow.

Yes correct. When I first installed the MMI I never took the centre console apart and left it alone. You can do all the wiring without disturbing the console. If you tuck the aux cable under the console where it meets the carpet and bring it to the back of the console and under the lid you will not see any part of the cable except for when you open the lid and the little bit that comes from the Aux port which is no big deal. To make life easier you may want to remove the black plastic cover located right at the back of the console so you can feed the wire under the lid.
 
Not sure I fancy finishing with that white stuff out there.
 

Attachments

  • Dericam local wired_2021-01-24_104511.jpg
    Dericam local wired_2021-01-24_104511.jpg
    198.9 KB · Views: 2,486
Came across and thought of you Dave!
 

Attachments

  • 06A5A38F-52EA-4226-828B-F27970904A0D.png
    06A5A38F-52EA-4226-828B-F27970904A0D.png
    425.4 KB · Views: 2,477
Yoghurt said:
Came across and thought of you Dave!
:thumbsup: nice find.

On all other sites I've ever been on (and that goes back to around 2001) I use DavesZed, but that is already in use on here, so I decided upon AnubisZed as I've had Anubis in my email address for about the same amount of time :D :thumbsup:
 
Sorry for going slightly off topic...

I installed a new Android head unit on my old Mercedes SLK which involved a LOT of trim removal etc. I did manage it and it all worked well.
However, my z4 I feel a LOT less confident installing carplay after watching all the quite detailed guides there are around.

The question is - does anyone on this group know anyone who would be willing to fit the carplay addition for me? I'm very happy to pay. Either a commercial fitter in or around Edinburgh/Central Scotland or even some friendly forum user who has done it before and knows what they are doing? I'm happy to travel to get this done.

I called a couple of commercial fitters who refused to install a 3rd party piece of kit.
 
McHaggis69 said:
Does anyone on this group know anyone who would be willing to fit the carplay addition for me? I'm very happy to pay.

Yup - Dave/AnubisZed offers this service I believe, in addition to cruise control etc. Bit of a trek from Scotland but good excuse for an overnight drive out once the weather becomes less horrible and lockdown eases....
 
Timmyboybunter said:
McHaggis69 said:
Does anyone on this group know anyone who would be willing to fit the carplay addition for me? I'm very happy to pay.

Yup - Dave/AnubisZed offers this service I believe, in addition to cruise control etc. Bit of a trek from Scotland but good excuse for an overnight drive out once the weather becomes less horrible and lockdown eases....
:thumbsup:

Yes I do do it, yes it's a bit of a trek but saying that I've had members come from South Wales, Scotland, Holland and France before :D so distance is relative.

McHaggis69, I live in Grantham, Lincolnshire and if you don't mind a nice drive down then I can sort this for you once the current restrictions are over, send me a PM and we can talk. :thumbsup:
 
A dedicated MMI installation thread, perfect :thumbsup:
I'm going to start at the back, with a camera, not highly recommended I know but was my original purpose.
The number plate light location isn't good, as mentioned I will use a number plate mounted camera. I will need to drill a small hole and insert a grommet here (maybe 10 ~ 15mm diameter):

Camera wiring.jpg

From studying photos and vids I think I will be able feed the wiring without removing the bumper, what say ye? Can't think of any other way to feed wire in.
 
Ok, plain sailing from where I left it last weekend thankfully.

1) Wireless antenna: ran from where you see it in the pic earlier down the inside of the center console. I DID undo the 3 fixing points to be able to left the center console itself, and removed the oddments tray. The antenna is routed under the central structural bar and pokes out directly UNDER where the oddments tray sits as there is a perfect gap.

2) Aux lead: again, from where I was in the picture earlier I follow the same route as the wireless antenna to the structural bar, then came OUT of the center console underneath and into the passenger side cabin. From there, easy to route up to the rear of the latch and tuck is as per Dave's video - then just hide the wire under the outer edge. Again, difficult without loosening the center console.

3) Microphone: as prevously concluded, had to pop the head unit out again, route the wire BACK to the rear of the head unit and over to where all the wiress run at the top of the steering column. There is plenty of space, you can easily feed the wires from the head unit cavity over to the steering column cavity in the same/opposite way as feeding wires between head unit and MMI box. I was dreading removing and refitting the steering column cowling as I remember it taking ages (and cutting me in several places) when I did the cruise control - but the thing popped off and back on within about a minute!

I did have trouble refitting the center console trim top/cover, which again I've struggled with in the past - just very tight and hard to pop back in.

Anyway, all working now and tested the mic/wireless connection etc etc so glad that's all over with. Not too bad a job really, just worth planning/knowing exactly where all your wires will eventually be running - and as I've found a number of times before, working on the car is just generally far easier in good weather with the top down. I'm just too damn tall, old and porky to work on this thing comfortably inside it :D
 

Attachments

  • 20210130_153918.jpg
    20210130_153918.jpg
    158 KB · Views: 1,196
I do have some random thoughts, observations and questions but have only had the briefest of plays with it and one journey.

1) Night/day seems to default to 'day'. I've tried the setting on the MMI box which made no difference - last night I changed a setting on my phone (in the 'dev' only settings in the AA app) which supposedly lets the phone set the night/day mode based on sunrised and sunset times - haven't tried since changing this setting however. Dave's tip about the satellite view is noted, but I find that a but busy.

2) Not sure what my general day to day experience should be in using the MMI box - in a perfect world, I want to just get in my car and at some point long press the 'menu' button on the iDrive controller to then find a wirelessly connected, ready to go phone one click away from Android Auto. The 2 quick tests so far have forced be to re-pair the bluetooth connection before my phone pings into Android Auto mode and off we go. I have since configured my phone to automatically start AA once a bluetooth connection to the MMI box is established so will see if that makes a difference.

3) My display is different to Dave's - I have the audio controls to the right (or left, if I change the lhd/rhd option) rather than at the bottom which takes up too much screen area. Can't find a setting for this, could have missed it (have emailed MY seller to ask about firmware updates)

4) Using the iDrive wheel is quite fiddly navigating around the little icons in e.g. Google maps

5) Sounds quality is a bit dodgy. I did have bad distortion originally, then used settings as per Dave's video - it now all sounds 'ok', just on the cusp of distortion. Needs a bit more playing time (also tried the 'aux' socket volume setting in iDrive at around 75% then 100%, not sure if this introduces distortion into the sound somewhere). There is also a noticeable 'hiss' present when the volume is turned up - this is definitely not present when using iDrive e.g. music on the HDD.

Early days yet, will have a play around with a wired connection as I'm not overly fussed with wireless per se and may find some answers to some of the above.

Massive thanks to Dave once again, I would have been completely lost without that YouTube video to follow at many stages of the installation.
 
1) Day/Night - Yeah I've tried to sort this but my phone is set to DarkMode (which I prefer) and I can't find any other way to sort it, so gave up.

2) The Auto Start option should sort it :thumbsup:

3) I've just installed the latest software to mine and now my screen is like yours. Although I prefer the older screen, it is nice to see the clock on the screen in a bigger font (when in Music mode, not Map mode)

4) Haven't really had the opertunity to use much of Google Maps, as I tend to leave it in Music view the majority of the time.

5) Yes I think it's a bit of play and try with the sound settings, you can use the graphic equalizer as well.

OK, so I've just finished off my full PDC retrofit today, and I'me very happy with the result...
 

Attachments

  • 20210131_120626.jpg
    20210131_120626.jpg
    135.8 KB · Views: 1,186
Thanks Dave for the replies - your PDC retrofit looks great :thumbsup:

(it is nice to see the MMI box switch between OEM PDC display and back to the MMI display seamlessly too, while I remember)
 
I've been playing with the start up flash screen on my MMI box, and came up with this. I might make it a little bigger now I know what it'll look like...

20210131_140624.jpg

This is the info I received...

"Just need an 800x480 image named logo.bmp on the root of the usb, then go to the software update screen and select update logo." :thumbsup:
 
Back
Top Bottom