A
Anonymous
Guest
So just a small " How to" on a problem I noticed with my Z's head lining
I notice the head lining wasn't complete uniformly taught across the inside of the roof when the roof was up and viewed from sitting inside the car, there appeared to be a small section that was lower than the rest. For me this was just above the drives seat, but apparently it can happen anywhere across the head lining.
Ok so I decided to take a look and see what was what. I managaed to get my local stealer to send me via email a parts diagram of the roof and found out how the head lining could be accessed to the point I needed. ........
So first you need open the roof and then stop it mid way so the roofs plastic front inner section is above the head rests or there abouts.

then chock it with something suitable to stop it rolling back down

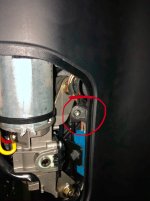
remove the locking mechanism motor cover, this just unclips/pulls off with a gentle tug

inside this cover is a small T20 Torx screw that needs removing

Next remove from either side another T20 Torx screw , counter sunk this time, hidden just at the back and to the side of the inner plastic locking mechanism cover

finally remove the 4 x T20 Torx screws along the front edge of the plastic locking mechanism cover


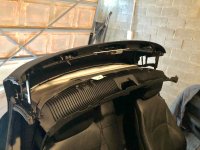
Now just ease to cover and attached lining down onto the top of the headrests and roll hoops

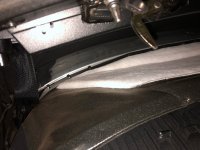
now you will see the problem ........a thin plastic strip that is sewn into the liner screws to the roof frame, and this plastic strip cracks over time and come away from the fixings.


What I did was remove any fixing that weren't doing anything and drilled some new holes in the good section of the plastic lip and screwed the fixings back in. The frame has a tapered V section all the way across the fixing bar so you only need to drill holes in the plastic lip as the screws will screw in anywhere along the bar without the need to drill it. Just take care to only drill the plastic, as doing this in situ could lead to potentially slipping with the drill and we don't want any holes on the roof fabric do we !

I tried to drill the holes central to the plastic lip to give better strength , but when refixing with the screws you will need to push up from underneath the liner to get the screw into the V in the bar.


Once your all fixed back up

Simply refit the cover and all the screws, close the roof and remove your chock......Job done .

I notice the head lining wasn't complete uniformly taught across the inside of the roof when the roof was up and viewed from sitting inside the car, there appeared to be a small section that was lower than the rest. For me this was just above the drives seat, but apparently it can happen anywhere across the head lining.
Ok so I decided to take a look and see what was what. I managaed to get my local stealer to send me via email a parts diagram of the roof and found out how the head lining could be accessed to the point I needed. ........
So first you need open the roof and then stop it mid way so the roofs plastic front inner section is above the head rests or there abouts.
then chock it with something suitable to stop it rolling back down
remove the locking mechanism motor cover, this just unclips/pulls off with a gentle tug
inside this cover is a small T20 Torx screw that needs removing
Next remove from either side another T20 Torx screw , counter sunk this time, hidden just at the back and to the side of the inner plastic locking mechanism cover
finally remove the 4 x T20 Torx screws along the front edge of the plastic locking mechanism cover
Now just ease to cover and attached lining down onto the top of the headrests and roll hoops
now you will see the problem ........a thin plastic strip that is sewn into the liner screws to the roof frame, and this plastic strip cracks over time and come away from the fixings.
What I did was remove any fixing that weren't doing anything and drilled some new holes in the good section of the plastic lip and screwed the fixings back in. The frame has a tapered V section all the way across the fixing bar so you only need to drill holes in the plastic lip as the screws will screw in anywhere along the bar without the need to drill it. Just take care to only drill the plastic, as doing this in situ could lead to potentially slipping with the drill and we don't want any holes on the roof fabric do we !
I tried to drill the holes central to the plastic lip to give better strength , but when refixing with the screws you will need to push up from underneath the liner to get the screw into the V in the bar.
Once your all fixed back up
Simply refit the cover and all the screws, close the roof and remove your chock......Job done .

")


 Barcelona