Roof cowl panel lock/unlock issues. Any tips on how to tackle?

NaweedMustafa

Member
 Eindhoven NL
To start, this is the only error code i get on the diagnostic tablet

CVM: Drive, Cowl panel, Open circuit

Detection of events:
  • Issue occurs intermittently. Can happen when extending or retracting the roof.
  • Ruled out hydraulic pump, that works perfectly. Roof is able to extend/retract at a reasonable speed.
  • Error occurs when the roof is just about to close itself onto the windshield catches, then it stops with half an inch gap between the cowl and the windshield.
  • Unable to operate/retract the roof anymore. I just tested my manual hydraulic bypass pin and that seems to work after 21 years luckily.
  • Issue also occurs when i want to retract the roof. Button lights blink and the cowl panel latch does nothing.


When i manually retracted the roof, I reset the bypass pin, then drove around for a bit with the roof control button still flashing red. At some point with the car stopped, i held the extend button and then everything worked as it should. Roof extended all the way, caught the windshield and the cowl drive latches locked it into place.

Since It extended and latched itself yesterday, i tried today and there's no response at all. no light blinking, no reaction to the button presses. Was expecting at least a red LED again to start flashing so, i guess I haven't got any automatic roof controls anymore.

Any idea how to approach a diagnosis for this? I did extensive research already on the possible scenarios and saved the repair videos for each symptom. Snagged wire along the roof loom possibly? I can definitely rule out the fuse because the cowl drive does work sometimes. Still checked the fuses just in case and all was good (didnt pull out the 50A fuse but that should be good). My GM5 module does fault out once in a while (cannot unlock car with remote) so not sure if that has an influence. I also have a GAPtech module installed since last year, would that be a possible cause or does this symptom really point towards a break in the wiring loom?
 
Unfortunately, until the gap tech is removed from the equation you will be guessing, so I think that would be first step for me.
Next, check the loom for damage.
Possibly try swapping the control module too.
 
Eliminated the gap tech module from the equation, unfortunately same issue. Could it be that the a wire on the harness completely broke? I tried clearing the fault codes with ISTA however CVM: Drive, Cowl panel, Open circuit stays active. not sure if i should use INPA as well to try and clear the module specific codes. Its strange for me that no red error light blinks at all anymore. Definitely not a broken LED, removing and reinserting fuse 31 flashes both the amber and red led once.

My next plan is to undo the 7 bolts holding the plastic thingy to the roof to check the harness. if i do find a break in the wire, what's the best course of action? strip the shielding at both ends and solder it together or strip both ends and add some more wire in between?
 
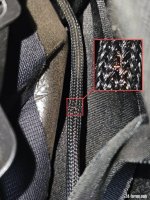
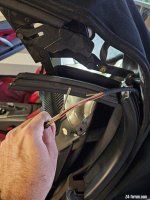
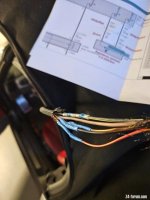
Aha! found the culprit. Indeed it's a break in the wire, figured it out without having to undo the 7 bolts. Using the bypass pin and the allen key, i retracted the roof halfway until there was a gap to fondle the harness :rofl:

Does anyone know the AWG of these wires? From the other forum posts, I'm aware two of them are thicker than the rest however, i couldn't find anything about the wire thickness. Not sure if others just spliced and soldered the existing length together (is there enough slack?) or if additional wire was placed in-between.


20240701_165337.jpg
 
Ah

That issue I feel will come up more and more often I feel

The best tips I can give you are

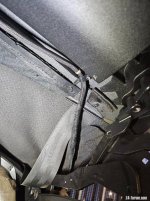
Open the roof half way and get the plastic front part of the roof detached. 7 x Torx 15 from memory and the two on the sides you can’t locate until the roof is half opened

Once it’s dangling down you can undo the loops that secure the loom and cut the armouring away

I think there are two thicker gauge wires and five thinner. I usually cut splice solder and heat shrink then wrap in more armoured equivalent.

Not a hard job lots of slack in the loom
 
Thanks bigwinn!

Glad to hear there's plenty of slack. I'll take the lazy route and merge the spliced wires with these
Snag_33339a.png

Just got to hunt for some splicing tools at work tomorrow.

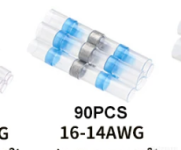
Also to answer one of my previous questions: I found the cable thickness is on the SSP diagrams. Smaller wires are 16 AWG
 
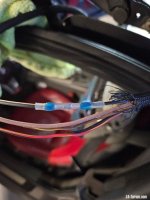
Forgot to provide an update, oops. Job was done last week. Surprisingly all other wires were in good condition except for the Cowl Drive wire
20240708_211441.jpg

Quick patch job, was easier to just unplug the whole loom from the cowl motor and work on it at a comfortable position. Also added additional tape to the wires that seemed fine, just as a preventive measure
20240708_212745.jpg
20240708_214216.jpg

Covered up with fire retardant tape and neatly tucked away
20240708_220111.jpg

20240710_085330.png

Overall pretty happy with the job. Didn't end up relocating the motor, as i clean the drain pipes every year + use the hard top during winter. I'll hold off from doing this at the moment. For 21 years (and 275,000Km's) I'm amazed the original hydraulic pump is holding up well.
 
It does allow it to bend however, not as freely as i thought. Since i didnt add additional wire and just spliced and attached, the loom displaced itself a little bit so the bending point has changed. Added some electrical tape covering a bit more wire than what is pictured. Also added some electrical tape on the ends of the shrink tubing connector. Hopefully this holds up well, only time will tell :driving:
 
NaweedMustafa said:
It does allow it to bend however, not as freely as i thought. Since i didnt add additional wire and just spliced and attached, the loom displaced itself a little bit so the bending point has changed. Added some electrical tape covering a bit more wire than what is pictured. Also added some electrical tape on the ends of the shrink tubing connector. Hopefully this holds up well, only time will tell :driving:
So the worst casse will be having to use two splices on straight parts, with new wire between them at the bend point?
 
Indeed that would be the best prevention. A colleague of mine at work told me about silicone insulated wiring which are extremely flexible and durable as opposed to the materials used in standard wiring. Would definitely recommend that as a permanent fix. Luckily access to this wiring loom isn't that difficult. If there is a break again at the same point, I'm going to upgrade to the silicone insulation at the bend point.
 
Back
Top Bottom