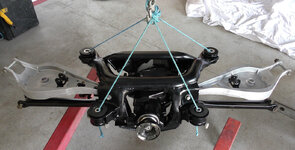
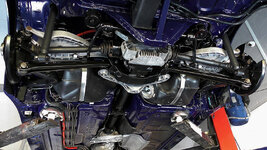
"Loaded" angle of rear wishbones

jontZ4M

Member
Hey guys

Bit of a weird one. I'm doing a full refurb. All parts are off the car. I need to re-build the entire rear axle assembly while off the car and then lift it onto the car once complete.

The issue I've got here is that I need to torque the wishbone bolts with the wishbones in a suspension "loaded" position.

My plan was to find a picture of a Z4m from the rear underside on a 4 post ramp. From this I could judge the wishbone angles and approximate them on my assembly as best I can and torque the bolts in that position. Should be near enough.

Try as I might on Google, I can't find the picture I need.

I don't suppose any of you have a pic of your car from the rear on a 4 post ramp please?

Thanks
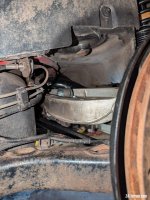
 
I did this today, but I did it on the car. If you don't fit the diff and the axle together then you can easily torque the bolts when it's on the car. It's much easier to manhandle the suspension arms and the diff separately, because together they weigh a *lot*.

I checked the stock ride height and adjusted it for the size of the wheel, which gets you 378mm from the wheel arch rim to the centre of the wheel. I jacked the suspension arm up until I got about this measurement from the arch to the centre of the hub (rounded up to 15 inches because it's slightly further to the hub than to the wheel due to offset) and torqued the bolts.

It's probably not perfect, but definitely close enough. The upper arm was pretty close to horizontal I think. I plan to repeat the process tomorrow to set the ride height when I fit the coilovers, I will take another photo then if I can.
 
ed80 said:
I did this today, but I did it on the car. If you don't fit the diff and the axle together then you can easily torque the bolts when it's on the car. It's much easier to manhandle the suspension arms and the diff separately, because together they weigh a *lot*.

I checked the stock ride height and adjusted it for the size of the wheel, which gets you 378mm from the wheel arch rim to the centre of the wheel. I jacked the suspension arm up until I got about this measurement from the arch to the centre of the hub (rounded up to 15 inches because it's slightly further to the hub than to the wheel due to offset) and torqued the bolts.

Thanks Ed.

Hmmm that is tempting. I'm worried about fitting the diff afterwards because I'm on my own and the car is 7 feet in the air. I'm not confident I can do that, at least without mashing the heck out of the lovely restored chassis. I remember fitting a Z4M diff a couple of years back and it was a sod of a fit.

Do you think the arms could be torqued on the car with the diff already fitted?
 
I don't think there is access to the bolts with the diff installed, but I will check when I am at the car later.

Sorry I didn't get pictures on Saturday, I didn't get as far as I hoped. Will be finishing off the rear today, so will get pictures after work.
 
This is the best photo I can get of the upper arm in it's loaded position. It's as close to stock ride height as I can measure with the wheels off:
PXL_20250317_104913366.jpg
 
ed80 said:
This is the best photo I can get of the upper arm in it's loaded position. It's as close to stock ride height as I can measu

Thanks Ed! What a trooper.

I guess it depends on the orientation of the camera, but the top of the alloy arm looks pretty much level. Maybe slightly rising as it approaches the wheel. Is that how you remember if looking by eye?
 
Yes, it is very close to level, with perhaps a couple of degrees angle downward from the subframe to the hub. The arm curves up at the end which is what you can see as it gets closer to the wheel.
 
ed80 said:
Yes, it is very close to level, with perhaps a couple of degrees angle downward from the subframe to the hub. The arm curves up at the end which is what you can see as it gets closer to the wheel.

OK thanks Ed.

Everything considered, I'm still tempted to assemble the entire axle including radial arms and lift it all up on a transmission jack into place. That's how I removed it and it was not fun, but manageable.
 
ed80 said:
Yes, it is very close to level, with perhaps a couple of degrees angle downward from the subframe to the hub. The arm curves up at the end which is what you can see as it gets closer to the wheel.

Rear assembly torqued with 2.5º of dihedral for the upper arms based on the main body of the arm. Fingers crossed it comes out OK. Worst case, I'll have to disassemble on the car and re-position.

S2920002.jpg
 
Hi folks, just come across this post. I've done a few rebuilds of the rear z4m and E46 rear axles (including refurbished trailing arms). Anyway, there's a notch on the subframe which is meant to line up with the top of the rear wishbone, that represents the "loaded position". I'll take pictures at some point, but it's self evident once you notice it.
 
Wassup said:
Hi folks, just come across this post. I've done a few rebuilds of the rear z4m and E46 rear axles (including refurbished trailing arms). Anyway, there's a notch on the subframe which is meant to line up with the top of the rear wishbone, that represents the "loaded position". I'll take pictures at some point, but it's self evident once you notice it.

Thanks - that's invaluable data.

As it happens our angle-based work-around worked out almost millimeter perfect. Possibly more fluke than skill, but shan't complain:
S2950007.jpg
 
Definitely all skill on our part :D

That underside looks cleeeeean, nice job! One thing I will mention since it bit me hard, check that you have the correct screws from the reinforcement braces to the sills, realOEM and Sytner's website both list 40mm bolts here, but when I tried to torque these up I stripped the threads. The screws that came out were 50mm (which realOEM lists for the non-M Z4), and I believe these are the correct parts for the M too (there is more than enough thread in the sill for a 50mm screw).

Incorrect part: https://www.realoem.com/bmw/enUS/part?id=DU92-EUR-11-2006-E86-BMW-Z4_M32&mg=33&sg=30&diagId=33_1333&q=07119905655
Correct part: https://www.realoem.com/bmw/enUS/part?id=DU52-EUR-11-2006-E86-BMW-Z4_30si&mg=33&sg=30&diagId=33_1138&q=07149140997
 
ed80 said:
Definitely all skill on our part :D

That underside looks cleeeeean, nice job! One thing I will mention since it bit me hard, check that you have the correct screws from the reinforcement braces to the sills, realOEM and Sytner's website both list 40mm bolts here, but when I tried to torque these up I stripped the threads. The screws that came out were 50mm (which realOEM lists for the non-M Z4), and I believe these are the correct parts for the M too (there is more than enough thread in the sill for a 50mm screw).

Thanks Ed! I did clock your previous thread on this, I was going to go back and pay proper attention to it when I get closer to fitting the bracing but thanks so far!
 
Back
Top Bottom